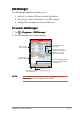
SIM Manager The SIM Manager application allows you to: • add, edit, or delete a SIM card contact information • copy phone contact information to the SIM contacts • manage SMS messages stored in the SIM card To launch SIM Manager: 1. Tap > Programs > SIM Manager Manager. 2. The SIM Manager main window appears.
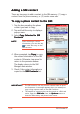
Adding a SIM contact There are two ways to add a contact to the SIM memory: (1) copy a contact from the phone memory, or (2) create a new one. To copy a phone contact to the SIM: 1. Tap the box preceding the phone contact you want to copy. 2. Tap and hold the entry to display a pop-up menu. 3. Select Copy Selected to SIM Contacts Contacts. NOTE After selecting a contact information, you can also tap to save the entry to the SIM contacts. 4.
To create a new SIM contact: 1. Tap Insert from the SIM Manager main window. A Create SIM Contact window appears. 2. Use the soft keyboard to enter the name and telephone number of the new contact, then tap Insert Insert. 3. An Entry Added! message appears indicating that you have successfully created a new SIM contact. 4. Tap to close the window. The created contact is displayed in the SIM Contacts list. 5. Follow the same instructions when creating new SIM contacts.
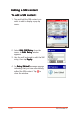
Editing a SIM contact To edit a SIM contact: 1. Tap and hold the SIM contact you want to edit to display a pop-up menu. 2. Select Edit SIM Entry from the menu. An Edit Entry window appears. 3. Use the soft keyboard to edit the SIM entry, then tap Apply Apply. 4. An Entry Edited! message appears indicating that you have successfully edited the SIM contact. Tap to close the window.
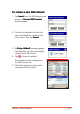
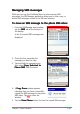
Managing SMS messages While you can use the Vodafone Menu to view incoming SMS messages, the SIM Manager application allows you to view, copy, or delete SMS messages stored in the SIM card memory. To move an SMS message to the phone SMS inbox: 1. From the SIM Manager main window, tap the S M S tab at the bottom of the display. A list of received SMS messages are displayed. 2. Check the box preceding the message you want to copy. 3.
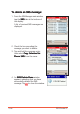
To delete an SMS message: 1. From the SIM Manager main window, tap the S M S tab at the bottom of the display. A list of received SMS messages are displayed. 2. Check the box preceding the message you want to delete. 3. Tap and hold the message entry, then select Copy Selected to Phone SMS from the menu. 4. An SMS Delete Done window appears indicating that you have successfully deleted the SMS to close the window. message.
Viewing the SIM status To view the SMS status status:: 1. From the SIM Manager main window, tap Tools at the bottom of the display, then select SIM Info Info. 2. The window shows the available SIM phone book and SMS storage, maximum name and phone number lenght, and the status of the PIN1 lock. to close and return to the SIM Tap Manager main window.
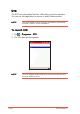
STK The STK lists value-added services offered by your phone operator. You can use this application to access or launch these services. NOTE The value-added services may vary according to your phone operator, location, and/or availability. To launch STK: 1. Tap > Programs > S T K K. 2. The STK main window appears. NOTE 5-48 The STK window shows blank when your phone operator has no value-added services.
This chapter teaches you how to send MMS, SMS, and e-mail messages using the Pocket PC phone and WAP features.
Chapter summary • Messaging features ...................................... 6 - 3 Using the Messaging application ...................................... 6-3 Creating message accounts ............................................. 6-9 • Multimedia Messaging Service (MMS) ............. 6 - 1 2 Composing an MMS message ......................................... Previewing the message ................................................ Creating and organising slides ........................................
Messaging features The Pocket PC allows you to send Multimedia Messaging Service (MMS), Short Message Service (SMS), or e-mail messages to a mobile phone or computer. The Pocket PC Messaging application integrates the MMS, SMS, and e-mail message accounts in one simple interface. From this application, you can manage, send, store, delete, and share e-mails, texts, or multimedia messages. Using the Messaging application To launch Messaging: 1. Tap . 2. Tap Messaging Messaging.
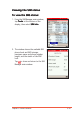
To change the frequently used message text: You probably use some phrases frequently in messages. Instead of writing/entering this text each time, you can select the phrase from a list of ten messages (called My Text). To see/change the default text: Messaging. 1. Tap , then tap Messaging 2. Tap Tools Tools, then select Edit My T e x tt. 3. Tap on the text you want to edit or replace and edit the text displayed.
To view e-mail account status: 1. Tap , then tap Messaging Messaging. 2. Ensure you are in an E-mail folder (tap top left folder name). 3. Tap Tools Tools, then select Status Status. 4. View the account status. Press return to the previous screen.
To change the account options: 1. Tap , then tap Messaging Messaging. 2. Ensure you are in the folder of the message type you want to manage (tap top left folder name). 3. Tap Tools Tools, then select Options Options. 4. Select from the tabs at the bottom of the screen to change the account options. Refer to the table below for the tab description.
To change the MMS settings: 1. Tap , then tap Messaging Messaging. 2. Ensure you are in an MMS folder (tap top left folder name). 3. Tap Tools Tools, then select M M S Settings Settings. 4. Select a tab to display its contents. Preferences The Preferences tab allows you to: • specify the MMS connection • specify the MMS connection server • limit the size of MMS sending • set the number of send attempts before aborting • set the resolution of the photo attached to an MMS mesage.
Servers The Servers tab allows you specify or change the server name, gateway, server address, and the port number to use in receiving MMS messages. You can change these settings by tapping the item, then type the new values using the soft keyboard. Tap the O K button to effect the changes. About The About tab displays the MMS Composer software infomation and End User License Agreement.
Creating message accounts You may want to add further messaging accounts, for example, an account for private POP3 or IMAP4 e-mail messages. To do this: 1. From the Messaging screen, tap Accounts Accounts, then select New Account Account. 2. Enter your e-mail address, then tap N e x tt. 3. The P505 tries to automatically configure the device. If successful, Completed appears in the Status field. Tap Next to continue. Otherwise, tap S k i p to manually configure the device.
4. When prompted, key-in your name, user name, and password in the fields. Tap Next when finished. 5. Select the account type from the drop-down menu. Refer to the accounts description below. Accounts description • If you select M M S S, all MMS messages received are automatically stored in the Inbox folder of the created account. • If you select POP3 and you move e-mail messages to a folder you created, the link is broken between the messages on the device and their copies on the mail server.
6. Type the account name on the field, then tap Next when finished. NOTE 7. Enter the incoming, outgoing mail, and domain in the fields. If you are unsure on the server information, check with your system administrator, e-mail and/or telephony provider. 8. Tap the Options button to adjust the advanced account settings. Otherwise, tap Finish Finish. 9. A Messaging window appears. Tap Y e s to download messages to the created account. Otherwise, tap N o to close the window. 10.
Multimedia Messaging Service (MMS) NOTE To send MMS you may have to subscribe tp your network operator’s service. The P505 has been configured to the Vodafone UK MMS settings. Multimedia Messaging Service or MMS is a messaging feature that allows you to send messages with text, audio, video, or animation attachments to an MMS-enabled mobile phone or a computer with e-mail capability. An MMS message is composed of one or many slides.
MMS message screen Tap to place the text above or below the photo or video file. Tap to navigate through the slides Tap to insert photo or video clip Tap to insert text Tap to insert an audio file. Tap to edit the message Tap to open the MMS tools menu. Tap to preview the message. Tap to open the soft keyboard. Tap to send MMS message. To add a photo or video clip from Photo Album: 1. Tap the photo or video clip field to open the Photo Album window. NOTE 2.
To add a photo or video clip saved in the SD card: 1. From the Photo Album, tap on Show or the name of the current folder selected (e.g. My Album), then select SD Card Card. 2. Locate the photo or video clip, then tap on it to insert. To add a photo or video clip saved elsewhere: 1. From the Photo Album, tap View w, then Select a Folder Folder. 6-14 2. Locate the photo or video clip folder, then tap O K K.
3. The Photo Album displays the contents of the selected folder. Select and tap a photo or video clip to insert. To add text to the MMS message: 1. Tap the text field. The soft keyboard appears. Chapter 6: Messaging Features 2. Type the text using the input panel, then press the input panel icon when finished.
To add an audio clip to the MMS message: 1. Tap the audio clip field to open the Pocket PC M y Sounds folder. NOTE The audio clip automatically plays when selected. The duration of the audio clip and the time elapsed are displayed on the bottom right corner of the screen. 3. If the audio clip you want to insert is in another folder, tap My Sounds Sounds, then select M y Device. 6-16 2. Select the audio clip to insert, then tap . 4. Locate the audio clip from the folders, then tap to insert.
Previewing the message To preview the message: 1. After composing the MMS message, tap to preview. 2. Tap to pause or the preview. to stop To preview the message objects individually: 1. Tap Objects from the MMS preview window to display the message objects. Chapter 6: Messaging Features 2. Tap on an object to display. You can sort the objects by name or by file size by tapping N a m e e.
3. The screen displays the selected object. Tap to return to the Message Objects window. 4. Do steps 2 to 3 to preview another message object. To reposition the text: Select the position of the text from the top right drop-down menu.
Creating and organising slides To add another slide: 1. Tap E d i tt, then select N e w Slide from the menu. A new slide window appears. 2. Insert text, photo or video clip, and audio file to the new slide. Refer to the “Composing an MMS message” section for details. 3. To preview the MMS slide, follow the instructions given in the previous section. To delete a slide: 1. Select the slide you want to delete from the top left drop-down menu. Chapter 6: Messaging Features 2.
To organise multiple slides: 1. Tap Edit > Organize Slides Slides. This displays a thumbnail of each slide. 2. Tap and hold a slide to move it forward or backward in the slide sequence, or to delete. 3. Tap 6-20 .
Sending the MMS message To send the MMS message to a mobile phone: 1. When you are ready to send the MMS message, tap to save and send the message. 2. Enter the phone number(s) to which you want to send the message (separate each contact numbers with ;). OR Tap the To Phone button to see your contacts, tap on the check box to select the recipients for your message. SIM contacts can be selected by tapping on the tab.
3. Enter the subject information. NOTE Hide the input panel to see the message information. 4. Tap the Send button. The outbox icon appears to indicate that the MMS message is being sent to the recipients.
To send the MMS message to an e-mail address: 1. Follow step 1 of the previous section. 2. Enter the e-mail address(es) to which you want to send the message (separate each e-mail address with ;). OR Tap the To Email button to see your contacts, tap on the check box to select the recipients for your message. 3. Enter the subject information. NOTE Hide the input panel to see the message information. 4. Tap the Send button.
Short Messag e Service ((S SMS) Message Short Message Service or SMS allows you to send text messages to almost any mobile phone, e-mail, or even fax account. In Messaging Messaging, you can manage SMS messages using the Text Messages account. Opening the Text Messages account To open the Text Messages account: 1. Tap , then tap Messaging Messaging. 2. Ensure you are in an SMS folder (tap top left folder name). 3. Tap N e w to compose a new SMS message.
Creating text messages To compose a text message: 1. Tap the To: field to enter the message recipient(s) manually, or tap over T o : to display the contact list. 2. Enter the mobile phone number or select from the contact list. 3. Tap Subj: , then type message the subject. 4. Tap to display the C c : and B c c : fields, then select the recipients you want the message copied to. NOTE Tap to open, or Chapter 6: Messaging Features to close the Cc: and Bcc: fields.
5. Tap the Accounts field down arrow, then select T e x t Messages Messages. 6. Tap the message section, then type the message. To insert a preset text 1. From the Text Message main window, tap My Text Text. 6-26 2. Select a preset message from the list to insert.
To use the spell check: 1. After composing the text, tap Tools Tools, then select Spell Check Check. 2. The spell checker searches for misspelled words, then displays an alternative word list. Tap the correct word to replace, or tap Ignore to leave the word unchanged. 3. A Spell Check window appears when spell check is complete. Tap to close.
To compose a text message from the Phone application: 1. Tap , then tap Phone Phone. 2. Tap Tools Tools, then select S e n d Text Message Message. 3. The Messaging window appears. Follow the instructions in the previous sections to compose the message.
Sending the text message To send the text message: 1. When finished, tap Send to send the text message to the recipient(s). Chapter 6: Messaging Features The SMS message icon appears to indicate that the SMS message is being sent to the recipients.
Changing the text message settings To change the text message options: 1. In the Messaging main window, select the T e x t Message account, tap Tools Tools, then select Options Options. 2. Select a tab, then adjust the settings accordingly. Tap when finished. See page 6-7 for details. To change the SMS service center number: 1. In the Options window, tap the Accounts tab, then tap Text Messages Messages. CAUTION 6-30 2. Tap the new SMS service center number, then tap .
E-mail Send and receive e-mail messages by: • synchronising with Microsoft Exchange or Microsoft Outlook on your desktop computer by cradle, infrared, or Bluetooth™. • connecting directly with your Microsoft® Exchange/Outlook or POP3/IMAP service using GPRS (contact your system administrator, service provider, or network provider for more details). Synchronising e-mail messages Once ActiveSync® has been installed on your desktop computer you can link your desktop computer to your P505 using the cradle.
When you connect to the e-mail server, new messages are downloaded to the Outlook E-mail account’s Inbox folder, messages in the device Outbox folders are sent, and messages that have been deleted on the e-mail server are removed from the device Inbox folder. Messages that you receive directly from an e-mail server are linked to your e-mail server rather than your desktop computer.
Using the Inbox The messages you receive are displayed in the Inbox. By default, the most recently received messages are displayed first in the list.
When you receive a message, tap it to open. Unread messages are displayed boldface. Tap to return to the message list Tap to delete this message Tap to reply to or forward this message Tap to view the next message Tap to view the previous message When you connect to your e-mail server or synchronise with your desktop computer, by default, you will receive messages from the last five days only, the first 100 lines of each new messages, and file attachments of less than 100KB in size.
Creating e-mail messages To open the e-mail account: 1. Tap . 2. Tap Messaging to open the Messaging screen. 3. Tap Inbox Inbox, then select the Outlook E-Mail account. 4. Tap N e w to create a new e-mail message.
To create a new e-mail message: 1. Tap the To: field to enter the message recipient(s) manually, or tap over T o : to display the contact list. 2. Enter the e-mail address of the recipient(s) using the soft keyboard or select from the contact list. 3. Tap Subj: , then use the soft keyboard to type message the subject. 4. Tap to display the C c : and B c c : fields, then select the recipients you want the e-mail message copied to. NOTE 6-36 Tap to open, or to close the Cc: and Bcc: fields.
5. Tap the Accounts field down arrow, then select Outlook E-mail E-mail. 6. Tap the message section, then type the message using the soft keyboard. To insert a standard message 1. Tap in the message section at the point you want to insert the standard message. 2. Tap My Text Text. Chapter 6: Messaging Features 3. Select a standard message from the list to insert.
To attach a file or recording to the e-mail message: 1. Tap Tools Tools, then select A d d Attachment Attachment. 2. Locate and tap the file you want to attach to the message. Otherwise, tap Cancel to return to the e-mail message. 3. The selected file is attached to the message. Tap the recording icon at the bootom of the screen to attach a recording. 4. Tap the record button ( ) to start recording. Tap to stop recording.
5. The recording is attached to the message. To check the spelling in the message: 1. After composing the text, tap Tools Tools, then select Spell Check Check. 2. The spell checker searches for misspelled words, then displays an alternative word list. Tap the correct word to replace, or tap Ignore to leave the word unchanged. 3. A Spell Check window appears when spell check is complete. Tap to close.
Sending the e-mail message When finished, tap the S e n d button to send the e-mail message. When you are using ActiveSync® to send and receive e-mail messages, the message is saved in the Outbox folder of the account. The message is sent to the recipients when the device synchronises with your desktop PC or notebook.
This chapter introduces the multimedia features of the Pocket PC including sections on Camera, Photo Album, and Pictures applications.
Chapter summary • Multimedia features ..................................... 7 - 3 • Camera ....................................................... 7 - 3 Launching the Camera ..................................................... 7-3 Changing the camera settings ......................................... 7-6 Taking photos ................................................................ 7-11 Capturing video ............................................................. 7-17 Using the Camera in phone mode ....
Multimedia features The P505 comes with a rich selection of multimedia applications that allows you to capture, edit, and share photos and videos with other PDAs, next generation mobile phones, and computers. The following sections describe these applications in detail. Camera Your pocket PC omes with a built-in 1.3 megapixel camera that allows you to take photos or capture videos when you are in PDA or phone mode. Launching the Camera To launch Camera: 1. 2. 3. 4. Tap . Tap Programs Programs.
Main panel The main panel has the information window and control buttons for adjusting the camera settings. Refer to the table below for button functions.
Button functions The function of the following buttons changes when the PDA is in camera mode. Button Press To 5-way joystick Down Zoom out the subject Up Center Camera button Once Zoom in the subject Capture the photo or start video capture Change the capture mode Capture modes The camera has six capture modes: Single Shot, MMS, Burst, Composition, Video, and Caller ID. Some main panel buttons are disabled when the camera is in a particular mode.
Changing the camera settings You can change the camera settings to capture sharper and clearer photos. You can change the zoom level level, environment settings settings, capture size size, and resolution resolution. To change the zoom level: When in Single Shot, MMS, Burst, Composition, or Caller ID modes, tap the zoom button to adjust the zoom level. Refer to the table below for zoom level information.
To change the environment settings: When in Single Shot, MMS, Burst, Composition, or Caller ID modes, tap the environment settings button to choose from nine preset settings and effects. These settings enhance your photo by auto-detecting the lighting condition, time, and place of capture. Refer to the table below for the settings description.
To change the photo size and resolution: When in Single Shot, MMS, Burst, Composition, or Caller ID modes, tap the photo resolution button to change the photo size and resolution. Refer to the table below for photo size and resolution supported by the capture modes.
To change the storage location: 1. When in any capture mode, tap the storage location button to locate the folder where captured photos and videos are saved. Current storage 2. Select and tap the folder you want the captured photos and videos saved, then tap . The information window displays the selected storage location including the number of captures you can store using the current capture mode.
To change the advanced camera settings: 1. When in any capture mode, tap the settings button to open the camera’s advanced settings window. 2. Adjust the contract, brightness, white balance, exposure, and color tone from this window. Preview the changes through the thumbnail displayed at the bottom left of the screen. 3. Tap OK when finished.
Taking photos After learning the camera basics, you are now ready to capture photos or videos using the Pocket PC. To capture a single shot photo: 1. Put the Pocket PC in camera mode, then set the camera capture . mode to Single Shot 2. Point the camera to your subject, then adjust the camera settings, if necessary. 3. When finished, tap or press the joystick to capture the image. 4. A pop-up menu appears. Tap an option to save, cancel, or send the image via MMS or e-mail.
Option Action Keep Saves the photo in JPG format (DSC_xxxx.jpg) to your specified location, then returns the camera to active mode Abort Ignores the photo, then returns the camera to active mode Send by MMS Saves the photo as an MMS message object, exits the Camera application, then opens the Messaging application Send by E-mail Saves the captured photo as an e-mail attachment, exits the Camera application, then opens the Messaging application 5.