Introduction Microsoft® Pocket Outlook® includes Calendar, Tasks, Notes, Contacts, and Messaging. You can use these programs individually or together. For example, e-mail address stored in Contacts can be used to address e-mail messages in Messaging. Using ActiveSync®, you can synchronise information in Microsoft® Outlook or Microsoft® Exchange on your desktop computer with your device. You can also synchronise this information directly with a Microsoft® Exchange server.
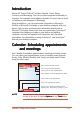
Creating appointments To create an appointment: 1. If you are in Day or Week view, tap your desired date for the appointment. 2. Tap N e w w. Tap to select from a list of predefined subjects Tap to select from previously entered locations Tap to specify the time of appointment Scroll down to see other appointment options Tap to specify the date of appointment Tap to set the appointment reminder options Tap to set the appointment category Tap to add notes to the appointment 3.
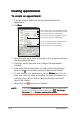
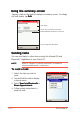
Using the summary screen When you tap an appointment in Calendar, a summary screen appears. To change the appointment, tap E d i tt. Appointment details Notes/additional information on the appointment Tap to change the appointment details Creating meeting requests You can use Calendar to set up meetings with users of Microsoft® Outlook® and mobile phone users. The meeting request will be created automatically and sent either when you synchronise Inbox or when you activate the phone.
3. If you send and receive e-mail messages through ActiveSync®, select Outlook E-mail E-mail. If you wish to send the meeting request to mobile phone contacts, select T e x t Messages Messages. NOTE You can only send a text message if your contact has a mobile phone number in C o n t a c t ss. To schedule a meeting: 1. Create an appointment. 2. In the appointment details, hide the input panel, then tap Attendees Attendees. 3.
Sending appointments You can send appointments and other schedules to other devices using the infrared (IR) and Bluetooth™ capabilities of your Pocket PC. NOTE Refer to “Chapter 10: Getting connected” for details on infrared and Bluetooth™ connections. To send an appointment: 1. Select an appointment you wish to send. 2. Tap and hold the appointment to display a pop-up menu. 3. Select Send via Bluetooth or Beam Appointment Appointment. 4. Follow screen instructions to send the appointment.
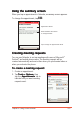
Tasks: Keeping a to do list Use Tasks to keep track or prioritise the things you have to do. Tap to select the category of tasks you want to display Tap to select a sort order of the task list Tap to quickly add a new task Tap to display or edit the task details Tap and hold a task to display a pop-up menu of actions Tap an action for the task Tap to create a new task Creating a task To create a task: 1. Tap , then tap Tasks Tasks.
6. To add notes, tap the Notes tab. You can enter text, add a drawing, or create a recording. For more information on creating notes, see “Notes: Capturing thoughts and ideas” later in this chapter. 7. Tap to return to the task list when done.
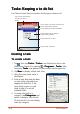
Using the summary screen Tapping a task on the task list displays a summary screen. To change the task details, tap E d i tt. Task details Tap to show or hide the task details Notes/additional information on the task Tap to change the task details Sending tasks You can send tasks to other devices using the infrared (IR) and Bluetooth™ capabilities of your Pocket PC. NOTE Refer to “Chapter 10: Getting connected” for details on infrared and Bluetooth™ connections. To send a task: 1.
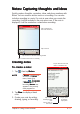
Notes: Capturing thoughts and ideas Quickly capture thoughts, reminders, ideas, and phone numbers with Notes. You can create a written note or a recording. You can also include a recording in a note. If a note is open when you create the recording, it will be included in the note as an icon. If the note is displayed, it will be created as a stand-alone recording.
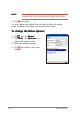
NOTE 4. Tap For more information about using the input panel, writing and drawing on the screen, and creating recordings, see Chapter 2. when done. You may change the default Notes options including the writing mode, template, file storage, and record button action. To change the Notes options: 1. Tap , then tap Notes Notes. 2. Tap Tools Tools, then Options... to display the options screen. 3. Make your desired changes. when done to save your 4. Tap changes.
Contacts: Tracking friends and colleagues Contacts maintains a list of your friends and colleagues so that you can easily find the information you look for, whether you are at home or on the road. With the mobile phone features of your Pocket PC, you can call your contact’s home, mobile, or office phone number, send an SMS message or share the contact information to another device using the infrared port (IR) or Bluetooth™.
Creating contacts You can create or add a contact information by: • Using the Contacts application • Using Microsoft® Outlook on your PC. New contacts will be added to the P505, the next time it is synchronised with the PC. See Chapter 3 for details on synchronisation. • Transferring contact information from your SIM card to the Contacts using the SIM Manager application. See Chapter 5 for details. • Receiving a contact information from other devices using beam or Bluetooth™ features.
Using the summary screen Tapping a contact on the contact list displays a summary screen. To change the contact information, tap E d i tt. Contact details Tap to display notes Tap to change contact information Changing a contact information display If a contact has multiple contact information (e.g. work telephone, home telephone, car mobile phone, mobile phone), you can change or select the contact information displayed on screen. To change a contact information display: 1.
Getting in touch with your contacts To call a contact: 1. Tap and hold a contact to display a pop-up menu. Tap Call Work/Home/Mobile to place a call. 2. The phone dials the selected contact number. Tap H i d e to hide the balloon information or E n d to cancel the call. 3. Talk to the called party when connected. The balloon displays the call duration. 4. Tap E n d to terminate the call.
To send an e-mail message to a contact: 1. Tap and hold a contact, then tap Send Email from the pop-up menu. NOTES 2. The Messaging window appears. Compose the e-mail message, then tap Send to send the message. • Refer to Chapter 6 for details on composing and sending e-mail messages. • E-mail messaging features are network dependent and may require subscription to a particular service. Contact your phone operator for details.
To send a text message to a contact: 1. Tap and hold a contact, then tap Send Text Message from the pop-up menu. NOTES 2. The Messaging window appears. Compose the text message, then tap S e n d d. The text message is sent to the contact’s mobile phone. When sending text messages to contacts with multiple contact information, the Messaging application automatically selects the mobile phone number entry. Refer to Chapter 6 for details on composing and sending text messages.
Finding a contact There are three ways to find a contact: 1. In the contact list, tap the category list (labelled A l l Contacts by default) and select the type of contact that you wish to display. To show all contacts again, select A l l Contacts Contacts. To view a contact not assigned to a category, select N o Categories Categories. 1 2. To view the names of companies your contacts work for, in the contact list, tap View > B y Company Company.
Adding a photo to a contact The Photo Contacts application allows you to attach photos to your contacts. The photo is displayed on screen when the contact calls you. To add a photo to a contact: 1. Tap and hold a contact, then tap Arcsoft Photo Contacts from the pop-up menu. 2. Tap the Thumbnail View button to display a thumbnail of each contact. Tap to view the contact thumbnail 3. Tap and hold a contact, then tap Attach Photo from the pop-up menu. 4-20 4. Tap Browse...
5. The selected photo is displayed. Select a template and/or ringtone if you wish to customise the contact call settings. Tap O K when done. A thumbnail of the attached photo with the contact name will appear on screen when the contact calls. You can also use Photo Contacts to: • • • • Call and send e-mail/SMS/MMS messages to contacts Send the contact information by beam Save the contact information to the SIM card phone book. Assign a speed dial key to a contact.
4-22 P505 Pocket PC
This chapter provides information on how to use the Pocket PC phone features using the Vodafone Menu and Phone applications.
Chapter summary Phone features .................................................. 5 - 3 Vodafone menu .................................................. 5 - 3 Customising the Vodafone menu ..................................... 5-4 The Vodafone Menu ......................................................... 5-7 The icon bar ..................................................................... 5-7 P h o n e .............................................................. 5 - 1 9 Placing a call ..................
Phone features The P505 is a tri-band mobile phone that allows you to place a call, send text messages, videos, and audio files to other mobile phones. You can place a call using the Vodafone Menu or the Windows® Mobile 2003 Phone applications. The following sections describe the phone features of your Pocket PC. Vodafone menu The Vodafone menu is an interactive application that transforms your Pocket PC into a mobile phone when you close the phone flip.
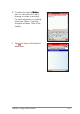
7. Open the flip, and now applications can be selected by tapping on the Vodafone icons or by tapping on and selecting the application you require. Customising the Vodafone menu To change the Vodafone menu settings: 1. Tap . 2. Tap Settings Settings. 3. Tap the Vodafone Menu icon to display the Vodafone Menu settings. 4. Check the Auto return to home option to allow the Vodafone Menu to return to the home screen when idle for a certain period of time. 5.
To change theme, home screen, and animation of the Vodafone menu: 1. Tap . 2. Tap Settings Settings. 3. Tap the Vodafone Menu icon to display the Vodafone Menu settings. 4. Tap the Customise button. 5. The Theme tab allows you to select or change the color theme for the Vodafone Menu display. Select a colour from the available color swatches. 6. Tap the Home Screen tab. The Home Screen tab allows you to select a new home screen background image. 7. Tap Browse to locate the new background image.
7. Locate the new home screen background image, then tap the O K button to select. 8. Tap the Screensaver tab to select or change the screensaver. Refer to the screens below for a comparison of screensaver modes. Screensaver modes Animation Clock Text 9. Tap to save your settings. Close the phone flip to see if the display and screensaver changed based on your settings.
The Vodafone Menu The Vodafone Menu contains the phone menu icons that you can select using button or the 5-way joystick. the Refer to the table below for the menu description.
Placing a call To place a call using the keypad: 1. Close the PDA flip. The Vodafone Menu appears. NOTE If you opened an application before you close the flip, you may have to press (Home) before you place a call. 2. Use the keypad to enter the number of the party you wish to call, then press . The phone dials the number. 3. Wait for the called party to answer. 4. Press anytime to end the call.
3. Use to select from incoming, outgoing, or missed calls, then press (Enter). The screen displays the received/dialled/missed call entries. 4. Use to highlight the number you (Send). wish to call, then press 5. Wait for the called party to answer. 6. Press anytime to end the call. To place a call using Contacts: 1. Close the PDA flip. The Vodafone menu appears. If the flip was (Menu) first. closed, you may have to press to select Contacts 2. Use from the menu, then press (Enter).
Receiving a call To receive or reject an incoming call: 1. Depending on your settings, the PDA rings, vibrates, or rings and vibrates when it receives an incoming call. Press (Accept) to answer the call or (Reject) to end the call. When you accept the call, the screen shows CONNECTED CONNECTED. 2. Press anytime to end the call. To use the call options: 1. After accepting an incoming call, press (Options) to display available call options. Refer to the table below for the call options.
Making a conference call To make a conference call: 1. Place a call to person A. 2. After establishing connection with person A, press (Option), then to select Hold from the use menu. Press (OK) to keep the current call on hold. 3. Press (Option), use to select Contacts from the menu. 4. Select the phone number of person B, then press . or Key-in the phone number of person B using the keypad, then press . 5.
To talk privately to a conference call member: 1. During a conference call, use to select a member you want to drop from the conference call. (Option), then select 2. Press D rro o p from the menu. 3. The selected member drops from the conference call. You can now talk privately to the remaining conference call member. 4. To resume the conference, use the menu, then press (OK). to select Conference from To end a conference call: 1. Use 2. Press 5-12 to select Conference from the list of members.
Viewing SMS messages The phone alerts you everytime it receives a Short Message Service (SMS) message from other mobile device. The Vodafone Menu allows you to view the SMS message. To view a new SMS message: 1. Press (Read) when a “ Y o u have a new message!!” appears (Ignore) to on the screen. Press read the SMS message later. 2. Read the message, then press (Back) to return to the previous menu. To read an ignored SMS message: 1. Use to select Messages from the menu, then press (Enter).
Viewing contacts The Vodafone Menu allows you to view the contact information stored in both the PDA memory and SIM memory even when the PDA flip is closed. To view your contacts: 1. Put the PDA in idle mode, close the flip, then press (Menu). to select Contacts 2. Use from the menu, then press (Enter). The screen displays the list of phone numbers stored in the PDA Contacts, including a link to the SIM Phone Book. 3. Use to select a contact, then press (Enter). The screen displays the contact information.
Viewing appointment schedules Your appointments stored in the PDA may be viewed using the Calendar menu. To view your appointments: 1. Close the PDA flip. The Vodafone menu appears. If the flip was closed, (Menu) you may have to press first. 2. Use to select Calendar from the menu, then press (Enter). The screen displays a list of your and past due appointments future . 3. Use to select the appointment you wish to view, then press (Enter) to view the appointment details. (Back) to return to the 4.
Viewing tasks The Tasks menu allows you to view the tasks saved in the PDA. To view tasks: 1. Close the PDA flip. The Vodafone menu appears. If the flip was closed, (Menu) you may have to press first. 2. Use to select Tasks from the menu, then press (Enter). The screen displays a list of completed 3. Use to select a tasks. task, then press and incomplete (Enter) to view the task details. 4. Press (Back) to return to the previous menu.
Changing the phone profile The Profile menu allows you to enable or disable the phone flight mode or change the phone profile. To open the Profile menu: 1. Close the PDA flip. The Vodafone menu appears. If the flip was closed, (Menu) you may have to press first. 2. Use to select Profiles from the menu, then press (Enter). Flight Mode The phone functions are disabled when the Flight Mode is enabled.
Profile The Profile option allows you to select from seven preset phone profiles. Each profile has a unique ring tone, type, and volume settings for various phone functions such as alarms, reminders, SMS message, etc. NOTE The C a rr, H e a d s e tt, and S p e a k e r profiles are auto-detected. For example, the phone profile is set to when you connect a headset to the device headset port, the phone profile is automatically set to H e a d s e tt.
Phone To use the Microsoft® application for telephony when the flip is open, tap , then tap Phone or press the green telephone button below the screen. This screen will appear.
To place a call using the keypad: 1. From the phone keypad, tap the number of the party you want to call, then tap T a l kk. NOTE Use the correct dialling prefixes when placing a long distance or international call. If the dialled number is stored in the Contacts Contacts, the display shows the name of the contact and type of phone number being dialled. The Talk button toggles to End d. 2. Talk to the called party when connected. The display shows the duration of the call.
To place a call using the Call History: 1. Tap the Call History button to display the incoming, outgoing and missed call information. 2. Tap and hold the entry you wish to call, then select Call from the pop-up menu. The phone dials the entry. If the number you wish to call is not in the list selected, tap All Calls Calls, then select from Missed, Outgoing, or Incoming call folders to locate the phone number entry. 3. Talk to the called party when connected. The display shows the duration of the call.
To place a call using Speed Dial: NOTE You must assign a speed dial key to a phone number before you can use the speed dial feature. 1. From the dialer, tap the Speed Dial button to open the Speed Dial window. 2. Tap N e w to display the list of contacts saved in your PDA. Tap a number from the list.
3. The screen displays the contact information. Tap the Location up/down arrow button to assign a speed dial key to the selected contact, then press . NOTE Speed dial key 1 is reserved for Voice Mail. You can assign up to 99 speed dial keys. 4. The screen shows the speed dial number and the assigned contact information. 5. Tap the speed dial number to call. Otherwise, tap to return to the previous menu.
To place a call in Contacts: 1. Tap , then select Contacts from the menu. The Contacts window appears. 2. Tap and hold a contact, then select Call Work/Home/Mobile depending on the saved contact information. 3. Talk to the called party when connected. The call balloon shows the duration of the call. Tap E n d to terminate the call, or hide to hide the balloon.
Receiving a call To receive an incoming call: 1. A Phone - Incoming... callout appears when you receive an incoming call while the PDA is in idle mode. Tap Answer to accept the call. 2. The Phone window appears. Talk to the called party. Tap E n d to terminate the call.
Rejecting a call To reject an incoming call: 1. A Phone - Incoming... callout appears when you receive an incoming call while the PDA is in idle mode. Tap Ignore to reject the call. 2. A Phone callout appears telling you that you have a missed call. Tap View to open the Call History window and view the missed call information. Otherwise, tap Close to ignore and close the callout.
Changing the phone settings To change the phone settings: 1. From the Phone window, tap Tools then select Options Options. The phone options window appears. 2. The screen displays the Phone settings tab. Change the ring type, ring/keypad tone, and Personal Identification Number (PIN) from this window. Tap when finished. To change the PIN: 1. From the Phone tab, tap the Change PIN button. The phone keypad appears. 2. Enter the old PIN using the phone keypad, then tap Enter Enter. 3.
To activate the phone security: 1. From the Phone tab, check the item Require PIN when phone is used used. The phone keypad appears. 2. Enter the PIN using the phone keypad, then tap Enter Enter. NOTE When the phone security is activated, you need to enter the correct PIN before using the phone application. To access the phone network services: 1. From the Phone options window, tap the Services tab. The window displays the available network services. 5-28 2.
To change the Call Barring settings: 1. From the Services tab, select Call Barring Barring, then tap the G e t Settings button. The screen displays the Call Barring settings. 2. Change the Call Barring settings from this window, then tap . The phone sends the new settings to the network. To change the Caller ID settings: 1. From the Services tab, select Caller ID ID, then tap the G e t Settings button. The screen displays the Caller ID settings. 2. Change the Caller ID settings from this window, then tap .
To change the Call Forwarding options: 1. From the Services tab, select Call Forwarding Forwarding, then tap the Get Settings button. The screen displays the Call Forwarding settings. 2. Adjust the Call Forward settings from this window, then tap . The phone sends the new settings to the network. To change the Call Waiting settings: 1. From the Services tab, select Call Waiting Waiting, then tap the G e t Settings button. The screen displays the Call Waiting settings. 2.
To change the Voice Mail and SMS settings: 1. From the Services tab, select Voice Mail and SMS SMS, then tap the Get Settings button. The screen displays the Voice Mail and SMS settings. 2. Key-in the new SMS and Voice Mail service center using the soft keyboard, then tap . The phone sends the new settings to the network. To change the network selection settings: 1. From the phone Settings window, tap the Network tab to display the network settings. NOTE 2.
To add ring tones in the ring tone selection: 1. From the phone Settings window, tap the Ring Tone tab to display available ring tones you can add to the ring tone list. 2. Select the audio file format (*.wav, *.mid, *.wma) from the drop-down menu to display all ring tones saved on that format. 3. To listen to a ring tone, select the ring tone file from the list, . Tap to stop. then tap 4. Tap the box preceding the ring tone(s) to select and add the tone to the ring tone list. 5. Tap the A d d button. 6.
To enable fixed dialling: 1. From the phone Settings window, tap the FDN Set tab to display the fixed dial settings. 2. Check the option Enabled Fixed Dial Number Number. 3. When prompted, enter the PIN2 using the soft keyboard, then tap Apply Apply. 4. When you enter the correct PIN2, you can modify, add, or delete an entry in the Fixed Dial List. 5. Tap when finished.
SMSCB shows information about the cell location in which you are registered. To enable the SMSCB: 1. From the phone Settings window, tap the SMSCB tab to display the SMSCB settings. 2. Check the option Enable SMSCB SMSCB. 3. Select the SMSCB language from the LANGUAGE list. 4. If you want to accept all SMSCB channels, check the Accept All Channels option. The available channels are displayed. 5. Tap the APPLY button.
To create a new SMSCB channel: 1. From the SMSCB window, tap NEW W. A pop-up window appears. 2. Use the soft keyboard to enter the channel name and number, then tap O K K. 3. The created channel is displayed in the SMSCB window. Tap the box preceding the channel to activate.
Using other phone applications The following sections provide information on how to use the Conference Conference, SIM Manager Manager, and S T K applications. You can access these applications by tapping > Programs Programs. Conference call The Conference call feature of the Pocket PC allows you to talk to up to five parties simultaneously. The Conference application provides a graphical conference presentation for easy use. To start a conference call: 1. Tap > Programs > Conference Conference. 2.
When you select: Dial Number Contacts Call History A phone keypad appears on the left side of the screen. Tap the phone number of the participant, then tap to place the call. The Photo Contacts window appears. Tap and hold a contact, then select C a l l W o r k / H o m e / M o b i l e from the menu. The Call History window appears. Tap and hold an entry, then select C a l l from the menu. When connected, the party becomes the first call conference participant. Chapter 5: Phone Features 3.
4. Tap and hold the new participant, then select Join Conference from the menu. or Tap and hold the first conference call participant, then tap Invite Participant Participant. The participant is added to the conference. 5. Follow steps 2 to 4 to call additional conference participants.
To talk privately to a conference call member: 1. Tap and hold the conference call participant you want to talk with privately, then select Leave Conference from the menu. 2. The conference is put on hold, while the selected member is placed at the bottom of the screen. You can now talk privately to the participant. 3. To bring the participant back to the conference, tap and hold the icon then select Join Conference. Otherwise, select E n d from the menu to terminate the conference call participant.
To terminate a conference call member: 1. Tap and hold the member you want to leave, then select E n d from the menu. 2. The selected member leaves the conference call. Tap and hold the remaining member(s) to invite other participants to the call. To end a conference call: 1. Tap from the Conference window. The Phone window appears. 2. Tap E n d to terminate the conference call.