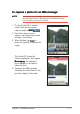
To capture a photo for an MMS message: NOTE You can also use the single shot mode popup menu to automatically insert a captured photo to an MMS message. See the previous section for details. 1. Put the Pocket PC in camera mode, then set the camera . capture mode to M M S 2. Point the camera to your subject, then adjust the camera settings, if necessary. 3. When finished, tap or press the joystick to capture the image. The Pocket PC closes the Camera application, then opens Messaging Messaging.
To capture multiple photos: 1. Put the Pocket PC in camera mode, then set the camera capture . mode to Burst 2. Point the camera to your subject, then adjust the camera settings, if necessary. or 3. When finished, tap press the joystick to start capturing the images. The camera captures ten successive photos in fixed intervals, then saves the photos in the Photo Album. The camera returns to active mode when finished. 4. Tap the Photo Album button to view the captured photos.
To add a frame to the photo: 1. Put the Pocket PC in camera mode, then set the camera capture mode to composition . 2. The screen displays the available frames. Tap a frame to select and display to the preview window. Otherwise, tap Cancel to return to the camera display. 3. Point the camera to your subject, then adjust the camera settings, if necessary. 4. When finished, tap or press the joystick to capture the image. 5.
To add a photo to your contacts: 1. Put the Pocket PC in camera mode, then set the camera capture mode to caller ID mode . 2. Point the camera to the person, then adjust the camera settings, if necessary. 3. When finished, tap or press the joystick to capture the image. The Pocket PC closes the Camera application, then opens Photo Contacts Contacts. 4. Select and tap the contact to attach the captured photo. The photo appears in the screen everytime you place a call to or receive a call from the person.
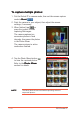
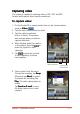
Capturing video The camera is capable of capturing video in ASF, 3GP, and MP4 formats and supports three capture resolutions. To capture video: 1. Put the Pocket PC in camera mode, then set the camera capture mode to Video . 2. Tap the video format button to select. 3. Tap the capture resolution button to select. The preview area changes when you select a capture resolution. 4. When finished, point the camera or to the subject, then tap press the joystick to start capturing. 5.
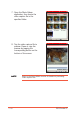
7. Open the Photo Album application, then locate the video capture file in the specified folder. 8. Tap the video capture file to preview. Pause or stop the preview by tapping the corresponding button on the bottom of the screen. NOTE 7-18 Refer to the Photo Album section for details on previewing video capture files.
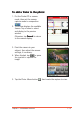
Using the Camera in phone mode NOTES Take note of the following when using the Camera Capture application while the Pocket PC is on phone mode: • The preview area is fixed at 240x180 pixels. • The display does not support landscape mode. You must set the preview orientation to P o r t r a i t mode before you close the phone flip. To launch Camera when the flip is open: 1. 2. 3. 4. Tap . Tap Programs Programs. Tap the Camera icon. The Camera screen appears.
Changing the settings in phone mode You can the camera settings when in phone mode using the joystick, side buttons, and the phone keypad buttons. Settings Capture mode Flash Environment Zoom Can be changed by pressing the c a m e r a b u t t o n located on the side of the PDA. The capture mode is set to Single Shot by default. Press the camera button once to change to MMS mode, press twice to Burst mode, and so on. The screen briefly displays the selected capture mode.
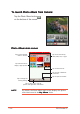
Photo Album The Photo Album application allows you view, edit, and manage multimedia files, including stock and captured photos, videos, animations, and clips. Launching the Photo Album To launch Photo Album from Today screen: 1. Tap . 2. Tap Programs Programs. 3. Tap the Photo Album icon to open the application. To launch Photo Album from the Vodafone Menu: NOTE Make sure that the Vodafone Menu is activated. Refer to Chapter 5 for details. 1. Open the phone flip to display the Vodafone Menu 2.
To launch Photo Album from Camera: Tap the Photo Album button on the bottom of the screen.
Finding files and customising your view To find your photos or video clips: 1. If the file you want to view or edit is not on the list, tap S h o w or My Album then select another location (Flash Disk or SD Card). The screen shows the contents of the selected location. 2. If the file you want to view or edit is in another folder, tap View w, then tap Select a Folder to display all other folders. 3. Locate the folder. The lower section of the screen shows the media filed inside the selected folder. 4.
To view a thumbnail of the files: 1. Tap V i e w > Thumbnails Thumbnails. The files are displayed based on your thumbnail settings. 7-24 2. Select and tap a thumbnail setting from the popup menu. 3. Tap V i e w > Show Name Under Thumbnails to display the file names.
To view a file list: Tap V i e w > L i s tt. Chapter 7: Multimedia Features The screen displays a list of the files.
Managing photos and videos To delete photos or videos: 1. Tap and hold a file to display a popup menu. 2. Select Delete this Media Media. 3. Tap O K when a confirmation window appears. The selected file is deleted. To delete multiple photos or video files: 1. Check the box at the bottom left corner of the files you want to delete. NOTE 7-26 If you want to delete all photos and video files in a folder, tap Tools > Check All M e d i a to select all files.
2. Tap Tools Tools, then select Delete Checked Media from the popup menu. 3. Tap O K when a confirmation window appears to delete the files. To move photos and videos to another folder: 1. Check the box at the bottom left corner of the files you want to move to another location. Chapter 7: Multimedia Features 2. Tap Tools Tools, then select Rename/Move Media from the popup menu.
3. Select the folder and location where you want the files moved. to move the files. 4. Tap Otherwise, tap Cancel to return to the previous screen. To rename a photo or video file: 1. Check the box at the bottom left corner of the file you want to rename. 7-28 2. Tap Tools Tools, then select Rename/Move Media from the popup menu.
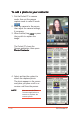
3. Enter the new file name using the soft keyboard. Select a new folder and location if you want to move the file after renaming it, then click . 4. Display the file names by tapping View > Show Name Under Thumbnails to view the new file name. To view a file information: 1. Tap and hold a file, then select Information from the popup menu. 3. Tap 2. The screen displays the file information including name. format, size, depth, etc.
Editing photos The Photo Album comes with several photo editing features that lets you: • rotate, flip, crop, and warp photos • add text, sounds, and cliparts to photos • create funhouse photos and photo greetings Before you can edit a photo, you must tap a photo file to display.
2. Tap the corresponding button to rotate or flip the photo. Refer to the illustrations below.
To crop a photo: 1. Tap Edit > Rotate/Flip/Crop Rotate/Flip/Crop. 2. The application prompts you to specify the crop area with the stylus. Tap to continue. 3. Drag the stylus over the area you wish to retain after cropping. 4. Tap to crop the photo, then tap Tools to save. NOTE 7-32 If you want to revert to the original photo after cropping, tap Tools > Revert to Saved d.
To warp a photo: 1. Tap Edit > Warp Warp. 2. Tap W a r p p, then choose the warping size. 3. Drag the stylus over the area you want to warp. For example, start from the center of the lioness’ lip up towards the chin. 4. Warp other areas of the photo as desired, then tap Tap Tools to save. NOTE . If you want to revert to the original photo after warping, tap Tools > Revert to Saved d.
To add a recording to a photo: 1. Tap Edit > Edit Sound Sound. The recording bar appears at the bottom of the screen. Recording slider Play button Stop button Record button Rewind Fast forward 2. Tap the record button to start recording. Tap the stop button to stop recording. NOTE 4. Tap 7-34 3. When finished, playback the recording by tapping the play, rewind, or fast forward buttons. Make sure to place the audio source near the device microphone to achieve clearer recordings.
To add a drawing to a photo: 1. Tap Edit > Draw Draw. 2. Tap the line weight button, then select from the list. 3. Tap the line color button to select the line color. Tap the color of choice. 4. Use the stylus to draw objects or texts over the photo, then tap Tools to save. NOTE If you want to revert to the original photo after drawing, tap d.
To add texts to a photo: 1. Tap Edit > Add Text Text. 2. Use the soft keyboard to type the text, then tap . 3. The text is inserted in the photo. Tap to change the text font, size, color, and style. 4. Change the text settings from this window, then tap to save the changes.
5. Move the text block to the desired location, then tap . NOTE 6. To add another text block, tap Text > Add New Text Text. Follow the same instructions to insert another text block. If you want to edit the inserted text, tap T e x t > E d i t C u r r e n t T e x t to display the Add/Edit Text window. Edit the text using the soft keyboard, then tap . To add a clipart to a photo: 1. Tap Edit > Add Clip Art Art. The cliparts appear. Chapter 7: Multimedia Features 2. Select and tap a clipart to insert.
NOTE The Photo Album comes with two clipart categories: e m o t i c o n s and f u n c l i p ss. You can switch categories by tapping the clipart category displayed on the top left corner of the display. 3. Tap emoticons emoticons, then select fun clips to change the clipart directory. Select and tap a clipart to insert. 4. The clipart appears over the photo. Drag the clipart to the desired location using the stylus. Tap to save the changes.
To add a Funhouse effect to a photo: 1. Tap Edit > Funhouse Funhouse. The Bobble heads effects appear. NOTE 2. Select and tap a Bobble head effect you want to apply to the photo. The Photo Album comes with two Funhouse categories: B o b b l e h e a d s and F u n G a m e ss. You can switch categories by tapping the Funhouse category displayed on the top left corner of the display. 3. Select and tap the Funhouse effect you want to apply to the photo. Chapter 7: Multimedia Features 4.
5. Tap Template to change the Funhouse effect. Select another effect to apply. 6. When finished, tap the changes. to save To create a photo greeting: 1. Tap Edit > Photo Greeting Greeting. The Photo Greeting frames appear. NOTE 7-40 2. Select and tap a frame you want to apply to the photo. The Photo Album comes with two Photo Greeting categories: J u s t f o r F u n and O c c a s s i o n ss.
3. After changing categories, select and tap a frame you want to apply to the photo. 4. Adjust the photo size, angle, and position to match the frame. 5. Tap Template to change the Photo Greeting frame. Select another frame to apply. 6. When finished, tap the changes.
Saving photos To save the photo: 1. Tap Tools > Save Picture A ss. The Save As window appears. 2. Use the soft keyboard to type a file name for the photo. 3. Select the folder and location where you want to save the photo. 4. Select the photo file type. You can save a photo in .jpg or .bmp format. 5. Tap O K to save the photo.
Sharing photos The Photo Album lets you share photos to other PDAs using infrared and Bluetooth™, next generation mobile phones via MMS and WAP, and notebooks/PCs via e-mail. To send a photo via MMS: 1. From the Photo Album main screen, tap a photo to display. 2. Tap Tools > Send via MMS S. The Messaging window appears. 3. The photo becomes an MMS object. Compose the MMS message following the instructions on Chapter 6. 4. When finished, send the MMS message.
To send a photo via e-mail: 1. From the Photo Album main screen, tap a photo to display. 2. Tap Tools > Send via E-mail E-mail. The Messaging window appears. 3. The photo becomes an e-mail attachment. Compose the e-mail message following the instructions in Chapter 6. 4. When finished, send the e-mail message.
To send a photo via e-mail: 1. From the Photo Album main screen, tap a photo to display. 2. Tap Tools > Beam Picture Picture. 3. The Pocket PC searches for the IR port of the recipient’s device Beam the photo following the instructions in Chapter 10.
Pictures The Pictures application allows you view and manage photos, and create slideshows from photos saved in the Pocket PC. Launching the Pictures To launch Pictures: 1. Tap . 2. Tap Programs Programs. 3. Tap the Pictures icon to open the application.
Editing photos using Pictures To adjust the photo brightness and contrast: 1. From the Pictures main screen, tap a photo to display, then tap Edit > Brightness and Contrast Contrast. 2. Adjust the photo brightness and contrast by tapping the appropriate buttons. Decrease brightness Increase brightness Decrease contrast Increase contrast 3. Tap Done to save your changes.
To rotate the photo: 1. From the Pictures main screen, tap a photo to display. 2. Tap the rotate button to rotate the photo 90º counterclockwise. Tap to rotate 3. Tap to save the changes. To rotate the photo: 1. From the Pictures main screen, tap a photo to display, then tap the crop button. 2. Use the stylus to select the photo area you want to retain after cropping.
3. When prompted, tap inside the crop to crop the photo. 4. The screen displays the cropped photo. Tap to save the changes. To zoom in/out a photo: 1. From the Pictures main screen, tap a photo to display, then tap the zoom button. Tap to zoom in/out NOTE 2. From the zoom navigator window, tap the zoom in or out button to magnify the photo. Zoom out Zoom in Fit in screen view Use the stylus to drag the red square inside the navigator window to the area you want to zoom.
Starting a photo slide show To adjust the slide show settings: 1. From the Pictures main screen, tap Tools > Options Options. 2. Tap the Slide Show tab to display the slide show settings. 3. Adjust the slide show settings from this window, then tap effect your changes. to To start a photo slide show: 1. From the Pictures main screen, tap the slide show button to begin the slide show.
2. During the slide show, tap the screen to display the slide show control buttons. Refer to the illustration below for the button description. Change orientation* Play slideshow Pause slide show Stop slideshow Next photo Previous photo * Portrait or landscape Using the Tools menu The Tools menu allows you to share photos via e-mail or beam, set the photo as wallpaper, or revert to the original photo. To access the Tools menu: 1. From the Pictures main screen, tap a photo to display, then Tools Tools.
Auto-launching Pictures You can auto-launch Pictures everytime you insert a digital camera SD card to the Pocket PC SD card slot. To auto-launch Pictures: 1. From the Pictures main screen, tap Tools > Options Options. 3. Tap 7-52 2. Tap the General tab, then check the option Detect digital camera storage cards cards. to save your settings.
This chapter includes basic information on how to use Pocket Word, Pocket Excel, MSN Messenger, and Windows Media Player for Pocket PC.
Chapter summary • Companion applications ................................ 8 - 3 • Pocket Word ............................................... 8 - 3 Creating Pocket Word documents .................................... 8-3 Modes of entering information ......................................... 8-4 Saving Pocket Word documents ...................................... 8-8 Opening an existing Pocket Word document .................. 8-10 • Pocket Excel ..............................................
Companion applications The companion applications consist of Microsoft® Pocket Word, Microsoft® Pocket Excel, MSN Messenger, Windows Media™ Player for Pocket PC, Microsoft® Internet Explorer, and Voice Commander. To switch to a companion program on your device, tap , then select Programs Programs. Tap the icon of the program that you want to open. Pocket Word Pocket Word works with Microsoft® Word on your desktop computer to give you easy access to copies of your documents.
2. Tap N e w to display a blank document. NOTE Tap on T o o l ss, then O p t i o n s to change the format of blank documents. 3. Use any of the input modes to enter your text. Refer to the section “Modes of entering information” for details.
Typing Mode Using the input panel, enter typed text into the document. For more information on entering typed text, see Chapter 2. To find and replace text: 1. Highlight the text you wish to change by dragging the stylus across the text. 2. Press the Back bar to remove the text and enter new text. OR Tap Edit > Find/Replace. 3. Tap Replace or F i n d d, then follow screen instructions to continue.
Writing mode In writing mode, use your stylus to write directly on the screen. Ruled lines are displayed as a guide, and the zoom magnification is greater than in typing mode to allow you to write more easily. For more information on writing and selecting writing, see Chapter 2. Write your text here Click on the Space button, then tap on the screen at the point at which you want to insert space, dragging the arrow that appears to move to the text to a new line.
Drawing mode In drawing mode, use your stylus to draw on the screen. Gridlines appear as a guide. When you lift your stylus off the screen after the first stroke, you will see a drawing box indicating the boundaries of the drawing. Every subsequent stroke within or touching the drawing bounding box becomes part of the drawing. For more information on drawing and selecting drawings, see Chapter 2.
Saving Pocket Word documents To save a Pocket Word document: When you have finished editing . your document, tap NOTE If you do not specify a file name for the document using the steps below, then the first line of the document is used as the file name. To name a file: 1. With the document open, tap Tools Tools. 2. From the pop-up menu, tap File e, then tap S a v e Document As... option. The Save As window appears.
3. Change the file name by typing a new one in the Name field. 4. Tap the down arrow in the Folder field to select a folder where you want to save the file. 5. Tap the down arrow in the T y p e field to select a file format. You can save the document you create or edit in a variety of file formats including: • Pocket Word Document (.psw) • Rich Text Format (.rtf) • Plain Text (.txt) • Word 97/2000 Template • Word 97/2000 Document 6.
Opening an existing Pocket Word document Pocket Word contains a list of the files stored on your device. Tap a file in the list to open. To delete, make copies of, and send files, tap and hold a file in the list, then select the appropriate action on the pop-up menu.
Pocket Excel Use Pocket Excel to create spreadsheets such as expense reports and mileage logs. You can transfer spreadsheets between your device and desktop computer and vice versa. You can also synchronise spreadsheets between your desktop computer and your device so that you have the most up-to-date contents in both locations. Pocket Excel contains a list of the files stored on your device. Tap a file in the list to open.
2. Tap N e w to display a blank document. If you selected a template for new documents in the Options dialog box, that template appears with the appropriate text and formatting already provided. 3. A blank worksheet appears. Enter texts, numbers, and formulas using the soft keyboard and the application buttons.
2. By default, your spreadsheet will be saved with the file name Book1 Book1. You can change the file name to one that is more descriptive of your document. See next section for saving options. To specify save options: 1. With the document open, tap Tools Tools. 2. From the pop-up menu, tap File e, then tap S a v e Workbook As... to display the Save As screen. 3. Change the file name by simply typing a new one in the N a m e field. 4.
6. Tap the down arrow in the Location field to indicate the location of your saved file, either in the main memory of your device, or in a storage card, if available. 7. Tap O K when done. NOTE If you do not wish to save your workbook to a different format, but would like to change the file name, folder, and location of your document, simply tap and hold the file from the File Explorer window, then tap R e n a m e / M o v e . . . from the pop-up menu to make your changes.
3. Type a password in the Password field. 4. Re-type the password in the Verify Password field. 5. Tap when done. If you have set a password for your workbook, a password screen appears asking you to type your password whenever you try to open the workbook. Type your password, then tap O K K. If you type in a wrong password, a message appears telling you so. NOTE DO NOT forget your password! You cannot open your workbook unless you type in the correct password.
Tips for working in Pocket Excel Take note of the following when working in large worksheets in Pocket Excel: • View in full-screen mode to see as much of your worksheet as possible. Tap V i e w w, then tap Full Screen Screen. To exit full-screen mode, tap Restore Restore. • Show and hide window elements. Tap V i e w w, then tap the elements to show or hide. • Freeze panes on a worksheet. First select the cell where you want to freeze panes. Tap V i e w w, then tap Freeze Panes Panes.
MSN Messenger MSN Messenger on your device is an instant messaging program that allows you to: • See online friends and colleagues • Send and receive instant messages • Have instant message conversations with groups of contacts To use MSN Messenger: You must have a Microsoft Passport™ account or a Microsoft Exchange e-mail account account. You must have a Passport to use the MSN Messenger Service. If you have a Hotmail® or MSN account, you already have a passport.
Signing up To sign in to MSN Mesenger service: 1. Tap Tools then tap S i g n in... from the menu. OR Simply tap the screen. NOTE 8-18 2. In the sign-in screen, enter your e-mail address and password, then tap Sign In In. If you already use MSN Messenger on your desktop computer, your contacts will show up on your device without being added again.
Working with contacts The MSN Messenger window shows all of your messenger contacts at a glance, divided into Online and Not Online categories. From this view, while connected, you can chat, send an e-mail, block the contact from chatting with you, or delete contacts from your list using the pop-up menu. To see others online without being seen, tap My Status in the Tools menu and select Appear Offline Offline. If you block a contact, you will appear offline but will remain on the blocked contact’s list.
Chatting with contacts Tap a contact name to open a chat window. Enter your message in the text entry area at the bottom of the screen, or tap My Text to enter a preset message, then tap S e n d d. To invite another contact to a multi-user chat, tap Invite in the Tools menu, then tap the contact that you want to invite. NOTE To switch back to the main window without closing a chat, tap the C o n t a c t s button.