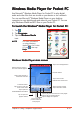
Windows Media Player for Pocket PC Use Microsoft® Windows Media Player for Pocket PC to play digital audio and video files that are stored on your device or on a network. You can use Microsoft® Windows Media Player on your desktop computer to copy digital audio and video to your Pocket PC. You can play Windows® Media and MP3 files on your Pocket PC. To launch the Windows® Media Player for Pocket PC: 1. Tap . 2. Tap Programs. 3. Tap the Windows Media icon.
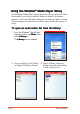
Using the Windows® Media Player library The Windows® Media Player library stores the links to audio and video files saved in your device, whether these are saved in the device memory or SD card. The library allows you to sort your audio or video files according to criteria such as artist’s name, album title, genre, or actor. To open an audio/video file from the library: 1. From the Windows® Media Player playback screen, tap M e n u u, then select Library... The Library screen appears. 2.
4. Tap on an audio or video file from the list, then tap the Play button. The selected file is played on the playback screen. Tap to play the file To update the library: Everytime you copy, save, or add an audio or video file to your device memory or SD card, Windows® Media Player automatically updates the library. However, you may need to update the library to make sure that recently added audio/video files are properly linked in the library. To do this: 1.
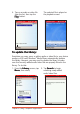
3. The audio/video files are automatically added to the library. When all files are added, tap D o n e to close the window. NOTE 8-24 For more information on using Windows Media Player for Pocket PC, tap , then tap H e l p p.
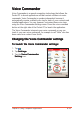
Voice Commander Voice Commander is a speech recognition technology that allows the Pocket PC to launch applications and dial contact numbers via voice commands. Voice Commander is speaker-independent because it automatically creates a default voice tag for each of your contacts and installed applications. You can, however, customise these voice tags using the Voice Commander Settings menu. Press the voice command button at the right side of the Pocket PC to launch the application.
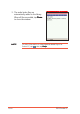
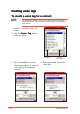
Creating voice tags To create a voice tag for a contact: NOTE An automatic (hidden) voice tag is attached to all contacts and applications. You can listen to these tags by tapping the play button. 1. Select a contact using the stylus. 2. Tap the Voice Tag button start recording. to Play button Voice tag record button 4. When prompted, repeat the 3. Use the headphone or the voice tag. device microphone to record a voice tag for the selected contact.
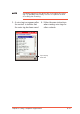
NOTE A message appears if the device fails to recognise the voice tag. Try speaking more loudly or move to a quieter location for making the recording. 5. A voice tag icon appears after the contact to indicate that the voice tag has been saved. 6. Follow the same instructions when creating voice tags for other contacts.
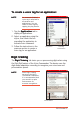
To create a voice tag for an application: NOTE An automatic (hidden) voice tag is attached to all contacts and applications. You can listen to these tags by tapping the play button. 1. Tap the Application tab to display all applications. 2. Select an applicaton using the stylus, then check the box preceding the application to activate voice command. 3. Follow the instructions in the previous section to create a voice tag for an application.
To teach the device to recognise digit digitss : 1. Tap the Digit Training tab, then tap the record button to start. 2. Say the first number sequence on the Digit model adaptation field. Record button 3. The device plays back the recording, then confirms if the recording is correct. Tap Y e s to record, or N o to repeat recording. Chapter 8: Using Companion Applications 4. Record the next digit model adaptation until all 10 are when done. recorded.
Adjusting the advanced settings To adjust the advanced settings: 1. Tap the Advanced Settings to display the options. NOTE By default, the Voice Commander application recognises three phone number lengths based on your settings. Tap the N o c o n s t r a i n t option to support unlimited number of phone number digits. 2. Assign the length of the phone number in the first three fields. 8-30 3. Select the voice command sensivity, then tap to save your changes.
Using the Voice Commander To launch and use the Voice Commander: 1. Press the Voice Commander button on the right side of the device to launch the application. 2. Say a voice command providing the relevant details as prompted for between the < >. Call For example, say “C Start Explorer Amanda Amanda”, “Start Explorer”. NOTE If you use your voice tags, make sure you use the same phrase as recorded. “Call Mandy” would not be recognised if you recorded “Amanda”. 3.
8-32 P505 Pocket PC
This chapter gives information on using Pocket Internet Explorer and the Mobile Favorites folder.
Chapter summary Introduction ...................................................... 9 - 3 Pocket Internet Explorer ..................................... 9 - 3 Using Pocket Internet Explorer ......................................... 9-3 Changing View settings ................................................... 9-4 Browsing the Internet ...................................................... 9-5 Mobile Favorites folder ....................................... 9 - 6 Favorite links ...............................
Introduction You can view web or WAP pages by connecting to the Internet via GPRS or your local area network. See Chapter 10 for information on creating a connection. When connected to an ISP or network, you can also download files and programs from the Internet or intranet. NOTE Your mobile phone operator may charge for Internet/WAP access. Contact them for details. You can copy the links to your favourite pages from your desktop computer to the P505 or vice versa using ActiveSync.
Pocket Internet Explorer home page Tap to open the Vodafone homepage Tap to go back to previous page Tap to stop/refresh Tap to launch Favorites Tap to go to the homepage 2. Tap the Home button to display the Pocket Internet Explorer welcome screen with links to some useful Web sites. 3. Tap any of the Web site buttons to go to a specific site. Changing View settings To change View settings: 1. Tap View to display a pop-up menu. 2. Tap Address Bar to display the Web site address bar. 4.
Browsing the Internet To browse the Internet: 1. To browse pages you must have a valid connection established. This may be automatic or require configuration. See Chapter 10 for details. 2. Do one of the following to connect and start browsing: • Tap the Favorites button, then tap the favourite that you wish to view. • Tap V i e w > Address B a rr. Enter the address of the website that you want to visit using the soft o. keyboard, then tap G o 3.
Mobile Favorites folder Only items stored in the Mobile Favorites sub-folder in the Favorites folder in the desktop PC Internet Explorer will be synchronised with your device. The Mobile Favorites folder is automatically created when you installed ActiveSync®. Favorite links During synchronisation, any links in your computer’s Mobile Favorites folder will be synchronised with Pocket Internet Explorer on your device. Both computers are updated with changes made to either list each time you synchronise.
5. If you want to download the pages that are linked to the mobile favourite you just created, in Internet Explorer on the desktop computer, right-click the mobile favourite, then click Properties Properties. In the Download tab, specify the number of links deep you want to download. To conserve device memory, go only one level deep. 6. Synchronise your device and your desktop computer. Mobile favourites that are stored in the Mobile Favorites in Internet Explorer are downloaded to your device.
Viewing mobile favourites and channels To view mobile favourites and channels: 1. Tap to display your list of favourites. Tap the favourite that you wish to view Tap to add or delete a folder or favourite link 2. Tap a Favorites page that you wish to view. You will see the page that was downloaded the last time you synchronised with your desktop computer. If the page is not on your device, the favourite is dimmed.
4. Type a name for the favourite that you wish to add in the Name field. 5. Type in the URL address in the Address (URL) field. 6. Select a folder to place the favourite from the Create in: box. 7. Tap A d d to return to the Favorites screen, which now shows the favourite that you added. To delete a favourite: 1. Tap to display your list of favourites. 2. Tap the Add/Delete button to display the Favorites screen. 3. Select the favourite that you wish to Delete. delete, then tap Delete 4.
To add a folder: 1. 2. 3. 4. 5. Tap to display your list of favourites. Tap the Add/Delete button to display the Favorites screen. Tap the New Folder button. Type a name for the folder that you wish to create. Tap A d d to return to the Favorites screen, which now shows the folder that you added. To delete a folder: 1. Tap to display your list of favourites. 2. Tap the Add/Delete button to display the Favorites screen. 3. Select the folder that you wish to delete, then tap Delete Delete. 4.
This chapter provides the procedures for connecting to the Internet, intranet, and for transferring data using infrared (IR).
Chapter summary • Introduction ............................................... 1 0 - 3 • My ISP connections ..................................... 1 0 - 4 Creating an Internet connection ..................................... 10-4 • My Work connections .................................. 1 0 - 9 Creating a VPN connection .......................................... 10-10 Adjusting the proxy server settings ............................. 10-12 Network card connections .........................................
Introduction The connection settings tell the device how you want it to connect to service/network to browse the Internet, send and receive e-mail, SMS, MMS, etc. Connections can be made using a modem modem, wireless network network, or network (Ethernet) cards cards. A modem connection can be used to set up connections with an external modem, or with the mobile phone network using a cellular line (WAP or GPRS). Your device has two groups of connection settings: My ISP and M y Work Network Network.
My ISP connections You can connect to the Internet using your Pocket PC cellular line (WAP), GPRS, generic IrDA, or Hayes-compatible modem. Refer to the following sections on how to set up your Internet connection. Your device is pre-configured to automatically connect to Vodafone’s services, provided you have subscription. Contact the operator for details of specific charges and services. To create a different connection, you need the following information to set up the device.
3. Type a name for the connection, then select Cellular Line from the modem list. Tap Next when finished. 4. Use the soft keyboard to type the number of the phone network server, then tap N e x tt. 5. Type the user name, password, and domain for the connection, then tap Advanced Advanced. Otherwise, tap Finish to create the connection. 6. Adjust the Connection Preferences and Terminal settings from this tab, then tap the TCP/IP tab.
7. Adjust the TCP/IP settings from this window, then tap the Servers tab. 8. Adjust the specific server address from this window, then tap . 9. The device creates the connection. To verify, return to the Connections main window, then tap Manage existing connections connections. 10.The connection appears in the list of network connections. Launch Internet Explorer to test the connection.
To create a Cellular Line (GPRS) connection: 1. Follow steps 1 to 2 of the previous section. 2. Type a name for the connection, then select Cellular Line (GPRS) from the modem list. Tap N e x tt. 3. Use the soft keyboard to type the GPRS access point name of the phone network server, then tap N e x tt. 4. Follow steps 5, 7 to 10 of the previous section to create the GPRS connection. NOTE To view additional information for any screen in the wizard or while changing settings, tap .
To create an IR or Hayes-compatible modem connection: 1. Follow steps 1 to 2 of the section on creating a cellular line (WAP) connection on page 10-4. 2. Type a name for the connection, then select Generic IrDA or Hayes-compatible on COM1: from the modem list. Tap N e x tt. 3. Use the soft keyboard to type the number of phone network server, then tap N e x tt. 4. Follow step 5 of the section on creating a cellular line (WAP) connection on page 10-5. 5.
My Work connections Use My Work connections to connect to a Local Area Network (LAN), virtual private network (VPN), and edit the firewall proxy settings. using the device or a network card (Ethernet card). Refer to the following sections on how to set up your work connections. Before you proceed Before setting up your Internet connection in the My Work group, obtain the following information from your network administrator.
Creating a VPN connection To create a Virtual Private Network (VPN) connection: 1. From the Connections tab, tap Connections Connections. 2. In My Work Network, tap A d d a new VPN server connection connection. 3. Type the VPN name using the soft keyboard. 4. Enter the host name/IP address, then select the VPN type. Tap Next when finished.
5. Select the VPN authentication, then tap Next to continue. 6. Type the user name, password, and domain for the connection, then tap Advanced Advanced. Otherwise, tap Finish to create the connection. 7. The created VPN network is displayed in the My Work Network list. Tap to close the window. 8. Launch Internet Explorer to test the connection. Chapter 10: Getting Connected NOTE To view additional information for any screen in the wizard or while changing settings, tap .
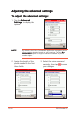
Adjusting the proxy server settings If you are connected to your ISP or private network during synchronization, your mobile device should download the proper proxy settings from your PC. If these settings are not on your PC or need to be changed, ask your ISP or network administrator for the proxy server name, server type, port, type of Socks protocol used, and your user name and password. To change proxy server settings: 1. From the Connections tab, tap Connections Connections. 2.
5. Tap the Advanced button to change the port number, proxy server type, and other advanced proxy settings. 6. Tap to save your changes. Network card connections Use a network (Ethernet) card to connect directly to a network. Once connected, you can view the Internet or intranet, download e-mail or send and receive MMS messages. You do not need to create a new connection on your device. Your network administrator can provide details of the network settings.
4. If you need to enter specific server information, tap the appropriate adapter. Most networks use DHCP, so you should not have to change these settings unless your network administrator instructs you otherwise. 5. If necessary, connect the network card to the network by using a network cable. For information, refer to the documentation that came with your network card. 6. To start a connection, insert the network card, and begin using a desired program.
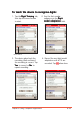
Set up a WAP gateway Your device is pre-configured to automatically connect to Vodafone’s services, provided you have subscription. Contact the operator for details of specific charges and services. If you lose these automatic settings, and do not want to reset your device completely, then you need the following information to set up the device: ISP server phone number, user name password, WAP gateway server name, and port number. To access WAP sites through Pocket Internet Explorer: 1.
4. Tap the Advanced button to access the WAP gateway settings. NOTE 5. In the W A P box, enter the WAP gateway server name e, then specify the port number. The most common WAP port number is 9201. 6. In the Secure WAP box, enter the Secure WAP gateway server name name, then specify the port number. 7. Tap 10-16 to save your changes.
Using dialing rules Depending upon where you use the P505, you may have to dial additional numbers, for example 0 or 9 to dial out of an exchange, or a particular prefix. The device automatically uses these numbers when the dialing rule is selected. You can create as many dialing locations as you require. Three are already created: Home, Mobile, and Work, edit these to your requirements. To change the dialing rules: 1. Tap > Settings > Connections tab > Connections > Advanced tab. 2.
Ending a connection Use the following methods to end a network connection. on the navigation • When connected via modem or VPN, tap bar, then tap Disconnect Disconnect. • When connected via cable or cradle, detach your device from the cable or cradle. • When connected via Infrared, move the device away from the other computer or device. • When connected via a network (Ethernet) card, remove the card from your device. • When connected via a wireless network, switch off the connection.
4. Tap the option Receive all incoming beams beams, then tap the Receive an infrared beam link to receive beams from this screen. NOTE The device automatically looks for another device using infrared. Turning off the R e c e i v e a l l i n c o m i n g b e a m options saves battery power. Sending information To beam a contact: 1. In Contacts Contacts, highlight the contact name to beam. 2. Select Tools > Beam Contacts. 3.
To beam a file: 1. Go to the program associated with the file you want to transfer, and select it from the list. 2. Align the IR ports of the P505 and the device to which you are beaming (the devices should be in close range of each other and have clear line-ofsight). 3. Tap and hold the item, then tap Beam File... on the pop-up menu. NOTE You can also send items, but not folders, from File Explorer. Tap and hold the item that you want to send, then tap B e a m F i l e on the pop-up menu.
This chapter provides information on how to use the Pocket PC Bluetooth® feature.
Chapter summary • Introducing Bluetooth ® ........................................... 1 1 - 3 Bluetooth icon ............................................................... 11-3 • Bluetooth settings ...................................... 1 1 - 4 • Bluetooth Manager ...................................... 1 1 - 6 Bluetooth connection wizard ......................................... 11-7 • Bluetooth® services .................................... 1 1 - 8 Wireless serial port .............................
Introducing Bluetooth® Bluetooth® is a short-range wireless communications technology. Devices with Bluetooth® capabilities can exchange information over a distance of about 10 meters (30 feet) without requiring a physical connection. Unlike infrared, you do not need to line up the devices to exchange information via Bluetooth®. The devices only need to be within a range of about 10 meters. You can even exchange information to a device in a different room, as long as it is within the specified range.
Bluetooth settings To configure the Bluetooth settings: 1. Tap from the lower right corner of the Today screen to display the Bluetooth menu. 2. Tap Bluetooth Settings Settings. 3. Tap one of the tabs at the bottom of the Bluetooth Settings window to make your desired changes.
Services Allows you to: • enable/disable available Bluetooth services • change the advanced settings of Bluetooth services • set authentication and specify encryption settings for Bluetooth services The available service settings are enabled when you select a Bluetooth service. Select a service from the list to establish its settings (enabled, authorisation and authentication).
Bluetooth Manager The Bluetooth Manager allows you to create, manage, and use Bluetooth® to connect to remote devices. To launch the Bluetooth Manager: 1. Tap and hold the Bluetooth icon in the Today screen. 2. Tap Bluetooth Manager Manager. 3. The My Shortcuts screen displays a list of pre-configured connections, if any.
4. Tap the Active Connections tab to display the active incoming and outgoing connections. Bluetooth connection wizard The Bluetooth connection wizard helps you set up connections with remote Bluetooth® devices. To launch the Bluetooth connection wizard: 1. Tap from the Bluetooth Manager command bar. The Bluetooth Connection Wizard screen appears. 2. Select a type of connection that you wish set up, then tap N e x tt. Tap Cancel to terminate the connection process.
Bluetooth® services Wireless serial port Using a Bluetooth® serial port is equivalent to using a physical cable serial port connection between two devices. As with a physical connection, you have to configure the application that will use the serial port. To configure the Bluetooth Serial Port: 1. Tap the Bluetooth icon from the Today screen to display the Bluetooth menu. 2. Tap Bluetooth Settings Settings, then tap the Services tab. 3.
To use the wireless serial port: 1. Create a connection to the device that uses the wireless serial port (i.e. Bluetooth GPS). See the section “Bluetooth connection wizard” on page 11-7. 2. Tap and hold the Bluetooth icon on the Today screen, then tap Bluetooth Manager Manager. 3. In My Shortcuts screen, tap and hold the device connection shortcut, then select Connect from the pop-up menu. 4. Enter the required information on the succeeding screens to complete the connection process. 5.
Dial-up networking The Dial-up Networking feature allows you to connect to a remote computer through a phone line. Once connected, you can browse the Internet, check or read emails, etc. NOTE The remote Bluetooth device that will provide the Dial-up Networking service should have access to a telephone system, either a hard-wired or a cellular connection, and capable of answering a call.
Send via Bluetooth You can conveniently send your Pocket Outlook contacts, calendar items, and tasks individually or collectively to the remote device via Bluetooth. To send data via Bluetooth: 1. Tap , then open either Contacts Contacts, Calendar Calendar, or Tasks Tasks. 2. Highlight an item that you wish to send to the remote device. 3. Tap and hold the item, then tap Send via Bluetooth from the pop-up menu. OR Tap Tools from the command bar, then select Send via Bluetooth Bluetooth.
The device searches and displays remote Bluetooth® device(s) in your location. 4. Tap the destination of the file, then to send.
Bluetooth® Personal Area Network A Bluetooth® personal area network is a private, temporary, ad-hoc network of up to eight (8) devices. A Bluetooth® personal area network allows you to easily exchange information that normally requires a TCP/IP network. Most chat utilities, multi-player games, etc. are fully functional in a Bluetooth® personal area network environment.
3. Tap the remote devices you want to add to the personal network, then tap N e x tt. 4. Add remote devices to the Bluetooth personal network, if desired. a. Tap the A d d button, then select the device that you want to add. b. Add other devices, if desired. You can add up to eight devices, including the host. 5. After adding devices, tap O K to complete the setup and close the wizard. To join a personal network: 1. From the Bluetooth Manager Manager, tap N e w > Join a personal network network.
Notices
Chapter summary • Federal Communications Commission Statement ......................................................... A - 3 • Canadian Department of Communications Statement . . . . . . . . . . . . . . . . . . . . . . . . . . . . . . . . . A - 3 • UL Safety Notices . . . . . . . . . . . . . . . . . . . . . . . . . . . . . . . . . . . . . . . . . . . . . .
Federal Communications Commission Statement This device complies with Part 15 of the FCC Rules. Operation is subject to the following two conditions: 1) This device may not cause harmful interference, and 2) This device must accept any interference received, including interference that may cause undesired operation. This device and its antenna must not be co-located or operating in conjunction with any other antenna or transmitter.
UL Safety Notices Required for UL 1459 covering telecommunications (telephone) equipment intended to be electrically connected to a telecommunication network that has an operating voltage to ground that does not exceed 200V peak, 300V peak-to-peak, and 105V rms, and installed or used in accordance with the National Electrical Code (NFPA 70).
Replaceable batteries If an equipment is provided with a replaceable battery and if replacement by an incorrect type could result in an explosion (e.g.
4RF Exposure Information (SAR) This model phone meets the government’s requirements for exposure to radio waves. This phone is designed and manufactured not to exceed the emission limits for exposure to radio frequency (RF) energy set by the Federal Communications Commission of the U.S. Government. The exposure standard for wireless mobile phones employs a unit of measurement known as the Specific Absorption Rate, or SAR. The SAR limit set by the FCC is 1.6W/kg.