
User Manual


42
4 Using the Notebook PC
$&'GULYHOHWWHUVKRXOGEHSUHVHQWUHJDUGOHVVRIWKHSUHVHQFHRID&'GLVFLQWKHGULYH$IWHUWKH&'LV
properly inserted, data can be accessed just like with hard disk drives; except that nothing can be written
WRRUFKDQJHGRQWKH&'8VLQJWKHSURSHUVRIWZDUHD&'5:GULYHRU'9'&'5:GULYHFDQDOORZ
&'5:GLVFVWREHXVHGOLNHDKDUGGULYHZLWKZULWLQJGHOHWLQJDQGHGLWLQJFDSDELOLWLHV
9LEUDWLRQLVQRUPDOIRUDOOKLJKVSHHGRSWLFDOGULYHVGXHWRXQEDODQFHG&'VRU&'SULQW7RGHFUHDVH
YLEUDWLRQXVHWKH1RWHERRN3&RQDQHYHQVXUIDFHDQGGRQRWSODFHODEHOVRQWKH&'
Listening to Audio CD
7KHRSWLFDOGULYHVFDQSOD\DXGLR&'VEXWRQO\WKH'9'520GULYHFDQSOD\'9'DXGLR,QVHUWWKH
DXGLR&'DQG:LQGRZVDXWRPDWLFDOO\RSHQVDQDXGLRSOD\HUDQGEHJLQVSOD\LQJ'HSHQGLQJRQWKH
'9'DXGLRGLVFDQGLQVWDOOHGVRIWZDUHLWPD\UHTXLUHWKDW\RXRSHQD'9'SOD\HUWROLVWHQWR'9'
audio. You can adjust the volume using hotkeys or Windows™ speaker icon on the taskbar.
Using the Optical Drive
Optical discs and equipment must be handled with care because of the precise mechanics involved.
.HHSLQPLQGWKHLPSRUWDQWVDIHW\LQVWUXFWLRQVIURP\RXU&'VXSSOLHUV8QOLNHGHVNWRSRSWLFDOGULYHV
WKH1RWHERRN3&XVHVDKXEWRKROGWKH&'LQSODFHUHJDUGOHVVRIWKHDQJOH:KHQLQVHUWLQJD&'LWLV
LPSRUWDQWWKDWWKH&'EHSUHVVHGRQWRWKHFHQWHUKXERUHOVHWKHRSWLFDOGULYHWUD\ZLOOVFUDWFKWKH&'
WARNING! If the CD disc is not properly locked onto the center hub, the CD can be
damaged when the tray is closed. Always watch the CD closely while closing the tray
slowly to prevent damage.
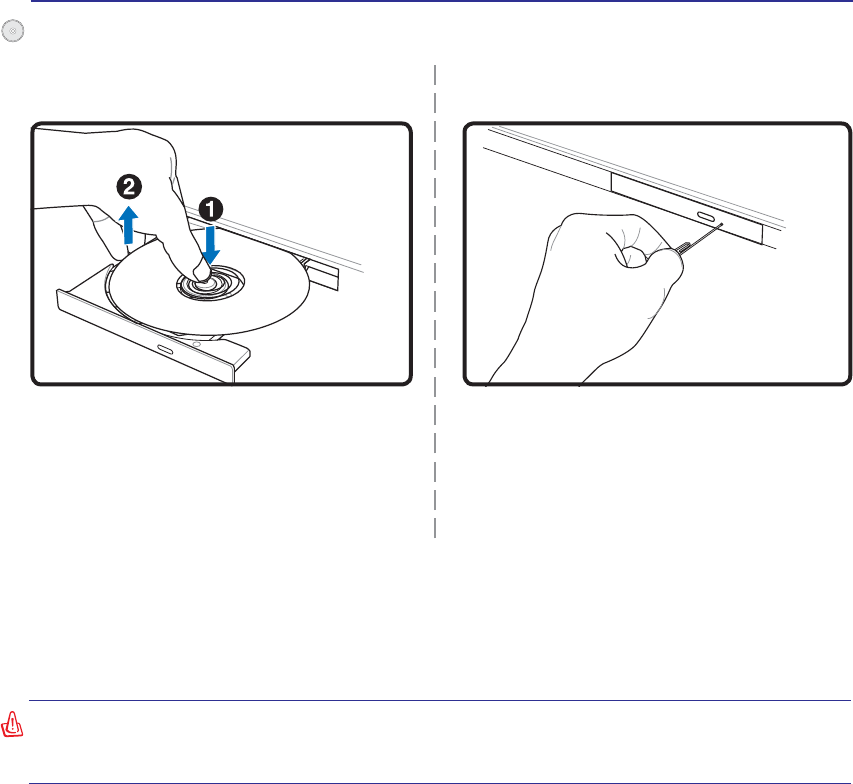
Eject the tray and gently pry the edge of the disc
upwards at an angle to remove the disc from
the hub.
The emergency eject is located in a hole on the op-
tical drive and is used to eject the optical drive tray
LQFDVHWKHHOHFWURQLFHMHFWGRHVQRWZRUN'RQRW
use the emergency eject in place of the electronic
eject. Note: Make sure not to stab the activity
indicator located in the same area.
Actual location will
vary by model.
Optical Drive (Cont.)
Emergency eject
Removing an optical disc