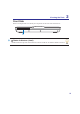
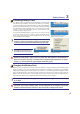
Knowing the Parts 2 Front Side Refer to the diagram below to identify the components on this side of the Notebook PC. 1 1 Status Indicators (front) Status indicators represent various hardware/software conditions. See indicator details in section 3.
3 22 Getting Started
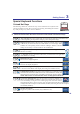
. Getting Started Using AC Power Using Battery Power Powering ON the Notebook PC Checking Battery Power Restarting or Rebooting Powering OFF the Notebook PC Special Keyboard Functions Switches and Status Indicators 23
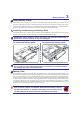
3 Getting Started Power System Using AC Power The Notebook PC power is comprised of two parts, the power adapter and the battery power system. The power adapter converts AC power from a wall RXWOHW WR WKH '& SRZHU UHTXLUHG E\ WKH 1RWHERRN PC. Your Notebook PC comes with a universal $& '& DGDSWHU 7KDW PHDQV WKDW \RX PD\ FRQQHFW the power cord to any 100V-120V as well as 220V240V outlets without setting switches or using SRZHU FRQYHUWHUV 'LIIHUHQW FRXQWULHV PD\ UHTXLUH that an adapter be used to connec
Getting Started 3 Using Battery Power The Notebook PC is designed to work with a removable battery pack. The battery pack consists of a set of battery cells housed together. A fully charged pack will provide several hours of battery life, which can be further extended by using power management features through the BIOS setup. Additional battery packs are optional and can be purchased separately through a Notebook PC retailer.
3 Getting Started Powering ON the Notebook PC The Notebook PC’s power-ON message appears on the screen when you turn it ON. If necessary, you may adjust the brightness by using the hot keys. If you need to run the BIOS Setup to set or modify the V\VWHP FRQÀJXUDWLRQ SUHVV >) @ XSRQ ERRWXS WR HQWHU WKH %,26 6HWXS ,I \RX SUHVV >7DE@ GXULQJ WKH VSODVK VFUHHQ VWDQGDUG ERRW LQIRUPDWLRQ VXFK DV WKH %,26 YHUVLRQ FDQ EH VHHQ 3UHVV >(6&@ DQG \RX ZLOO be presented with a boot menu with selections to boot from
Getting Started 3 Checking Battery Power The battery system implements the Smart Battery standard under the Windows environment, which allows the battery to accurately report the amount of charge left in the battery. A fully-charged battery pack provides the Notebook PC a few hours of working power. But WKH DFWXDO ÀJXUH YDULHV GHSHQGLQJ RQ KRZ \RX XVH WKH SRZHU VDYLQJ features, your general work habits, the CPU, system memory size, and the size of the display panel.
3 Getting Started Restarting or Rebooting After making changes to your operating system, you may be prompted to restart the system. Some installation processes will provide a dialog box to allow restart. To restart the system manually, click Windows Start button and select Shut Down and then choose Restart. (Screens are different depending on security settings.
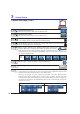
3 Getting Started Special Keyboard Functions 1.3 MEGA PIXELS Colored Hot Keys 7KH IROORZLQJ GHÀQHV WKH FRORUHG KRW NH\V RQ WKH 1RWHERRN 3&·V NH\ERDUG 7KH FRORUHG FRPPDQGV FDQ RQO\ EH DFFHVVHG E\ ÀUVW SUHVVLQJ DQG KROGLQJ WKH IXQFWLRQ key while pressing a key with a colored command. ASUS WIDE SCREEN NOTEBOOK OFF ON NOTE: The Hot Key locations on the function keys may vary depending on model but the functions should remain the same. Follow the icons instead of the function keys.
3 Getting Started Colored Hot Keys (Cont.) 1.3 MEGA PIXELS ASUS WIDE SCREEN NOTEBOOK OFF ON Speaker Down Icon (F11): 'HFUHDVHV WKH VSHDNHU YROXPH RQO\ LQ :LQGRZV 26 Speaker Up Icon (F12): Increases the speaker volume (only in Windows OS) Num Lk (Ins): Toggles the numeric keypad (number lock) ON and OFF. Allows you to use a larger portion of the keyboard for number entering. Scr Lk (Del): Toggles the “Scroll Lock” ON and OFF. Allows you to use a larger portion of the keyboard for cell navigation.
Getting Started 3 Microsoft Windows Keys There are two special Windows keys on the keyboard as described below. The key with the Windows Logo activates the Start menu located at the bottom left of the Windows desktop. The other key, that looks like a Windows menu with a small cursor, activates the properties menu and is equivalent to pressing the right mouse button on a Windows object.
3 Getting Started Switches and Status Indicators Switches 1.3 MEGA PIXELS ASUS WIDE SCREEN NOTEBOOK OFF ON Power4 Gear+ Key The Power4 Gear+ button toggles power savings between various power saving modes. The power saving modes control many aspects of the Notebook PC to maximize performance versus battery time. When you are using an AC power adapter, Power4 Gear+ will switch between modes in the AC power mode segment.
Getting Started 3 Status Indicators 1.3 MEGA PIXELS Front ASUS WIDE SCREEN NOTEBOOK OFF ON Wireless Indicator This is only applicable on models with built-in wireless LAN and/or built-in Bluetooth. When the built-in wireless LAN and/or built-in Bluetooth is enabled, this indicator will light. (Windows software settings are necessary.) Bluetooth Indicator This is only applicable on models with internal Bluetooth (BT).
3 Getting Started Multimedia Control Keys (on selected models) The multimedia control keys allows for convenient controlling of the multimedia application. The folORZLQJ GHÀQHV WKH PHDQLQJ RI HDFK PXOWLPHGLD FRQWURO NH\ RQ WKH 1RWHERRN 3& Use the [Fn] key in combination with the arrow keys for CD control functions. CD Play/Pause During CD stop, begins CD play. During CD play, pauses CD play. CD Stop During CD stop: Ejects the CD tray. During CD play: Stops CD play.
4.
4 Using the Notebook PC Pointing Device The Notebook PC’s integrated touchpad pointing device is fully compatible with all two/three-button and scrolling knob PS/2 mice. The touchpad is pressure sensitive and contains no moving parts; therefore, mechanical failures can be avoided. A device driver is still required for working with some application software. Cursor Movement IMPORTANT! Do not use any objects in SODFH RI \RXU ÀQJHU WR RSHUDWH WKH WRXFKpad or else damage may occur to the touchpad’s surface.
Using the Notebook PC 4 Touchpad Usage Illustrations Clicking/Tapping - :LWK WKH FXUVRU RYHU DQ LWHP SUHVV WKH OHIW EXWWRQ RU XVH \RXU ÀQJHUWLS WR WRXFK WKH WRXFKSDG OLJKWO\ NHHSLQJ \RXU ÀQJHU RQ WKH WRXFKSDG XQWLO WKH LWHP LV VHOHFWHG 7KH VHOHFWHG LWHP ZLOO change color. The following 2 examples produce the same results. Clicking Tapping Lightly but rapidly strike the touchpad. Press the left cursor button and release.
4 Using the Notebook PC Caring for the Touchpad The touchpad is pressure sensitive. If not properly cared for, it can be easily damaged. Take note of the following precautions. • Make sure the touchpad does not come into contact with dirt, liquids or grease. 'R QRW WRXFK WKH WRXFKSDG LI \RXU ÀQJHUV DUH GLUW\ RU ZHW 'R QRW UHVW KHDY\ REMHFWV RQ WKH WRXFKSDG RU WKH WRXFKSDG EXWWRQV 'R QRW VFUDWFK WKH WRXFKSDG ZLWK \RXU ÀQJHU QDLOV RU DQ\ KDUG REMHFWV NOTE: The touchpad responds to movement not t
Using the Notebook PC 4 Storage Devices 6WRUDJH GHYLFHV DOORZ WKH 1RWHERRN 3& WR UHDG RU ZULWH GRFXPHQWV SLFWXUHV DQG RWKHU ÀOHV WR YDULRXV data storage devices. This Notebook PC has the following storage devices: • • • • Expansion Card Optical drive Flash memory reader Hard disk drive Expansion Card One 26pin Express card slot is available to support one ExpressCard/34mm or one ExpressCard/54mm expansion card. This new interface is faster by using a serial bus supporting USB 2.
4 Using the Notebook PC Optical Drive Inserting an optical disc 1. While the Notebook PC’s power is ON, press the drive’s eject button and the tray will eject out partially. 2. Gently pull on the drive’s front panel and slide the tray completely out. Be careful not to touch WKH &' GULYH OHQV DQG RWKHU PHFKDQLVPV 0DNH sure there are no obstructions that may get jammed under the drive’s tray. 3. Hold the disc by the edge and face the disc’s 4. Slowly push the drive’s tray back in.
Using the Notebook PC 4 Optical Drive (Cont.) Removing an optical disc Emergency eject Actual location will vary by model. Eject the tray and gently pry the edge of the disc upwards at an angle to remove the disc from the hub. The emergency eject is located in a hole on the optical drive and is used to eject the optical drive tray LQ FDVH WKH HOHFWURQLF HMHFW GRHV QRW ZRUN 'R QRW use the emergency eject in place of the electronic eject.
4 Using the Notebook PC Flash Memory Card Reader Normally a memory card reader must be purchased separately in order to use memory cards from devices such as GLJLWDO FDPHUDV 03 SOD\HUV PRELOH SKRQHV DQG 3'$V 7KLV 1RWHERRN 3& KDV D VLQJOH EXLOW LQ PHPRU\ FDUG UHDGHU WKDW FDQ XVH PDQ\ ÁDVK PHPRU\ FDUGV DV VKRZQ LQ WKH H[DPSOH EHORZ 7KH EXLOW LQ PHPRU\ card reader is not only convenient, but also faster than most other forms of memory card readers because it utilizes the internal high-bandwidth PCI b
Using the Notebook PC 4 Hard Disk Drive +DUG GLVN GULYHV KDYH KLJKHU FDSDFLWLHV DQG RSHUDWH DW PXFK IDVWHU VSHHGV WKDQ ÁRSS\ disk drives and optical drives. The Notebook PC comes with a replaceable 2.5” (6.35cm) wide and approximately .374” (.95cm) high hard disk drive. Current hard drives support S.M.A.R.T. (Self Monitoring and Reporting Technology) to detect hard disk errors or failures before they happen.
4 Using the Notebook PC Memory (RAM) Additional memory will increase application performance by decreasing hard disk access. The BIOS automatically detects the amount of memory in the sysWHP DQG FRQÀJXUHV &026 DFFRUGLQJO\ GXULQJ WKH 3267 3RZHU 2Q 6HOI 7HVW process. There is no hardware or software (including BIOS) setup required after the memory is installed. 1 2 3 6 4 5 Installing a Memory Card 4 The memory compartment provides expansion ca- pabilities for additional memory.
Using the Notebook PC 4 Connections NOTE: The built-in modem and network cannot be installed later as an upgrade. After purchase, modem and/or network can be installed as an expansion card. Modem Connection The telephone wire used to connect the Notebook PC’s internal modem should have either two or four wires (only two wires (telephone line #1) is used by the modem) and should have an RJ-11 connector on both ends.
4 Using the Notebook PC Network Connection Connect a network cable, with RJ-45 connectors on each end, to the modem/network port on the Notebook PC and the other end to a hub or switch. For 100 BASE-TX / 1000 BASE-T speeds, your network cable must be category 5 or better (not category 3) with twisted-pair wiring. If you plan on running the interface at 100/1000Mbps, it must be connected to a 100 BASE-TX / 1000 BASE-T hub (not a BASE-T4 KXE )RU %DVH 7 XVH FDWHJRU\ RU WZLVWHG SDLU ZLULQJ
Using the Notebook PC 4 Wireless LAN Connection (on selected models) The optional built-in wireless LAN is a compact easy-to-use wireless Ethernet adapter. Implementing the IEEE 802.11 standard for wireless LAN (WLAN), the optional built-in wireless LAN is capable of IDVW GDWD WUDQVPLVVLRQ UDWHV XVLQJ 'LUHFW 6HTXHQFH 6SUHDG 6SHFWUXP '666 DQG 2UWKRJRQDO )UHTXHQF\ 'LYLVLRQ 0XOWLSOH[LQJ 2)'0 WHFKQRORJLHV RQ *+] *+] IUHTXHQFLHV 7KH RSWLRQDO EXLOW LQ ZLUHless LAN is backward compatible with the earli
4 Using the Notebook PC Intel PROSet (3945) Wireless LAN (on selected models) Connecting to a network 3UHVV >)1 ) @ RU GRXEOH FOLFN the Wireless Console icon on the taskbar). Four icons will appear as shown here. Click on the 1st setting to activate both Wireless & Bluetooth, or you may select the 2nd option for Wireless activation only. 1. Click Start | All Programs | Intel PROSet Wireless | Intel PROSet Wireless. 2. Select the Network by double clicking or click on connect.