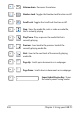
+ Volume down: Decreases the volume. + Number Lock: Toggles the Number Lock function on/off + Scroll Lock: Toggles the Scroll Lock function on/off. + Stop: Stops the media file, such as video or audio file, that is currently playing. + Play/Pause: Plays or pauses the media file that is currently playing. + Previous: Goes back to the previous track of the currently playing media file. + Next: Goes to the next track of the currently playing media file.
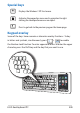
Special keys Displays the Windows® XP Start menu. Activates the properties menu and is equivalent to rightclicking the touchpad/mouse on an object. Press to go back to the previous page or the home page. Keypad overlay Some of the keys have numeric or character overlay functions. To key in letters and symbols, simultaneously press + to enable the Number Lock function. To enter uppercase letters or enter the upper character, press the Shift key and the key that you want to use.
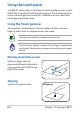
Using the touch panel Your EKB PC comes with a 5” Touch panel, which enables you to use your EKB PC like a standard fully-functional computer. The touch panel allows you to use touch gestures instead of a standard mouse to select items or navigate around the screen. Using the Touch gestures Touch gestures are movements that you make with the use of your finger to select items or navigate around the screen. Use light pressure when making a touch gesture.
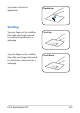
Tap twice to launch an application. Double tap Scrolling Tap your finger on the scrollbar, then slide your finger upward to scroll up a document or a webpage. Scroll up Tap your finger on the scrollbar, then slide your finger downward to scroll down a document or a webpage.
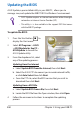
Updating the BIOS ASUS Update, a pre-installed utility in your EKB PC, allows you to manage, save, and update the EKB PC BIOS in Windows® environment. • ASUS Update requires an Internet connection either through a network or an Internet Service Provider (ISP). • This utility is is also available in the support DVD that comes with the EKB PC package. To update the BIOS: 1. Press the Start button to display the Start menu. 2.
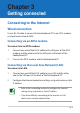
Chapter 3 Getting connected Connecting to the Internet Wired connection Use an RJ-45 cable to connect the EeeKeyboard PC to an ADSL modem or a local area network (LAN). Connecting via an ADSL modem To connect via an ADSL modem: 1. Connect one end of the RJ-45 cable to the LAN port of the ADSL modem and the other end to the LAN port at the back of the EeeKeyboard PC. 2. Turn on the ADSL modem and the EeeKeyboard PC. Connecting via the Local Area Network (LAN) To connect via LAN: 1.
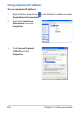
Using a dynamic IP address To use a dynamic IP address: 1. Right-click the network icon on the Windows® taskbar and select Open Network Connections. 2. Right-click Local Area Connection and select Properties. 3. Click Internet Protocol (TCP/IP) and click Properties.
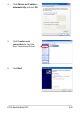
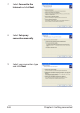
4. Click Obtain an IP address automatically and click OK. 5. Click Create a new connection to start the New Connection Wizard. 6. Click Next.
7. Select Connect to the Internet and click Next. 8. Select Set up my connection manually. 9. Select your connection type and click Next.
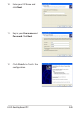
. Enter your ISP Name and click Next. 11. Key in your User name and Password. Click Next. 12 Click Finish to finish the configuration.
13. Enter your user name and password. Click Connect to connect to the Internet. Using a static IP address To use a static IP address: 1. Repeat steps 1–3 in the section Using a dynamic IP. 2 Click Use the following IP address. 3. Key in the IP address, Subnet mask, and Gateway. Get these information from your ISP or from your network administrator. 4. If needed, enter the preferred DNS Server address and alternative address. 5.
Connecting to a wireless network To connect to a wireless network: 1. Connect the wireless antenna to the wireless antenna ports at the back of the EeeKeyboard PC. 2. Double-click the wireless network icon in the Windows taskbar. If the wireless connection icon does not show in the taskbar, press + 3. ( + ) to turn on the wireless function. From the list, select the wireless network or access point you want to connect to and click Connect to establish the connection.
5. After establishing a successful connection, the connection status is displayed. Using Bluetooth® Bluetooth® is a short-range wireless technology that allows your EeeKeyboard PC to communicate with other Bluetooth-enabled devices, such as PCs, mobile devices, headsets, GPS receivers, and headset, within a short range of about 10 meters or 30 feet. Bluetooth® devices only need to be within the specified range to exchange information and the devices do not need any physical connection.
2. On the Windows® desktop, click My Bluetooth Places. In the Initial Bluetooth Configuration Wizard, select the alternative locations where you want the Bluetooth icon to appear. Click Next. 3. Key in a unique name for your EeeKeyboard PC and select the computer type. Click Next. 4. Click Next to configure the Bluetooth services that your EeeKeyboard PC will offer to or share with other Bluetooth devices.
5. Select the Bluetooth service that you want to enable or configure. Click Next. 6. Before setting up a Bluetooth connection, ensure that the other device is set to discoverable mode. Click Next to start searching for other Bluetooth devices. To set the other device to discoverable mode, refer to the documentation that came with the other device. 7. 3-10 From the list of available Bluetooth devices, select the device you want to connect to, then click Next.
8. If your selected device requires a security key to put it on a pairing mode with your EeeKeyboard PC, key in the Bluetooth security code. Some Bluetooth devices come with built-in security code or passkey. Refer to the device’s documentation for the security code or passkey. 9. After pairing the devices, select the service you want from the list and click Finish to use the selected service. Click the Bluetooth icon Bluetooth features.