
User's Manual


Manual Setup
If you encounter any difficulty configuring your ADSL connection with Quick Setup, click Manual Setting to
manually set up your DSL-N13.
ADSL Setup
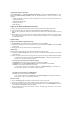
1. Select your Country and ISP and click Next.
2. If your country and ISP are not on the list, select Not list, key in your VPI and VCI values and click Next.
You may ask your ISP for VPI/VCI values.
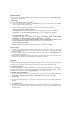
3. Select your connection type and click Next. You can get the connection type from your ISP.
-- If your connection type is PPPoA or PPPoE
For dynamic IP users, input your PPP user name, password, and service name then click Next.
For static IP users, check Use Static IP Address then key in y our IP address, then click Next.
-- If your connection type is MER
For dynamic IP users, check Obtain an IP address automatically, Obtain default gateway
automatically, and Obtain DNS server address automatically, then click Next.
For static IP users, check Use the following IP Address, Use the following default gateway, and Use
the following DNS server address, then input the addresses in correspondent fields.
-- If your connection type is IPoA
Static IP user only. Input the WAN IP address assigned by your ISP, then click Next.
Wireless Setup
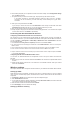
1. Designate an SSID (network name) for DSL-N13. Choose the security level then input a key. The number
of digit of your key depends on the security level you choose. Refer to the note on the web page. When
finished, click Next.
2. This page provides a summary of DSL-N13 WAN and wirelss configuration. Click Save/Reboot to save
and activate your configuration.
3. Setup complete! DSL-N13 reboots in about 50 seconds. The green bar shows the current rebooting status.
After reboot, the web page will automatically refresh to display the settings.
EZSetup
ASUS DSL-N13 Wireless ADSL2/2+ Home Gateway provides an easy-to-use setup utility -- EZSetup. With
this utility, you can wirelessly setup your Internet connection, wireless LAN with just several clicks.
Installing ASUS utility
To use ASUS EZSetup for DSL-N13 configuration, you must install the ASUS utilities from the support CD
included in your package. Insert the CD into your optical drive and autorun the installation program. If autorun
is disabled on your computer, double-click SETUP.EXE in the root directory of the CD.
Setup DSL-N13 using EZSetup
1. Before using this utility, make sure that your hardware connections are all set. Click Start -> Program ->
ASUS Utility -> DSL-N13 Wireless Router -> EZSetup Wizard to start EZSetup. Click Next.
2. Click EZSetup.
3. Push the red EZSetup button on the rear panel of DSL-N13 for over 3 seconds until the PWR LED is
blinking.
4. Click EZSetup button.
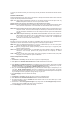
5. The system generates the SSID and Network key automatically. The network key is a 128-bit WEP key by
default. You can accept the settings, or assign SSID and keys to your own need. Click Next to save the
wireless settings.