
User's Manual


DSL-N13 802.11n All-in-1 Wireless ADSL2/2+ Home Gatway User Manual 6
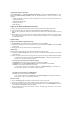
Rear panel
Viewed from left to right, the rear panel of DSL-N13 contains the following elements:
• ADSL port
• Power connector
• Power switch
• Four Local Area Network (LAN) ports
• USB 2.0 ports
• EZSetup button
• Reset button
• Integral antenna
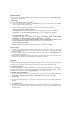
PWR
AIR
WAN
LAN
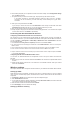
3) Wall mount option
Out of the box, ASUS DSL-N13 Wireless Router is designed to sit on a raised flat surface like a file cabinet or book shelf.
The unit may also be converted for mounting to a wall or ceiling.
Follow these steps to mount the ASUS Wireless Router to a wall:
1. Look on the underside for the two mounting hooks.
2. Mark two upper holes in a flat surface.
3. Tighten two screws until only 1/4'' is showing.
4. Latch the hooks of the ASUS Wireless Router onto the screws.
Note: Re -adjust the screws if you cannot latch the ASUS Wireless Router onto the screws or if it is too loose.
Product features
The DSL-N13 Wireless ADSL 2/ 2+ Home Gateway provides the following features:
• Built-in ADSL modem
• Built-in firewall
• IEEE802.11g standard-based wireless network, backward compatible with 802.11b devices
• Easy-to-use Web-based configuration interface: Quick Setup for ADSL connection, wireless, and security
configuration
• Extensive routing protocol support: RIP v1, v2
• Content-based filter
• EZSetup™ utility for ADSL connection, wireless network and security quick setup
DSL-N13 802.11n All-in-1 Wireless ADSL2/2+ Home Gatway User Manual
Hardware connections
ADSL connection
Use the ADSL splitter supplied in the package to split ADSL signal and telephone service. First connect the
splitter to the wall telephone outlet either by just plugging your splitter onto the outlet or by inserting the line
connector into the outlet. Then connect your ASUS DSL-N13 to the ADSL or mode port of the splitter with the
telephone cable supplied in the package. Use another telephone cable to connect your telephone to the
phone port of the ADSL splitter.