
User's Manual
RIP stands for Rounting Information Protocol. DSL-N13 supports RIPv1 and RIPv2.
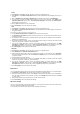
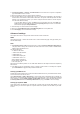
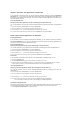
1. Click Advanced Setup -> Routing -> RIP to open the configuration page.
2. To activate RIP, select Enabled radio button for global RIP mode.
3. To configure an individual interface, select the desired RIP version and operation and check the Enabled
checkbox for the interface.
4. Press Save/Apply to save and activate the settings.
USB applications
DSL-N13 offers two USB2.0 ports for setting up FTP server and sharing USB printer.
FTP server function
Before setup, you need to prepare a USB disk for FTP storage.
If the format of your external hard disk is NTFS, the FTP server can only be readable. Uploading
files on the FTP server is not allowed. Besides, only Anonymous User can login. Super User can
not login under NTFS FTP server.
Setting up FTP server
To setup FTP server:
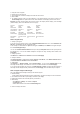
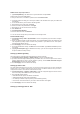
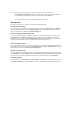
1. Plug your USB storage into the USB2.0 port on the DSL-N13 rear panel. Then click USB Application ->
FTP Server in the left side menu to open the configuration page.
2. Set Enable FTP Server to Yes.
3. Allow Anonymous User to Login: If you want to allow anonymous user to access your FTP site, select
Yes; if you want to protect your data from unauthenticated user, select No.
4. Allow Super User to Login: Select Yes to allow super user to access the FTP server.
5. FTP Port: Set up the port number of the FTP server. For example, if the port number is set to 1111, you
can access the FTP server by typing ftp://192.168.1.1:1111 into the address box of your Web browser
(192.168.1.1 is the default IP address of DSL-N13).
6. Maximum User Allowed to Login: set up the maximum login user according to your working
environment.
7. Login Timeout in Seconds: When login times out, the login trail is terminated.
8. Stay Timeout in Seconds: Timeout value for inactive connection.
9. Press Save/Apply to save and activate the settings.
If you use web access for Super User Login (as the red circle marks), please set Maximum Users
Allowed to Log in to more than 1 or the message "server is busy" will pop up.
Setting up FTP account
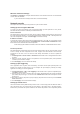
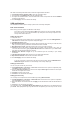
You can set up 12 accounts for your FTP site.
1. Click USB Application -> FTP Server -> User List in the left side menu to open the configuration page.
Click Add to create new FTP account.
2. Define the Username, Password for the new account. Setup the Max. Login to restrict the access request.
Define the access right to the account.
3. Click Apply to save the new account.
4. Click Save to save and activate the settings.
Setting up FTP security
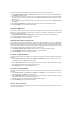
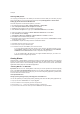
You can deny access request from certain IP address by setting up Banned IP List.
1. Click USB Application -> FTP Server -> Banned IP List in the left side menu to open the configuration
page. Click Add to create a new rule.
2. Input the IP address of the banned host and click Apply to save the banned IP. Make sure the banned IP is
static.
3. Click Save to save and activate the settings.
Your FTP site is ready. Type ftp://192.168.1.1(:port number) into the address box of your Web browser and
press Enter. When prompted for login, input the username and password you have set up for FTP account