
User's Manual
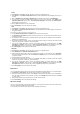
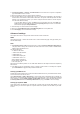
1. Click Advanced Setup -> Security -> Parental Control in the left side menu to open the configuration
page. Click Add to create a new rule.
2. Fill in the username to whom you want to apply the restriction.
3. Fill in the MAC address of the restricted host. If you are accessing this configuration at the computer of
restricted host, select Browser's MAC Address radio button. The system automatically detects the MAC
address of the configuration console. If you want to configure hosts other than the console computer,
enter the MAC address manually.
To get the MAC address of a host, click Start menu on the desktop of the host, select Run, type
cmd into the box and press OK, then type command ipconfig /all and press enter. You can find the
MAC address displayed as Physical Address.
4. Select the days of a week to which the rule shall apply.
5. Fill time into the Start Blocking Time and End Blocking Time box to set up block time.
6. Press Save/Apply to save and activate the settings.
Advanced settings
This chapter shows how to configure other advanced router features of DSL-N13.
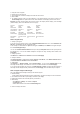
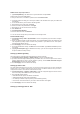
WAN
Click Advanced Setup -> WAN in the left side menu to enter the WAN setup page. This page allows you to
edit the WAN settings.
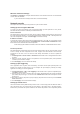
LAN
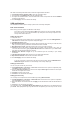
1. Click Advanced Setup -> LAN in the left side menu to enter the Local Area Network (LAN) Setup page.
This page allows to change the IP address and subnet mask of the router, enables or disables UPnP,
IGMP snooping and DHCP server.
The default settings are:
• IP Address: 192.168.1.1
• Subnet mask: 255.255.255.0
• Enable UPnP: Yes
• Enable IGMP Snooping: No
• Enable DHCP Server: Yes
Start IP Address: 192.168.1.2
End IP Address: 192.168.1.254
Lease Time (hour): 24
DHCP server is enabled by default. You can define which addresses to be assigned to the LAN computers by
DHCP server.
2. Press Save to save the configurations and go on setting up other features. If all settings are complete,
press Save/ Reboot to apply the settings and reboot DSL-N13.
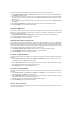
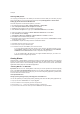
Setting up DNS server
Domain Name System (DNS) server is used to translate IP addresses into easy-to-remember domain names,
such as www.asus.com, and vice versa.
Click Advanced Setup -> DNS -> DNS Server to open the DNS server configuration page. By default, the
DNS server is set to automatically accept the DNS server assigned by ISP. If your ISP specifies certain DNS
server addresses, uncheck Enable Automatic Assigned DNS checkbox and type the DNS addresses into
the Primary DNS server box and Secondary DNS server box (if any). Click Save to save the settings.
Setting up dynamic DNS
Hosts using dynamic IP addresses can associate with a domain name via Dynamic DNS (DDNS). To use
DDNS function, you need to first register at a dynamic DNS service provider, such as DDNS, to get a valid
account.