
User's Manual
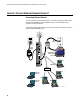


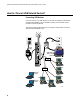
Table Of Contents
- WebSTAR DPR2320 and EPR2320 Gateway Cable Modems User's Guide, Software Release v2.0.1 r1132
- WebSTAR DPR2320 and EPR2320 Gateway Cable Modems User's Guide
- WebSTAR™ DPR2320™ and EPR2320™ Gateway Cable Modems User’s Guide Introduction
- In This Guide
- IMPORTANT RULES FOR SAFE OPERATION
- What’s In the Carton?
- Front Panel Description
- Back Panel Description
- Where is the Best Location for My Gateway Cable Modem?
- What are the System Requirements for Internet Service?
- How Do I Set Up My High-Speed Internet Access Account?
- How Do I Connect My Devices to Use the Internet?
- How Do I Configure TCP/IP Protocol?
- How Do I Install USB Drivers?
- How Do I Troubleshoot My Internet Service Installation?
- What are the Requirements for Ethernet Network Devices?
- How Do I Select and Place Ethernet Network Devices?
- How Do I Connect Ethernet Network Devices?
- What are the Requirements for USB Network Devices?
- How Do I Select and Place USB Network Devices?
- How Do I Connect USB Network Devices?
- What are the Requirements for Wireless Network Devices?
- How Do I Select and Place Wireless Network Devices?
- How Do I Install Wireless Network Devices?
- How Do I Configure the Gateway Cable Modems?
- Having Difficulty?
- Tips for Improved Performance
- How Do I Renew the IP Address on My PC?
- Front Panel Status Indicator Functions
- Notices
- FCC Compliance
- For Information
How Do I Connect Ethernet Network Devices?
23
To connect Ethernet devices
Read the warnings and caution on this page. Then, follow the subsequent
installation procedures to ensure proper gateway cable modem operation when
connecting Ethernet network devices.
1. Select locations for Ethernet network devices. For more information, see
How Do I Select and Place Ethernet Network Devices, earlier in this
guide.
2. Connect an Ethernet port on the gateway cable modem to your PC.
3. Connect additional Ethernet network devices using the other Ethernet
ports on the gateway cable modem, or by connecting an Ethernet hub or
router to the gateway cable modem.
4.
Connect the active RF coaxial cable to the CABLE connector on the back
of the gateway cable modem. Use an optional cable signal splitter to add
a TV, a DHCT or set-top converter, or a VCR.
5. After all connections are complete, insert the AC power adapter cord into
the DC POWER connector on the back of the gateway cable modem, and
then plug the power adapter into an AC power source.
6. The gateway cable modem begins an automatic search to locate and
sign on to the network. In some unusual circumstances, this process may
take up to 5 minutes. The gateway cable modem is ready for use when
the CABLE status indicator on the front panel stops blinking and
illuminates continuously.
7. Verify that all Ethernet network devices are working properly.
You will not be able to check the Ethernet front panel status
indicators on the gateway cable modem until after two or more Ethernet
network devices are connected to the gateway cable modem.
WARNING:
• Hazardous electrical
voltages can be
present on any
connected wiring.
Ethernet wiring and
connections must be
properly insulated to
prevent electrical
shock. Disconnect
power from the
gateway cable
modem before
attempting to
connect to any
device.
• To avoid personal
injury, follow these
steps in the exact
order shown.
CAUTION:
To prevent possible
damage to the
equipment, disconnect
any other service
before connecting
your gateway cable
modem to other
devices.