
User's Manual
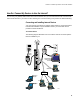


Table Of Contents
- WebSTAR DPR2320 and EPR2320 Gateway Cable Modems User's Guide, Software Release v2.0.1 r1132
- WebSTAR DPR2320 and EPR2320 Gateway Cable Modems User's Guide
- WebSTAR™ DPR2320™ and EPR2320™ Gateway Cable Modems User’s Guide Introduction
- In This Guide
- IMPORTANT RULES FOR SAFE OPERATION
- What’s In the Carton?
- Front Panel Description
- Back Panel Description
- Where is the Best Location for My Gateway Cable Modem?
- What are the System Requirements for Internet Service?
- How Do I Set Up My High-Speed Internet Access Account?
- How Do I Connect My Devices to Use the Internet?
- How Do I Configure TCP/IP Protocol?
- How Do I Install USB Drivers?
- How Do I Troubleshoot My Internet Service Installation?
- What are the Requirements for Ethernet Network Devices?
- How Do I Select and Place Ethernet Network Devices?
- How Do I Connect Ethernet Network Devices?
- What are the Requirements for USB Network Devices?
- How Do I Select and Place USB Network Devices?
- How Do I Connect USB Network Devices?
- What are the Requirements for Wireless Network Devices?
- How Do I Select and Place Wireless Network Devices?
- How Do I Install Wireless Network Devices?
- How Do I Configure the Gateway Cable Modems?
- Having Difficulty?
- Tips for Improved Performance
- How Do I Renew the IP Address on My PC?
- Front Panel Status Indicator Functions
- Notices
- FCC Compliance
- For Information
WebSTAR DPR2320 and EPR2320 Gateway Cable Modems User’s Guide
14
To configure Windows 2000 systems
1.
Click Start, select Settings, and choose Network and Dial-up
Connections.
2.
Double-click the Local Area Connection icon in the Network and Dial-up
Connections window.
3.
Click Properties in the Local Area Connection Status window.
4.
Click Internet Protocol (TCP/IP) in the Local Area Connection Properties
window, and then click Properties.
5.
Select both Obtain an IP address automatically and Obtain DNS
server address automatically in the Internet Protocol (TCP/IP)
Properties window, and then click OK.
6.
Click Yes to restart your computer when the Local Network window
opens. The computer restarts. The TCP/IP protocol is now configured on
your PC and your Ethernet devices are ready for use.
7. Try to access the Internet. If you cannot access the Internet, go to
Having Difficulty, later in this guide. If you still cannot access the
Internet, contact your cable service provider for further assistance.
To configure Windows XP systems
1.
Click Start, select Connect to, and choose Show all connections.
2.
Double-click the Local Area Connection icon in the LAN or High-Speed
Internet section of the Network Connections window.
3.
Click Properties in the Local Area Connection Status window.
4.
Click Internet Protocol (TCP/IP), and then click Properties in the Local
Area Connection Properties window.
5.
Select both Obtain an IP address automatically and Obtain DNS
server address automatically in the Internet Protocol (TCP/IP)
Properties window, and then click OK.
6.
Click Yes to restart your computer when the Local Network window
opens. The computer restarts. The TCP/IP protocol is now configured on
your PC and your Ethernet devices are ready for use.
7. Try to access the Internet. If you cannot access the Internet, go to
Having Difficulty, later in this guide. If you still cannot access the
Internet, contact your cable service provider for further assistance.