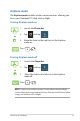
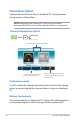
Airplane mode The Airplane mode disables wireless communication, allowing you to use your Notebook PC safely while in-light. Turning Airplane mode on or 1. Launch the Charm bar. 2. Tap 3. Move the slider to the right to turn the Airplane mode on. Press and tap . . Turning Airplane mode of or 1. Launch the Charm bar. 2. Tap 3. Move the slider to the left to turn the Airplane mode of. Press and tap . .
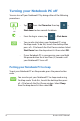
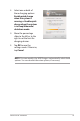
Turning your Notebook PC off You can turn of your Notebook PC by doing either of the following procedures: • Tap from the Charm bar then tap > Shut down to do a normal shutdown. or • From the log-in screen, tap > Shut down. • You can also shut down your Notebook PC using Desktop mode. To do this, launch the desktop then press alt + f4 to launch the Shut Down window. Select Shut Down from the drop-down list then select OK.
Chapter 4: ASUS apps Notebook PC E-Manual 53
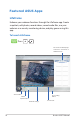
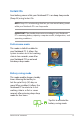
Featured ASUS Apps LifeFrame Enhance your webcam functions through the LifeFrame app. Create snapshots, edit photos, record videos, record audio iles, use your webcam as a security monitoring device, and play games using this app. To launch LifeFrame Press . The archive toolbar displays a function's saved files in thumbnail view.
LifeFrame functions Camera Use this function to take pictures using your webcam. Camcorder Use this function to take videos through your webcam. Monitor This function lets you use your webcam as a security video monitor as it automatically detects movement then captures it on photo. Voice Recorder Use this function to record audio iles in your Notebook PC. Game This function lets you play games using the webcam.
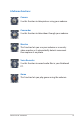
Power4Gear Hybrid Optimize the performance of your Notebook PC using the power saving modes in Power4Gear. NOTE: Unplugging the Notebook PC from its power adapter automatically switches Power4Gear Hybrid to Battery Saving mode. To launch Power4Gear Hybrid Press . Select from these power saving modes. Use these options to customize your power saving mode. Allows you to hide the desktop icons onscreen and turns the presentation mode on or of.
Instant On Save battery power while your Notebook PC is on deep sleep mode (Deep S3) using Instant On. NOTE: Deep S3 is a technology that lets you save more battery power while your Notebook PC is on sleep mode. IMPORTANT! The standby time varies according to your Notebook PC's remaining battery capacity, computer model, coniguration, and operating conditions. Performance mode This mode is default-enabled in your Notebook PC.
USB Charger+ USB Charger+ allows you to quick-charge mobile devices via your Notebook PC’s USB charge port. This feature can also be used even while your Notebook PC is on sleep, hibernate, or shutdown mode (available on selected models only). NOTE: USB Charger+ is available in your USB 3.0 charge port with the icon. WARNING: If your connected device overheats, remove it immediately.
3. Select one or both of these charging options: Enable quick charge when the system is running or Enable quick charge when the system is in sleep/hibernate/ shutdown mode. 4. Move the percentage slider to the left or to the right to set the limit for charging devices. 5. Tap OK to save the settings made. Otherwise, tap Cancel. NOTE: On some models, the USB Charger+ automatically selects both options. You can deselect these two options, if necessary.
60 Notebook PC E-Manual
Chapter 5: Power-on Self Test (POST) Notebook PC E-Manual 61
The Power-on Self Test (POST) The Power-on Self Test (POST) is a series of software-controlled diagnostic tests that run when you turn on or restart your Notebook PC. The software that controls the POST is installed as a permanent part of the Notebook PC’s architecture. Using POST to access BIOS and Troubleshoot During POST, you can access the BIOS settings or run troubleshooting options using the function keys of your Notebook PC. You may refer to the following information for more details.
BIOS Settings NOTE: The BIOS screens in this section are for reference only. The actual screens may difer by model and territory. Boot This menu allows you to set your boot option priorities. You may refer to the following procedures when setting your boot priority. 1. On the Boot screen, select Boot Option #1. Main Aptio Setup Utility - Copyright (C) 2012 American Megatrends, Inc.
Security This menu allows you to set up the administrator and user password of your Notebook PC. It also allows you to control the access to your Notebook PC’s hard disk drive, input/output (I/O) interface, and USB interface. NOTE: Main • If you install a User Password, you will be prompted to input this before entering your Notebook PC's operating system. • If you install an Administrator Password, you will be prompted to input this before entering BIOS.
To clear the password: 1. On the Security screen, select Administrator Password or User Password. 2. Type in the current password then press 3. Leave the Create New Password ield blank then press . . 4. . Select Yes in the conirmation box then press I/O Interface Security In the Security menu, you can access I/O Interface Security to lock or unlock some interface functions of your Notebook PC. Aptio Setup Utility - Copyright (C) 2012 American Megatrends, Inc.
USB Interface Security Through the I/O Interface Security menu, you can also access USB Interface Security to lock or unlock ports and devices. Aptio Setup Utility - Copyright (C) 2012 American Megatrends, Inc. Security USB Interface Security USB Interface [UnLock] External Ports CMOS Camera Card Reader If LOCKED, all USB devices will be disabled [UnLock] [UnLock] [UnLock] USB Interface Lock UnLock →← : : ↑↓ Enter: +/— : F1 : F9 : F10 : ESC : Select Screen Select Item Select Change Opt.
Set Master Password In the Security menu, you can use Set Master Password to set up a password-enabled access to your hard disk drive. Aptio Setup Utility - Copyright (C) 2012 American Megatrends, Inc. Aptio Setup Utility - Copyright (C) 2011 American Megatrends, Inc. Main Advance Boot Security Save & Exit Password Description Set HDD Master Password. If ONLY the Administrator’s password is set,then this only limits access to Setup and is only asked ***Advisable to Power for when entering Setup.
Save & Exit To keep your coniguration settings, select Save Changes and Exit before exiting the BIOS. Aptio Setup Utility - Copyright (C) 2012 American Megatrends, Inc. Save & Exit Main Advance Boot Security Save Changes and Exit Exit system setup after saving the changes.
Main Aptio Setup Utility - Copyright (C) 2012 American Megatrends, Inc. Aptio Setup Utility - Copyright (C) 2011 American Megatrends, Inc. Advance Boot Security Save & Exit POST Logo Type Start Easy Flash Play POST Sound Speaker Volume Internal Pointing Device Wake On Lid Open Power Off Energy Saving Legacy USB Support USB 3.
Troubleshoot By pressing during POST, you can access Windows® 8 troubleshoot options which includes the following: • Refresh your PC • Reset your PC • Advanced options Refresh your PC Use Refresh your PC if you want to refresh your system without losing your current iles and applications. To access this during POST: or 1. Restart your Notebook PC then press during 2. POST. Wait for Windows® to load the Choose an option screen then tap Troubleshoot. 3. Tap Refresh your PC. 4.
Reset your PC IMPORTANT! Back up all your data before performing this option. Use Reset your PC to restore your Notebook PC to its default settings. To access this during POST: or 1. Restart your Notebook PC then press during 2. POST. Wait for Windows® to load the Choose an option screen then tap Troubleshoot. 3. Tap Reset your PC. 4. In the Reset your PC screen, read the bullet points to learn more about using this option then tap Next. 5.
Advanced options Use Advanced options to perform additional troubleshooting options in your Notebook PC. To access this during POST: or 1. Restart your Notebook PC then press during 2. POST. Wait for Windows® to load the Choose an option screen then tap Troubleshoot. 3. Tap Advanced options. 4. In the Advanced options screen, select the troubleshooting option you wish to perform. 5. Follow the succeeding steps to complete the process.
4. In the Advanced options screen, select System Image Recovery. 5. Choose an account you would like to recover using a system image ile. 6. Type your account password then tap Continue. 7. Select Use the latest available system image (recommended), then tap Next. You can also choose Select a system image if your system image is in an external device or DVD. 8. Follow the succeeding steps to complete the system image recovery procedure.
74 Notebook PC E-Manual
Appendices Notebook PC E-Manual 75
DVD-ROM Drive Information (on selected models) The DVD-ROM drive allows you to view and create your own CDs and DVDs. You can purchase an optional DVD viewer software to view DVD titles. Regional Playback Information Playback of DVD movie titles involves decoding MPEG2 video, digital AC3 audio and decryption of CSS protected content.
Region Deinitions Region 1 Canada, US, US Territories Region 2 Czech, Egypt, Finland, France, Germany, Gulf States, Hungary, Iceland, Iran, Iraq, Ireland, Italy, Japan, Netherlands, Norway, Poland, Portugal, Saudi Arabia, Scotland, South Africa, Spain, Sweden, Switzerland, Syria, Turkey, UK, Greece, Former Yugoslav Republics, Slovakia Region 3 Burma, Indonesia, South Korea, Malaysia, Philippines, Singapore, Taiwan, Thailand, Vietnam Region 4 Australia, Caribbean (Except US Territories), Central America, New
Blu-ray ROM Drive Information (on selected models) The Blu-ray ROM Drive allows you to view high deinition (HD) videos and other disc ile formats such as DVDs and CDs. Region Deinitions Region A North, Central and South American countries, and their territories; Taiwan, Hong Kong, Macao, Japan, Korea (South and North), South East Asian countries and their territories. Region B European, African, and South West Asian countries and their territories; Australia and New Zealand.
Internal Modem Compliancy The Notebook PC with internal modem model complies with JATE (Japan), FCC (US, Canada, Korea, Taiwan), and CTR21. The internal modem has been approved in accordance with Council Decision 98/482/EC for pan-European single terminal connection to the public switched telephone network (PSTN).
Network Compatibility Declaration Statement to be made by the manufacturer to the user: “This declaration will indicate the networks with which the equipment is designed to work and any notiied networks with which the equipment may have inter-working diiculties. The manufacturer shall also associate a statement to make it clear where network compatibility is dependent on physical and software switch settings.
This table shows the countries currently under the CTR21 standard.
This information was copied from CETECOM and is supplied without liability. For updates to this table, you may visit http://www.cetecom. de/technologies/ctr_21.html 1 National requirements will apply only if the equipment may use pulse dialling (manufacturers may state in the user guide that the equipment is only intended to support DTMF signalling, which would make any additional testing superluous). In The Netherlands additional testing is required for series connection and caller ID facilities.
• Connect the equipment into an outlet on a circuit diferent from that to which the receiver is connected. • Consult the dealer or an experienced radio/TV technician for help. WARNING! The use of a shielded-type power cord is required in order to meet FCC emission limits and to prevent interference to the nearby radio and television reception. It is essential that only the supplied power cord be used. Use only shielded cables to connect I/O devices to this equipment.
RF Exposure Information (SAR) This device meets the government’s requirements for exposure to radio waves. This device is designed and manufactured not to exceed the emission limits for exposure to radio frequency (RF) energy set by the Federal Communications Commission of the U.S. Government. The exposure standard employs a unit of measurement known as the Speciic Absorption Rate, or SAR. The SAR limit set by the FCC is 1.6 W/kg.
FCC Radio Frequency (RF) Exposure Caution Statement WARNING! Any changes or modiications not expressly approved by the party responsible for compliance could void the user’s authority to operate this equipment. “The manufacture declares that this device is limited to Channels 1 through 11 in the 2.4GHz frequency by speciied irmware controlled in the USA.” This equipment complies with FCC radiation exposure limits set forth for an uncontrolled environment.
CE Marking CE marking for devices without wireless LAN/Bluetooth The shipped version of this device complies with the requirements of the EEC directives 2004/108/EC “Electromagnetic compatibility” and 2006/95/EC “Low voltage directive”. CE marking for devices with wireless LAN/ Bluetooth This equipment complies with the requirements of Directive 1999/5/ EC of the European Parliament and Commission from 9 March, 1999 governing Radio and Telecommunications Equipment and mutual recognition of conformity.
Déclaration d’Industrie Canada relative à l’ exposition aux ondes radio Cet appareil est conforme aux limites d’exposition aux radiations d’ Industrie Canada déinies pour un environnement non-contrôlé. Pour maintenir la conformité avec les exigences d’exposition RF d’IC, veuillez éviter tout contact direct avec l’antenne pendant l’ émission. Les utilisateurs inaux doivent suivre les instructions de fonctionnement spéciiques pour satisfaire la conformité aux expositions RF.
Wireless Operation Channel for Diferent Domains N. America 2.412-2.462 GHz Ch01 through CH11 Japan 2.412-2.484 GHz Ch01 through Ch14 Europe ETSI 2.412-2.472 GHz Ch01 through Ch13 France Restricted Wireless Frequency Bands Some areas of France have a restricted frequency band. The worst case maximum authorized power indoors are: • 10mW for the entire 2.4 GHz band (2400 MHz–2483.5 MHz) • 100mW for frequencies between 2446.5 MHz and 2483.
Departments in which the use of the 2400–2483.
UL Safety Notices Required for UL 1459 covering telecommunications (telephone) equipment intended to be electrically connected to a telecommunication network that has an operating voltage to ground that does not exceed 200V peak, 300V peak-to-peak, and 105V rms, and installed or used in accordance with the National Electrical Code (NFPA 70).
Power Safety Requirement Products with electrical current ratings up to 6A and weighing more than 3Kg must use approved power cords greater than or equal to: H05VV-F, 3G, 0.75mm2 or H05VV-F, 2G, 0.75mm2. TV Tuner Notices Note to CATV System Installer—Cable distribution system should be grounded (earthed) in accordance with ANSI/NFPA 70, the National Electrical Code (NEC), in particular Section 820.
VORSICHT! Explosionsgefahr bei unsachgemäßen Austausch der Batterie. Ersatz nur durch denselben oder einem vom Hersteller empfohlenem ähnlichen Typ. Entsorgung gebrauchter Batterien nach Angaben des Herstellers. (German) ADVARSELI! Lithiumbatteri - Eksplosionsfare ved fejlagtig håndtering. Udskiftning må kun ske med batteri af samme fabrikat og type. Levér det brugte batteri tilbage til leverandøren. (Danish) VARNING! Explosionsfara vid felaktigt batteribyte.
Optical Drive Safety Information Laser Safety Information CD-ROM Drive Safety Warning CLASS 1 LASER PRODUCT WARNING! To prevent exposure to the optical drive’s laser, do not attempt to disassemble or repair the optical drive by yourself. For your safety, contact a professional technician for assistance. Service warning label WARNING! INVISIBLE LASER RADIATION WHEN OPEN. DO NOT STARE INTO BEAM OR VIEW DIRECTLY WITH OPTICAL INSTRUMENTS.
CTR 21 Approval (for Notebook PC with built-in Modem) Danish Dutch English Finnish French German Greek Italian Portuguese 94 Notebook PC E-Manual
Spanish Swedish ENERGY STAR complied product ENERGY STAR is a joint program of the U.S. Environmental Protection Agency and the U.S. Department of Energy helping us all save money and protect the environment through energy eicient products and practices. All ASUS products with the ENERGY STAR logo comply with the ENERGY STAR standard, and the power management feature is enabled by default. The monitor and computer are automatically set to sleep after 15 and 30 minutes of user inactivity.
European Union Eco-label This Notebook PC has been awarded the EU Flower label, which means that this product has the following characteristics: 1. Decreased energy consumption during use and stand-by modes. 2. Limited use of toxic heavy metals. 3. Limited use of substances harmful to the environment and health. 4. Reduction of the use of natural resources by encouraging recycling. 5.
Global Environmental Regulation Compliance and Declaration ASUS follows the green design concept to design and manufacture our products, and makes sure that each stage of the product life cycle of ASUS product is in line with global environmental regulations. In addition, ASUS disclose the relevant information based on regulation requirements. Please refer to http://csr.asus.com/english/Compliance.
EC Declaration of Conformity We, the undersigned, Manufacturer: ASUSTeK COMPUTER INC. Address, City: 4F, No. 150, LI-TE Rd., PEITOU, TAIPEI 112, TAIWAN R.O.C. Country: TAIWAN Authorized representative in Europe: ASUS COMPUTER GmbH Address, City: HARKORT STR.