GSM/GPRS CF+ Card User’s manual
FCC RF EXPOSURE INFORMATION Read this information before using your handset In August 1996 the Federal Communication Commission (FCC) of the United States with its action in Report and Order FCC 96-326 adopted an updated safety standard for human exposure to radio frequency (RF) electromagnetic energy emitted by FCC regulated transmitters. Those guidelines are consistent with the safety standard previously set by both U.S and international standards bodies.
Copyright No part of this manual, including the products and software described in it, may be reproduced, transmitted, transcribed, stored in a retrieval system, or translated into any language in any form or by any means, except documentation kept by the purchaser for backup purposes, without the express written permission of the MANUFACTURER.
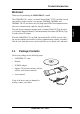
Contents Safety instructions ........................................................................... iv Chapter 1 Product introduction ............................................... 1-1 Welcome! ............................................................................... 1-1 1.1 Package Contents ...................................................... 1-1 1.2 Specifications ............................................................. 1-2 1.3 CF card parts .............................................
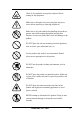
Safety instructions Use of radio equipment is prohibited in hospitals. DO NOT use the GSM/GPRS CF card phone or online network features in hospitals to avoid interference with medical equipment. Most airlines have restrictions on using electronic devices. DO NOT use the GSM/GPRS CF card while on an airplane, especially during take off and landing, to avoid interference with normal operation of aviation instruments. use the GSM/GPRS CF card while at any gas station.
Check if all peripherals are properly connected before turning on any equipment. Make sure to disconnect the power plug from the power source before installing or removing peripherals. Make sure to dry your hands before handling the product to prevent water from seeping through the internal parts. Droplets of water may cause short circuit and damage to the product. DO NOT place the unit near steaming electrical appliances, such as electric pots and thermal jars, etc.
Notes vi GSM/GPRS CF+ Card
Product Introduction Welcome! Thank you for purchasing the GSM/GPRS CF+ card! The GSM/GPRS CF+ card is a tri-band CompactFlash® (CF™) card that extends your mobility in the world as it can operate at 900MHz, 1800MHz, and 1900MHz. The CF card allows not only high-speed GPRS data transmission but also voice communication capability through a headset.
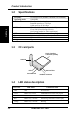
Product Introduction 1.2 Specifications Frequency Operating modes GPRS mode GSM mode Chapter 1 LED Power Dimensions Weight 1.3 Tri-band operation (900MHz, 1800MHz, and 1900MHz) GSM/GPRS Class B, multi-slot class 10 Downlink speed up to 57.6 Kbps Uplink speed up to 28.8 Kbps Upload and download speeds up to 9.6 Kbps 2-way SMS (Short Message Service) Voice (using headset for audio input/output) Tri-color LED indicates network status 3.3V for both PCMCIA and CompactFlash® slots 65.9mm x 45.2mm x 10.
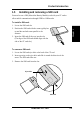
Product Introduction 1.5 Installing and removing a SIM card You need to use a SIM (Subscriber Identity Module) card with your CF card to allow mobile communication through GPRS or GSM modes. To install a SIM card: 1. Locate the SIM card slot. Chapter 1 2. Position the SIM card with the contact gold plate up and the notched corner parallel to the antenna. 3. Insert the SIM card all the way into the slot. (The edge of the SIM card should align with the side of the CF card slot.) To remove a SIM card: 1.
Product Introduction 1.6 Connecting to a PCMCIA adapter The PCMCIA card adapter included in the product package fits in any PC equipped with a Personal Computer Memory Card International Association (PCMCIA) Type II socket. To connect the CF card to a PCMCIA adapter: 1. Position the CF card and the PCMCIA adapter as shown. Chapter 1 DO NOT flip up the CF card antenna at this time to avoid breaking the hinge. 2. Slide the side grooves of the CF card to the rails of the adapter.
Product Introduction 1.7 Installing to a notebook PC To install the CF card to your notebook PC: 1. Insert the CF card to the PCMCIA adapter. See section “1.6 Connecting to a PCMCIA adapter” for instructions. 1 2 Chapter 1 Always connect the CF card to the PCMCIA adapter before installing into a notebook PC. 2. Install the card into a Type II PCMCIA slot of your notebook PC. 3. Flip up the antenna perpendicular to the card. 1.8 3 Installing to a PDA To install the CF card to your PDA: 1.
Product Introduction 1.9 Connecting a headset To make or receive voice calls, you need to connect the headset to the connector on the side of the CF card. The headset that came with your card package includes an ON/OFF switch. Press the switch to answer a voice call. Press the switch again to terminate a call.
Notebook PC installation 2.1 System requirements Before using your GSM/GPRS CF+ card, make sure that your notebook PC has the following: • Pentium® II 233MHz (or faster) CPU Type II PC card slot Microsoft® Windows® 98/ME/2000/XP operating system a hard disk drive with at least 20MB free space at least 32MB system memory for Windows 98/ME or at least 64MB for Windows 2000/XP GPRS/Fax option (included in the subcription contract with your SIM card operator) 2.2 Driver installation 2.2.
Notebook PC installation 2.2.2 Windows 98/ME driver installation Make sure to insert the GSM/GPRS CF+ card into the card slot before installing the driver. Chapter 2 1. Turn on your notebook PC. The Add New Hardware Wizard appears to guide you through the installation. Click Next. 2. Select Search for the best driver for your device (Recommended). Click Next. 3. Check Specify a location. Insert the support CD and click Browse to select the path E:\Driver. 4. Click Next. 4.
Notebook PC installation 2.3 Installing mobile PhoneTools To install mobile PhoneTools: 1. Make sure that that GSM/GPRS CF+ card is installed in the card slot of your notebook PC. Chapter 2 2. Insert the support CD into the CD-ROM drive. The mobile PhoneTools setup program is automatically launched if Autorun is enabled in your PC. If the setup program did not start automatically, follow these steps: a. Select the Run command from the Start menu on the taskbar. b.
Notebook PC installation mobile PhoneTools installation process 2. Select your desired language from the list that appears. 3. Click on Install the application. 4. Click Install mobile PhoneTools. 5. The mobile PhoneTools setup screen appears. Click Next to continue the installation. 6. Read the license agreement, then click Yes. Chapter 2 1. Launch the installation wizard. (See step 2 on the previous page.
Notebook PC installation 8. Specify the destination folder for the PhoneTools files. Click Next. 9. If you have previously installed mobile PhoneTools, you will be asked if you want to keep the documents (files) from the previous version. Click Yes to keep, or No to erase files from the previous version. 10. Specify the program folder where Setup will add the PhoneTools program icons. Click Next. 11. Review your settings then click Next to start copying the program files.
Notebook PC installation 14. Check the item Yes, I want to restart my computer now. Click Finish to complete Setup and restart your computer. 15. After you have restarted your computer, run the mobile PhoneTools. From your Windows desktop, click Start then Programs. Select mobile PhoneTools to specify your location, and phone and modem information. 16. Type in the required information, then click OK when done. Chapter 2 13. Specify the phonebook that you wish to use with mobile PhoneTools.
Notebook PC installation 2.4 mobile PhoneTools functions Make sure that you have inserted a SIM card into the GSM/GPRS CF card if you wish to make a call or connect to the Internet. See section “1.5 Installing and removing a SIM card” for instructions.
Notebook PC installation 2.5 Creating a GPRS connection 2. Double-click the Add New GPRS Connection icon. 3. Click Next. 4. Select Create a new connection. Click Next. Chapter 2 1. Click the Menu button. From the pop-up menu, click Setup then select Internet connections...
Notebook PC installation 6. Select the type of connection that you wish to set up. Click Next. 7. Enter the access point name (APN) provided by your operator. Click Next. 8. Enter the IP address provided by your operator. Click Next. 9. Set your network access configuration based on the information provided by your operator. Click Next. 10. Click Next. Chapter 2 5. Type a name for your connection. Select the country where you are located and your operator (service provider). Click Next.
Notebook PC installation 12. When prompted to create a fallback connection, select No. 13. Click Finish when done creating a GPRS connection. 14. The GPRS connection icon appears on the window. Doubleclick the icon whenever you wish to connect to the network. Chapter 2 11. Click Next.
Pocket PC installation 3.1 System requirements Before using your GSM/GPRS CF+ card, make sure that you have the following: • • A PDA (Pocket PC) with at least 6MB free space, a Type II CF card slot, and a Pocket PC 2002 operating system A computer with Windows® 98/ME/2000/XP operating system 3.2 Installing pocket PhoneTools Chapter 3 Make sure that you have installed ActiveSync® on your computer before installing pocket PhoneTools.
Pocket PC installation pocket PhoneTools installation process Chapter 3 3-2 1. Launch the installation wizard. (See step 2 on the previous page.) 2. Select your desired language from the list that appears. 3. Click on Install the application. 4. Click Install pocket PhoneTools. 5. The pocket PhoneTools setup screen appears. Click Next to continue the installation. 6. Read the license agreement, then click Yes.
7. Specify the destination folder for the PhoneTools files. Click Next. 8. Wait while Setup copies and installs the program files. The screen shows the setup status. Click Cancel if you wish to stop the installation. 9. The screen shows your computer establishing a connection to your mobile device. Click Cancel if you wish to stop the process. 10. When prompted, click Yes to use the default BVRP Software pocket PhoneTools directory, or click No if you wish to install the files to another directory. 11.
Pocket PC installation 13. When the installation is complete, the pocket PhoneTools icon appears in the Programs menu of your mobile device. Proceed to the next section to run and configure pocket PhoneTools.
Pocket PC installation 3.3 Running pocket PhoneTools 2. Tap Yes when prompted to select a network operator. 3. Type the required operator settings. Tap OK. 4. Tap OK. Chapter 3 1. From the Programs window, tap the pocket PhoneTools icon.
Pocket PC installation 5. When prompted, tap Yes to save your changes. 6. After saving your changes, the pocket PhoneTools interface appears. Proceed to the next section for information on the pocket PhoneTools functions. Chapter 3 To connect to a network, proceed to section “3.5 Creating a GPRS connection.
Pocket PC installation 3.4 pocket PhoneTools functions 3.4.
Pocket PC installation 3.4.2 Dialer menu To launch the Dialer menu, simply tap the Dialer... icon on the main menu toolbar.
Pocket PC installation 3.5 Creating a GPRS connection 2. From the General Setup screen, tap Internet Connection. Chapter 3 1. From the PhoneTools taskbar, tap Tools then Settings. 3. Tap New... to create a connection. 4. Type a name for your connection then tap Next.
Pocket PC installation 5. Check the box beside Internet Explorer. Tap Next. 6. Select GPRS for the network to use. Tap Next. Chapter 3 7. Enter the access point name 8. Configure your IP address based (APN) provided by your operator. on the information provided by Tap Next. your operator. Tap Next.
Pocket PC installation 10. Tap Next. 11. Tap Next. 12. Select No when prompted to create a fall-back connection. Tap Next. Chapter 3 9. Configure your DNS addresses based on the information provided by your operator. Tap Next.
Pocket PC installation 14. Tap the OK to go to the pocket PhoneTools main menu. 15. Tap the Internet connection icon to start connecting to a network. 16. Tap the network connection icon on the taskbar to display the connection status. Chapter 3 13. The new connection you created My Connection is added to the list. Tap OK to close the window and return to the General Setup menu.