Zhone Bonded Channel User Manual Version 1.
FCC Warning Statement This device complies with Part 15 of the FCC Rules. Operation is subject to the following two conditions: (1) this device may not cause harmful interference, and (2) this device must accept any interference received, including interference that may cause undesired operation. This equipment has been tested and found to comply with the limits for a class B digital device, pursuant to part 15 of the FCC Rules.
Table of Contents GENERAL INFORMATION .......................................................................... 4 Package Contents ........................................................................ 4 Important Safety Instructions.......................................................... 4 Front Panel View ......................................................................... 5 Back Panel View .......................................................................... 6 INSTALLING THE ROUTER .......
Tone Settings.........................................................................50 Port Mapping.............................................................................51 WIRELESS .......................................................................................53 Basic.......................................................................................53 Security ...................................................................................53 MAC Filter ...............................
General Information The Bonded Channel features 4 LAN ports and wireless ability. Package Contents The package includes one of each of the following items— • • • • • • Bonded Channel 12 VDC 1.5 A power adapter RJ-11 telephone cable RJ-45 Ethernet cable External antenna User Manual / Quick Guide Important Safety Instructions • Place your device on a flat surface close to the cables in a location with sufficient ventilation.
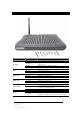
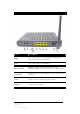
Front Panel View LED Internet AP DSL2 ACT DSL1 ACT LAN1-LAN4 Power Mode Definition Solid (green) IP is connected and no traffic detected. Modem is in bridged mode or ADSL connection not present. Connected and traffic is present. Device attempted to connect to IP and failed. Wireless is enabled. Wireless is disabled. There is wireless traffic. ADSL is connected, and there is no ADSL traffic. ADSL is not connected. There is ADSL traffic. ADSL is connected, and there is no ADSL traffic.
Back Panel View Port Description Phone RJ-11 cable connects to telephone (no external splitter necessary; unit has internal splitter). Line RJ-11 cable connects the ADSL line. Reset / Default Restart—press the button for less than 5 seconds. Default settings—press the button for 5 seconds or longer. LAN1-LAN4 RJ-45 connects the unit to Ethernet devices such as a PC or a switch. Power Connects to the 12 VDC 1.5 A power adapter.
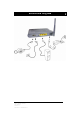
Installing the Router Connect the ADSL Line and Telephone Connect one end of an RJ-11 cable from your ADSL connection and the other end to the LINE port of the router. Use a second RJ-11 cable to connect between a telephone and the PHONE port of the router. Connect the PC to the Router Use the Ethernet cable to connect your computer directly to the router.
Installation Diagram 8 Zhone Bonded Channel User Manual Version 1.
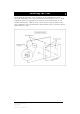
Mounting the Unit The bonded channel unit can be mounted on the wall with the screws provided. Mounting can be done on wall material including concrete, wood, or drywall. Select an appropriate location free from obstructions or any possible interference. Make sure the cables can be easily attached to the router without strain. The illustration below shows how to mount the device horizontally on a wall. 9 Zhone Bonded Channel User Manual Version 1.
Configuring Your Computer Prior to accessing the router through the LAN port, note the following necessary configurations— • Your PC’s TCP/IP address: 192.168.1.__( the last number is any number between 2 and 254) • The router’s default IP address: 192.168.1.1 • Subnet mask: 255.255.255.0 Below are the procedures for configuring your computer. Follow the instructions for the operating system that you are using. Windows 2000 1.
11. Click on OK twice to save your changes and then close the Control Panel. Windows XP 1. In the Windows taskbar, click on the Start button and point to Settings and then click Network Connections. 2. In the Network Connections window, right click on the Local Area Connection icon and click on properties. 3. Listed in the Local Area Connection window are the installed network components. Make sure the box for Internet Protocol (TCP/IP) is checked and then click on Properties. 4.
Log in to the Router This section explains how to log in to your router using the following steps— 1. Launch your web browser. 2. Enter the URL http://192.168.1.1 in the address bar and click on Enter. A login screen like the one below will be displayed after you connect to the user interface. 3. Enter your user name and password, and then click on OK to display the user interface.
Device Info This section describes the system information that can be accessed using the menu items under Device Info. In addition to general device information, the following items can also be seen—WAN, Statistics, Route, ARP and DHCP. Summary To access information on the device and connection status, click on Summary under Device Info.
WAN To access WAN Information click on the WAN item located under Device Info. The following information about each WAN connection is provided— VPI/VCI Connection ID Category Service Name Interface Name Protocol IGMP (Internet Group Management Protocol) QoS (Quality of Service) State Status IP Address Note that this screen will be like the one below before a WAN connection is set up. The following screen shows a WAN connection that has been created. 14 Zhone Bonded Channel User Manual Version 1.
STATISTICS LAN Statistics To access LAN statistics click on the LAN item under Statistics. Information is given for each interface (Ethernet Bonding, Ethernet (Port 1-4) and Wireless). For both received and transmitted data, the following information is provided— Bytes Packets Errors Drops To renew the data, click on the Reset Statistics button below the table. WAN Statistics To access WAN statistics click on the WAN item under Statistics.
ATM Statistics To access ATM statistics click on the ATM item under Statistics. ATM statistics are organized into three areas— ATM Interface Statistics, AAL5 Interface Statistics, and AAL5 VCC Statistics. To view renewed values, click on the Reset Statistics button. 16 Zhone Bonded Channel User Manual Version 1.
ADSL Statistics To view ADSL statistics click on the ADSL item under Statistics. Information contained in this screen is useful for troubleshooting and diagnostics of connection problems. Click on the Reset Statistics button to view renewed values. ADSL BER Test A Bit Error Rate Test (BER Test) is a test that reflects the ratio of error bits to the total number transmitted.
Below is an ADSL BER Test result screen displaying information about the test including the error bits and ratio. 18 Zhone Bonded Channel User Manual Version 1.
Route To access the routing information, click on the Route item under Device Info. The following are the routing information provided— Destination Gateway Subnet Mask Flag Metric Service Interface ARP (Address Resolution Protocol) To access ARP status click on the ARP item under Device Info. The information provided shows the IP address that is mapped to the hardware IP address. 19 Zhone Bonded Channel User Manual Version 1.
DHCP (Dynamic Host Configuration Protocol) To access the DHCP lease information click on DHCP under Device Info. Devices that have been issued IP addresses by DHCP will be listed on this screen by its hostname, MAC address and IP address along with the expiration of the IP address. 20 Zhone Bonded Channel User Manual Version 1.
Quick Setup This section will explain how to quickly configure the router for the main purpose of connecting to the Internet. If you need to configure any advanced functions, then those can be performed in the advanced section. ATM PVC Configuration To enable the auto-connect process, click on the box labeled DSL Autoconnect, a process that will automatically detect the first usable PVC and automatically detect PPPoE, PPPoA, and Bridge Protocol (with DHCP Server available).
VPI and VCI numbers can be entered manually if you do not want to use DSL Auto-connect. Quality of service can also be enabled on this screen. Additionally, if you do not use DSL Auto-connect, then you will need to select the connection type and encapsulation mode from a list as shown below. 22 Zhone Bonded Channel User Manual Version 1.
The next screen to appear will depend on the connection type that was selected in the previous screen. In the next screen, decide whether or not NAT, firewall, IGMP multicast, and WAN service should be enabled. 23 Zhone Bonded Channel User Manual Version 1.
The following is the Device Setup screen where you enter the IP address / subnet mask as well as enable or disable DHCP server. If you have a second IP address and subnet mask for the LAN interface, click on the checkbox. The last screen under the Quick Start section allows you to set up the wireless feature on the router. 24 Zhone Bonded Channel User Manual Version 1.
When you click on Next, the summary screen shows the settings made under WAN setup. 25 Zhone Bonded Channel User Manual Version 1.
Advanced Setup This section of the user manual explains the advanced configurations of the CPE. The topics under Advanced Setup are WAN, LAN, NAT, security, routing, DNS, and DSL. WAN Configure the WAN settings according to the instructions given by your ISP. Each existing WAN connection will be listed in the table with the options to edit or remove them as well as to add new WAN connections. Remember to click on the Save / Reboot button after any changes made.
The ATM PVC Configuration screen allows you to configure an ATM PVC identifier (VPI and VCI) and select a service category. Verify the following values with your ISP before you change them. • • • VPI: Virtual Path Identifier. The valid range is 0 to 255. VCI: Virtual Channel Identifier. The valid range is 32 to 65535.
If you selected a PPP connection, then the next screen shows the PPP Username and Password section. The PPP username and password will have already been entered. For this example, the PPPoA Service Name “Test” has been chosen. Select an authentication method from the following choices— auto, PAP, CHAP, and MSCHAP. Dial on demand: If you select this box, then an additional Inactivity Timeout box will appear for you to enter the time in minutes.
The next screen allows you to configure NAT settings as well as enable IGMP multicast and WAN service. Bridge Example: To set up a bridge connection, from the following Connection Type Screen, select bridging as the connection type and select the preferred encapsulation mode and then click on Next. 29 Zhone Bonded Channel User Manual Version 1.
The next screen will be to select whether or not to enable bridge service and to enter the service name. To finish the bridge connection setup, click on Next and the summary of the connection will be displayed. 30 Zhone Bonded Channel User Manual Version 1.
When the settings are complete, the next screen shows a WAN Setup – Summary screen displaying the WAN configurations made. Below is the bridge connection WAN Setup Summary page. Click on the Save button when the settings are correct. The below screen will appear showing the WAN settings that you made. When satisfied with the settings, and no changes are necessary, click on the Finish button. To remove any settings, click on the Remove button. 31 Zhone Bonded Channel User Manual Version 1.
After selecting the Finish button, the below screen will appear. At this point, the router will reboot to save the changes made. LAN Local Area Network (LAN) Setup You can configure the DSL Router IP address and Subnet Mask for the LAN interface to correspond your LAN’s IP Subnet.
NAT Enable NAT (Network Address Translation) to configure the Virtual Server, Port Triggering, and DMZ Host. Virtual Servers A virtual server allows you to direct incoming traffic from the WAN side to a specific IP address on the LAN side. To set up a virtual server, click on the Add button. Select the virtual server from the drop-down list and complete the server IP address, then click on the Save / Apply button. 33 Zhone Bonded Channel User Manual Version 1.
The following screen appears after you save your selection. To add additional virtual servers, click on the Add button. If you need to remove any of the server names, select the check box and click on the Remove button. 34 Zhone Bonded Channel User Manual Version 1.
Port Triggering Click on the Add button to add Port Triggering to your Internet application. The below screen appears when you click on Add allowing you to select the application that you want to set the port settings for. After a selection has been made, click on the Save / Apply button. The below screen appears after you save your selections. You will be able to add or remove selections made, by clicking on the Add and Remove buttons. 35 Zhone Bonded Channel User Manual Version 1.
DMZ Host You can define the IP address of the DMZ Host on this screen. Enter the IP address and click on Save / Apply. 36 Zhone Bonded Channel User Manual Version 1.
Firewall IP Filtering—Outgoing The outgoing filter will block the LAN traffic from entering the WAN side. Click on the Add button to create filters. The below screen will appear when you click on Add. Input the filter name, source information (from the LAN side), and destination information (from the WAN side). Then click on Save / Apply. 37 Zhone Bonded Channel User Manual Version 1.
IP Filtering—Incoming Incoming filter filters the WAN traffic to the LAN side. Click on the Add button to add incoming filter settings. Enter a filter name, information about the source address (from the WAN side), and information about the destination address (to the LAN side). Select the protocol and WAN interface, and then click on Save/Apply to add the setting. 38 Zhone Bonded Channel User Manual Version 1.
MAC Filtering MAC filtering can forward or block traffic by MAC address. You can change the policy or add settings to the MAC filtering table using the MAC Filtering Setup screen. If you click on Change Policy, a confirmation dialog allows you to verify your change. If you want to add a setting to the MAC filtering table, enter the Source and Destination MAC address, and select protocol type, frame direction, and WAN interface. Then click on Save / Apply to save it.
After you save the settings, a screen showing the settings will appear. On this screen you will be able to view and delete MAC filtering rules. Parental Control In a home setting, parents can also restrict the day of the week certain computers can access the router. Click on Add to set up the restrictions. After you click on Add, you will see the below screen. You will be able to enter the MAC address of the PC that you wish to place on a time of day restriction.
Quality of Service This QoS screen allows you to enable QoS and configure outgoing IP packet traffic management using DSCP (Differentiated Services Code Point) marks. Any outgoing packets without any classification rules will be marked with the DSCP mark that is selected. 41 Zhone Bonded Channel User Manual Version 1.