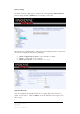
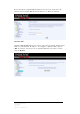
Queue Config To add or remove a QoS queue, click on the corresponding Add or Remove button. Click on Save / Reboot after removing a selection. The QoS queue configured here will apply to incoming IP packets.
The following screen allows you to add a network traffic class rule. 43 Zhone Bonded Channel User Manual Version 1.
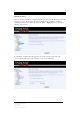
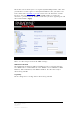
Routing Default Gateway You can enable automatic assigned default gateway on the Routing – Default Gateway screen. As default, the box is checked for automatic assigned default gateway to be enabled. Click the Save / Apply button to enable or disable this feature. If automatic assigned default gateway is not selected, then enter the preferred default gateway IP address or select the interface. 44 Zhone Bonded Channel User Manual Version 1.
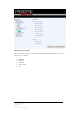
Static Route Use the Routing – Static Route screen to add a static route to the routing table. Enter the route information and click on Save/Apply. No reboot is required. 45 Zhone Bonded Channel User Manual Version 1.
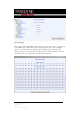
RIP If RIP is enabled, the router operation can be configured as active or passive. DNS DNS Server Use the DNS Server screen to request automatic assignment of a DNS or to specify a primary and secondary DNS. 46 Zhone Bonded Channel User Manual Version 1.
If the automatic assigned DNS checkbox is not selected, then enter the primary and secondary DNS Server IP addresses as illustrated below. Dynamic DNS Dynamic DNS (D-DNS) allows you to have your own permanent domain name linked to your dynamic IP address. To configure a dynamic DNS, click on Add. If you have already created a dynamic DNS that you want to delete, click on Remove. 47 Zhone Bonded Channel User Manual Version 1.
The below screen allows you to set up the Dynamic DNS provider. Note that you will have to first register at the Dynamic DNS site that you wish to use. Select from either DynDNS.org or TZO. Then enter the hostname and the interface that you want to establish the D-DNS address to. Enter the username / password for the D-DNS account that you have signed up for and then click on Save / Apply.
DSL Advanced Settings The test mode can be selected from the DSL Advanced Settings page. Test modes are as follows— • • • • • Normal Reverb Medley No retrain L3 49 Zhone Bonded Channel User Manual Version 1.
Tone Settings The frequency band of ADSL is split up into 256 separate tones, each spaced 4.3125 kHz apart. With each tone carrying separate data, the technique operates as if 256 separate modems were running in parallel. The tone range is from 0 to 31 for upstream and from 32 to 255 for downstream. Do not change these settings unless instructed by your ISP. 50 Zhone Bonded Channel User Manual Version 1.
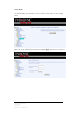
Port Mapping Port mapping is a feature that allows you to open ports to allow certain Internet applications on the WAN side to pass through the firewall and enter your LAN. To use this feature, mapping groups should be created. Click on the Add button as displayed below. If you need to edit an entry, then click on the Edit button. After clicking the Add button, the below configuration screen appears, allowing you enter the groups and the interfaces they are associated with.
52 Zhone Bonded Channel User Manual Version 1.
Wireless This section allows you to configure wireless settings on your router. Basic The below Wireless—Basic screen lets you enable or disable wireless. The default setting for wireless is enabled. You can also hide the access point so others cannot see your ID on the network. Security The next screen is the Wireless – Security screen which allows you to select the network authentication method and to enable or disable WEP encryption.
• 802.1X—requires mutual authentication between a client station and the router by including a RADIUS-based authentication server. Information about the RADIUS server such as its IP address, port and key must be entered. WEP encryption is also enabled and the encryption strength must also be selected.
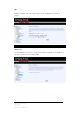
MAC Filter The MAC filter screen allows you to manage MAC address filters. Add the MAC addresses that you want to manage and then select the mode that you want to use to manage them. You can disable this feature or you can allow or deny access to the MAC addresses that you add to the list. The following screen appears when you want to add a MAC address to the filter. When completed, click on the Save / Apply button. 55 Zhone Bonded Channel User Manual Version 1.
Wireless Bridge In this next screen, you can select which mode you want the router to be in, either access point or wireless bridge. Advanced Advanced features of the wireless LAN interface can be configured in this section. Settings can be configured for the following— • AP Isolation—if you select enable, then each of your wireless clients will not be able to communicate with each other. • Band—a default setting at 2.4GHz – 802.11g 56 Zhone Bonded Channel User Manual Version 1.
• Channel-- 802.11b and 802.11g use channels to limit interference from other devices. If you are experiencing interference with another 2.4Ghz device such as a baby monitor, security alarm, or cordless phone, then change the channel on your router. • Multicast Rate—the rate at which a message is sent to a specified group of recipients. • Basic Rate—the set of data transfer rates that all the stations will be capable of using to receive frames from a wireless medium.
Quality of Service WMM (Wi-Fi Multimedia) technology is available on the wireless router, allowing you to give multimedia applications a higher quality of service and priority in a wireless network so applications such as videos will be of higher quality. Enabling WMM may delay the network traffic of other lower assigned quality applications. WMM No Acknowledgement can be enabled if you enable WMM which refers to the acknowledgement policy used at the MAC level.
Station Info The Station Info page shows stations that have been authorized access to the router through its wireless function. Troubleshooting—Diagnostics The diagnostics screen allows you to run diagnostic tests to check your DSL connection. In addition, you can test the connection to your DSL service provider. 59 Zhone Bonded Channel User Manual Version 1.
Management The Management section gives you access to certain setups for the purpose of maintaining the system, including backing up the configurations, viewing system log, maintaining access control, updating software, etc. Settings Backup Settings To save a copy of the configurations that you have made on your router, click on the Management and then Settings and Backup. Click on the Backup Settings button initiate the settings backup process.
Update Settings To restore saved settings, select Management and then Settings and Update. Then select the backup file you want to restore and click on Update Settings. The router will restore settings and reboot to activate the restored settings. Restore Default Restore Default will remove all current settings and restore the router to factory default settings. To restore the router to factory default settings, select Management and then Settings and Restore Default.
The router will restore the default settings and reboot. System Log The System Log dialog allows you to view the System Log and configure the System Log options. To view the System Log click on the View System Log button to check the log file. Below is a view of the System Log. 62 Zhone Bonded Channel User Manual Version 1.
System Log – Configuration If the log is enabled, the system will log selected events: Emergency, Alert, Critical, Error, Warning, Notice, Informational, and Debugging. All events above or equal to the selected log level will be logged and displayed. If the selected mode is “Remote” or “Both”, events will be sent to the specified IP address and UDP port of a remote system log server. If the selected mode is “Local” or “Both”, events will be recorded in the local memory.
If you choose to automatically synchronize with Internet time servers, then click on the box and the below fields appear. Select from the list of NTP (Network Time Protocol) time servers. Then select the time zone that you are in and click on Save / Apply to save and complete your time settings. Access Control You can enable or disable some services of your router by LAN or WAN. If no WAN connection is defined, only the LAN side can be configured.
IP Addresses Web access to the router can be limited when Access Control Mode is enabled. To add the IP addresses of allowed hosts click on Access Control and then IP Address.. Add the IP address to the IP address list by clicking on the Add button, then select “Enabled” to enable Access Control Mode. To assign the IP address of the management station that is permitted to access the local management services, enter the IP address in the box and click on the Save / Apply button.
Passwords Access the Passwords screen under the Access Control section to change a password. Select an account and enter the current password and the new password and then click on the Save / Apply button. Update Software If your ISP releases new software for this router, follow these steps to perform an upgrade. 1. Obtain an updated software image file from your ISP. 2. Enter the path to the image file location or click on the Browse button to locate the image file. 3.
Save / Reboot To reboot the device, click on Management and then Save/Reboot to save the configurations and/or changes made and to reboot the device using the web interface. The CPE will save the current configuration and reboot itself using the new configuration. 67 Zhone Bonded Channel User Manual Version 1.