MyPal A730 Pocket PC User’s manual
E1640 First edition V1 June 2004 Copyright © 2004 ASUSTeK COMPUTER INC. All Rights Reserved. No part of this manual, including the products and software described in it, may be reproduced, transmitted, transcribed, stored in a retrieval system, or translated into any language in any form or by any means, except documentation kept by the purchaser for backup purposes, without the express written permission of ASUSTeK COMPUTER INC. (“ASUS”).
Contents at a glance This user’s manual contains the information you need to efficiently use ASUS® MyPal A730 Pocket PC. • Chapter 1 - Get started!.............................................................. 1-1 This chapter introduces the ASUS MyPal A730 Pocket PC, how to set and power it up, and basic screens that will familiarize you with its many features. • Chapter 2 - Learn the basics .....................................................
A730 specifications Processor Intel® Bulverde 520 MHz Operating system Microsoft® Windows Mobile™ 2003 Second Edition Memory 64MB Flash ROM 64MB SDRAM (48MB /46MB user accessible for Western/ Eastern languages, respectively) iv Display 3.7-inch, brilliant transflective LCD 65,536 colors, 16-bit display VGA 640 x 480 resolution Battery 1100 mAh Lithium Ion (up to 9-hour battery life) Built-in backup battery 20mAh Card slot CompactFlash Type II (3.3V) card slot SD card slot (3.
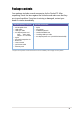
Package contents Your package includes several accessories for the Pocket PC. After unpacking, check the items against the list below and make sure that they are in good condition. If any item is missing or damaged, contact your dealer or retailer immediately. Standard package contents Optional accessories • • • • • • • • • • • • • • • • ASUS MyPal A730 USB cradle USB sync cable AC adapter/power cord Input: 100V~240V Output: 5V 2.
vi
Chapter 1 Get started! ♦ Introducing MyPal ................................................ 1-2 Front features ........................................................................... 1-2 Back features ........................................................................... 1-3 Side features ............................................................................ 1-4 Top features ............................................................................. 1-5 Bottom features ...................
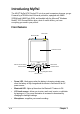
Introducing MyPal The ASUS® MyPal A730 Pocket PC is truly a good companion wherever you go.
• • • ASUS Launcher, Calendar, Tasks, and Contacts buttons - allow you quick access to commonly used programs. 4-way navigation button - functions like the four arrow keys on a keyboard. This button allows you to move through the program icons, folders, or files in a menu by scrolling up or down, left or right. Launch button - allows you to launch a selected program, list folder contents, or open a file.
Side features Left side Right side Power button/ Backlight button Camera button Back cover latch • Power/Backlight button - turns the device power on or off if you press the button quickly. Pressing and holding the button for a few seconds turns the backlight on or off. Turning off the backlight saves battery power.
Top features Headphone jack CF card slot SD card slot • • • • Headphone jack - connects a headphone. CF card slot - accommodates a CompactFlash (CF) card. SD card slot - accommodates an SD card. Infrared (IR) port - allows you to copy or send data to another device that has an IR port. Bottom features Cradle connector / Sync cable connector Reset switch Stylus • • • Cradle connector / Sync cable connector - connects to the 26-pin female connector on the cradle.
The stylus The stylus functions on a Pocket PC the same way a mouse functions on a standard PC. Use the stylus to tap or drag on the LCD touch screen to open programs or execute commands. • • • Tap. Touch the screen once with the stylus to open programs and select options. Slide out the stylus from the Drag. Hold the stylus on the screen and drag compartment across the screen to select text and images. Drag in a list to select multiple items. Tap and hold.
Setting up MyPal Removing and replacing the back cover To remove the back cover: 1. Locate the latch on the right side of the device, then use the stylus to push to latch toward to “unlocked” icon. NOTE As a precaution, the power button is automatically disabled when you unlock the back cover latch. You may only turn on the power when the back cover is securely locked to the unit. 2. Carefully slide the cover downward until it is released from the device.
To replace the back cover: 1. Carefully slide the cover from the bottom of the device making sure that the rails on its sides match the grooves on the side of the device. Groove Rail (on inner side) 2. Use the stylus to push the latch toward the “locked” icon.
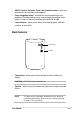
Installing and removing the battery NOTE You need to remove the back cover to access the battery compartment. Refer to the section “Removing and replacing the back cover” on page 1-7 for instructions. To install the battery: 1. Position and insert the left side of the battery with the notches matching the tabs on the left side of the compartment. 2. Press the right side of the battery to completely fit it into the compartment.
To remove the battery: 1. Use the stylus to push and unlock the battery latch. 2. Push the battery downward to disengage it from the battery contacts on the compartment. Battery latch unlocked 3. Flip up the upper edge of the battery to remove it from the compartment. Placing on the cradle Position the device on the cradle as shown. Match the connectors and carefully insert the device until it fits in place.
Connecting the AC adapter To connect the AC adapter without the cradle: 1. Connect the power cable to the jack on the sync cable adapter. 2. Connect the 26-pin device plug to the 26-pin connector on the bottom of the device. 3. Connect the power plug to a grounded wall socket. Power cable 26-pin device plug Sync cable adapter NOTE Sync cable The power LED (green) blinks as soon as you connect the power cable to a power source. To connect the AC adapter with the cradle: 1.
Additional storage Your device comes with two kinds of memory card slots for additional storage. The CF card slot supports the multimedia cards listed under “Optional Accessories” on page v of this manual. The SD card slot supports the SecureDigital memory card. NOTE You need to Install an SD card or CF card if you wish to use the ASUS backup features. Installing and removing an SD card To install an SD card: 1.
Installing and removing a CF card To install a CF card: 1. Locate the card side with the 50-pin female connector and insert into the slot. The label side (usually the side with the card manufacturer’s name) face up, and the bar code/serial number side face down. Label side NOTE A CF card fits only in one orientation, and slides smoothly into the slot if inserted correctly. DO NOT force the CF card into the slot! 2. Push the card all the way into the slot until it fits completely.
Activating MyPal It is important that you properly calibrate and activate your device before using it. This process ensures accurate positioning when entering text and selecting menus. To activate your device: 1. Press the power button. The Align screen appears when you turn on the device for the first time, and after you perform a hardware reset using the reset button. Power button 2. Use the stylus to tap the center of the cross to do the align screen process.
Basic screens on MyPal Today screen Normally, the Today screen appears when you turn on your device for the first time each day. NOTE When the device is already on and the screen displays another program, you can display the Today screen by tapping the icon. Then from the Start menu, tap Today. As shown in the sample below, the Today screen lets you see at a glance the summary of the important information for the day.
Start menu From the Start menu, you can select programs, settings, and Help topics. To display the Start menu, tap the icon from the top of the screen. Tap to open a program Tap to open a recently used program Tap to open the Programs menu Tap to open the Settings menu Tap to display the Help topics Icon 1-16 Program Description ActiveSync Synchronize information between your device and your desktop computer. Calendar Keep track of your appointments and create meeting requests.
Command bar At the bottom of the screen is the Command bar. You can use the menus and buttons on the Command bar to perform tasks in programs. NOTE The menus and buttons vary depending on the programs you are using. Tap to select menu commands Tap to select button commands Tap to display the input panel Pop-up menus With the pop-up menus, you can easily choose an action for an item. For example, you can use the pop-up menu in Notes to delete, copy, or beam an item.
1-18 Chapter 1
Chapter 2 Learn the basics ♦ Entering information ............................................ 2-2 Entering text using the Input Panel .......................................... 2-2 Writing on the screen ............................................................... 2-5 Drawing on the screen ............................................................. 2-8 Recording a message .............................................................. 2-9 Using a preset message ........................................
Entering information You can enter information in your device in any of the following ways.
When you use the Input Panel and the soft keyboard, your device anticipates the word you are typing and displays it above the Input Panel. When you tap the displayed word, it is inserted into your text at the insertion point. The more your use your device, the more words it learns to anticipate. Tap here if this is the word you wish to use NOTE To change options on word completion feature: 1. 2. 3. 4. 5. 6. . Tap Tap Settings. Tap Personal tab. Tap Input. Tap Word Completion tab.
To use Block Recognizer: With the Block Recognizer, you can input character strokes that are similar to those use on other devices. 1. Tap the arrow next to the Input Panel button, then tap Block Recognizer. 2. Write a letter in the box. When you write a letter, it is converted to a typed text that appears on the screen. For instructions and demonstation on using the Block Recognizer, tap the question mark next to the writing area.
Writing on the screen In any program that accepts writing, such as the Notes program, and in the Notes tab in Calendar, Contacts, and Tasks, you can use the stylus to write directly on the screen. Write the way you do on paper. You can edit and format what you have written and convert the information to text at a later time. To write on the screen: 1. Open the Notes program. 2. Tap the Pen button to switch to the writing mode. The screen displays blank space with lines to help you write. 3.
To edit your writing: 1. Tap and hold the stylus next to the text that you wish to select until the insertion point appears. 2. Without lifting, drag the stylus across the text to select it. If you accidentally write on the screen, tap Tools, then Undo and try again. You can also select text by tapping the Pen button to deselect it, then dragging the stylus across the screen. 3. Tap Edit on the Command bar and select an action, or use one of the tools in the Input Panel to enter a new text.
If the conversion is incorrect, you can select different words from a list of alternates or return to the original writing. 1. Tap and hold the incorrect word. 2. When the pop-up menu appears, tap Alternates to display a list of alternate words for the selection. 3. Tap the word that you want to use, or tap the writing at the top of the menu to return to the original writing.
Drawing on the screen You can draw on the screen in the same way that you write on the screen. The difference between writing and drawing on the screen is how you select items and how they can be edited. For example, selected drawings can be resized, while writing cannot. To create a drawing: 1. Use the stylus to make a stroke three ruled lines high. A dotted box appears. 2. Make your drawing in or touching the drawing box and crossing three ruled lines.
Recording a message In any program where you can write or draw on the screen, you can also quickly capture thoughts, reminders, and phone numbers by recording a message. In Calendar, Tasks, and Contacts, you can include a recording in the Notes tab. In the Notes program, you can either create a standalone recording or include a recording in a written note. If you want to include the recording in a note, open the note first. In the Inbox program, you can add a recording to an e-mail message.
To change the recording format: 1. In the note list, tap Tools then Options. 2. Tap the Global Input Options link. 3. Tap the Options tab. Mobile Voice is a 2.4KB audio codec. It is the recommended format because it provides good voice recording and less storage space. Pulse Code Modulation (PCM) provides slightly better sound quality but takes up 50 times more storage space tham Mobile Voice recordings.
Finding and organizing information The Find and Help features on your device helps you quickly locate information. Using the Find function To find information: 1. Tap , then tap Find. 2. Enter the text that you want to find, select a data type, then tap Go to start the search. To quickly find information that is taking up space on your device, select Larger than 64 KB in Type. Type a word to find Tap to search for the word Topics found containing the searched word To use the Help feature: 1.
Using the File Explorer To use the File Explorer to find and organize files: 1. Tap , then tap Programs. 2. In the Program screen, tap the File Explorer icon to display the files in your device.
Customizing your device You can customize your device by adjusting the settings, using the built-in programs, and installing additional software. You can adjust the device settings to your preference. To see the available options: 1. Tap , then tap Settings to display the Settings screen. 2. Tap the Personal or System tab on the bottom of the screen. You may want to adjust any one of the following items. • Clock. Change the time or set alarms. • Menus.
Changing the date and time To change the date and time settings: 1. Tap , tap Settings, then the System tab. 2. Tap the Clock & Alarms icon. 3. Make your desired settings. Tap to select a time zone Highlight a Time item then tap up or down arrow to set Tap this down arrow to display the Calendar To change the alarm settings: 1. Tap , tap Settings, then the System tab. 2. Tap the Clock & Alarms icon, then the Alarm tab. 3. Make your desired settings.
Changing the Start menus To change the menu items: 1. Tap , tap Settings, then tap the Menus icon. 2. Select the items that you wish to appear on the Start Menu. 3. Tap the New Menu tab. 4. Select the items that you wish to appear on the New menu (located on the lower left corner of the main screen).
Changing the owner information To change the owner information: 1. 2. 3. 4. Tap , tap Settings, then tap the Owner Information icon. Key-in the data that you wish to appear on the Today screen. Add notes to the owner information by tapping the Notes tab. Key-in your desired text. 6. Tap the Options tab, then select the items that you wish to appear onscreen whenever you turn on the device. Tap OK when done.
Setting a password To set a password for your device: 1. Tap , tap Settings, then tap the Password icon. 2 Check the box Prompt if device unused, then select the period from the available options by tapping the down arrow. 3. Select the password type, Simple 4 digit or Strong alphanumeric. 4. Key-in a password. If you selected the Strong alphanumeric type of password, you need to key-in the password twice. 5. Tap the Hint tab to create a kind of reminder in case you forget your password. 6.
Changing the screen display orientation To change the screen display orientation: 1. Tap , tap Settings, then the System tab. 2. Tap the Screen icon to show the screen options. 3. Select your desired orientation, then tap OK. Portrait orientation This setting Shows this screen Sets the screen display to portrait or landscape orientation NOTE 2-18 To quickly change the screen display orientation, simply tap the Screen icon on the lower right corner of the screen.
Landscape orientation (right-handed) This setting Shows this screen NOTE: Device buttons on the left-hand side. Landscape orientation (left-handed) This setting Shows this screen NOTE: Device buttons on the right-hand side.
To enable the ClearType feature: 1. Tap , tap Settings, then the System tab. 2. Tap the Screen icon to show the screen options. 3. Tap the Clear Type tab. 4. Check the Enable Clear Type box, then tap OK. To change the screen text size: 1. Tap , tap Settings, then the System tab. 2. Tap the Screen icon to show the screen options. 3. Tap the Text Size tab. 4. Move the slider toward the Smallest or Largest until you attain your desired text size. Tap OK. The slider is on the center of the line by default.
Changing the screen theme To change the screen theme: 1. Tap , tap Settings, then tap the Today icon. 2. Select your desired theme. or Check the box Use this picture as the background, then tap Browse to select an image from your picture files. 3. Tap OK when done. To specify the items to appear on the Today screen: 1. Tap , tap Settings, then tap the Today icon. 2. Tap the Items tab. 3. Check the box opposite your desired items. Tap OK when done.
Changing the button assignments To change the button assignments: 1. Tap , tap Settings, then tap the Buttons icon. 2. Highlight a button by tapping on it. 3. Tap the down arrow to display the programs that you can assign to the button. 4. Repeat steps 2 to 3 to change other button assignments. 5. Tap OK when done. To customize the speed of your Up/Down button control: 1. Tap the Up/Down Control tab. 2. Tap the slider to your desired settings. 3. Tap OK when done.
Selecting sounds and notifications Your device can remind you of things you have to do in several ways. For example, if you have set up an appointment in Calendar, a task with a due date, or an alarm in Clock, you will be notified in any of the following ways. • • • A message box appears on the screen A sound is played (you can select the type of sound) A light flashes on the device To choose the reminder types and sounds: 1. Tap , then tap Settings. 2.
Using ASUS Launcher This program allows you the convenience of classifying your frequently used programs, and quickly launching them with just a few taps. To access ASUS Launcher: 1. Tap , then Programs. 2. Tap ASUS Programs, then ASUS Launcher. NOTE To quickly access ASUS Launcher, press the (leftmost) on your device. button 3. From the command bar, tap Name to display the names of the existing categories. The default categories are Favorites, Start Menu, and Programs. 4.
5. Tap Start Menu or Programs to display the default programs in them. NOTE Whatever category is selected, that category will be launched the next time you tap the AsusLauncher icon. To edit the name of a default category: 1. Tap Name, and select a category that you wish to rename. For example, Programs. 2. Tap Category, then Edit Title. 3. In the Edit Current Category screen, revise the name. 4. Tap OK.
To customize an existing category: 1. Tap Editor, then Copy To. 2. Tap Name, then tap the category where you wish to copy the program icon, e.g. Programs or Start Menu. 3. In the Programs (or Start Menu) screen, tap the program icon that you wish to copy. For example, Jawbreaker. A pop-up screen appears. 4. Select a target destination for the program icon. For example, Favorites. 5. Repeat steps 3 and 4 to copy other programs that you wish to launch often. 6.
To remove programs from a category: 1. Tap Editor, then Remove. 2. Tap Name, then any of the existing categories. 3. Tap the program icon that you wish to remove. For example, the Calculator icon in the Favorites screen. The icon disappears from the screen as soon as you tap it. 4. When done, tap Remove then Launch to return to the launch mode. 5. Tap OK to save your changes. To add a new category: 1. Tap Category, then Add. A new category is automatically added. 2.
ASUS utilities Besides the Microsoft program that allows you to back up data, your device also includes proprietary ASUS utilities. The ASUS utilities allow you to backup or restore data, and adjust settings to customize your device and maximize its use. ASUS Backup The ASUS Backup utility lets you back up your system files and/or data contained in the main system memory.
NOTE See the online help on your device for online instructions to back up or restore data. To back up all data on your device: 1. Return to the ASUS programs screen and tap the ASUS Backup icon. 2. Tap the Backup tab on the ASUS Backup screen. 3. Tap All Data button to back up all data on your device. NOTE You need to insert a CF memory card or an SD card if you wish to save your backup file into a removable storage device. Otherwise, you can save the backup file into the Flash Disk. 4.
6. The screen shows the status of the backup process. When done, a message appears indicating that the backup is complete, and shows the total size of the backed up files. In case the program fails to back up any items, it will show the items on the screen. 7. Tap OK. To back up only PIM data on your device: 1. On the ASUS Backup screen, tap PIM Data button to back up only the personal information management (PIM) data on your device. 2.
4. Type a name for your backup file and the folder where you wish to place it. You may opt not to specify a folder. 5. Check the boxes opposite the items that you wish to back up, or tap Select All to select all listed items. If you checked the box User Defined Folders, tap Define to specify the folders that you wish to include in the backup file, then tap OK. 6. Tap Start to begin the backup process. 7.
To restore all data: 1. Tap NOTE , then tap Programs. If you saved your backup file into a CF memory card, you need to insert that CF memory card into the CF slot when restoring data. Otherwise, you will receive the message “No storage devices are found!” 2. On the ASUS Programs screen Tap the ASUS Backup icon. When prompted, stop all running programs. See page 2-29 for instructions. 3. Tap the Restore tab on the ASUS Backup screen. 4. Tap All Data. 5.
To restore PIM data: 1. On the ASUS Backup screen, tap PIM Data. 2. When prompted, select the storage device (Flash Disk or CF card) where you stored your backup file. Tapping Cancel returns you to the previous screen. 3. Tap the Restore tab. 4. Select the backup file name (tap the arrow to list down other backup files, if any). 5. Check the boxes opposite the items that you wish to restore, or tap Select All to select all listed items.
ASUS SmartKeeper The ASUS SmartKeeper is an automatic backup feature that prompts you to backup the current system status in a CF card or SD card whenever the remaining battery power reaches a certain level. With the automatic option, the backup process is done whether the device is ON or OFF as long as a CF card or an SD card is present in their respective slot.
6. In the Automatic screen, check the Automatic system backup box to enable automatic backup. This box is checked by default. When SmartKeeper is set to Automatic, make sure that a CF card or an SD card (64MB free space recommended) is present in the respective slot. 7. Tap OK. NOTE To verify if the CF card or the SD card is usable for system backup, perform a Manual backup first. See the section “To use manual backup” on page 2-33.
To back up the current system status: When prompted, tap the Yes button on the screen message window to start the backup process. Tap No if you do not wish to back up the system status at this time. NOTE Make sure that either a CF card or an SD card is present in the respective slot. If you tap Yes without any card, an error message appears, indicating that your selected backup destination is not ready. A confirmation message appears when the backup process is complete.
When the device is OFF Whenever a low battery status occurs while the device is in standby or OFF mode: 1. SmartKeeper wakes up the system to back up the system status. 2. SmartKeeper checks if a CF card or an SD card is ready in the slot. 3. If found, SmartKeeper backs up the current system status to ASUSBKUP.SAV file in the CF card or SD card. When the backup process is complete, the system automatically goes back to sleep (OFF).
The system detected a battery power low status and tried to back up the system status at 2004/06/14, 10:21:27 AM. Backup failed! Insufficient space in the CF card (or SD card). The system detected a battery power low status and tried to back up the system status at 2004/06/14, 10:21:27 AM. Backup failed! System error.
To use manual backup: 1. Tap , then tap Settings. 2. Tap the System tab on the bottom of the Settings screen. 3. Tap the SmartKeeper icon, then the Manual tab. 4. Tap the Back up system button to back up the current system status to the CF card or SD card. If a CF card or an SD card is not present, an error message appears after you tap the back up button. NOTE While backing up, the screen blacks out and shows the message “Backup in progress” and the percentage of backed up data.
To restore the system status: 1. 2. 3. 4. Tap , then tap Settings. Tap the System tab on the bottom of the Settings screen. Tap the SmartKeeper icon, then the Manual tab. Tap the Restore system button to restore the saved system status from the CF card or SD card.
Bundled programs Your device includes the most common Windows programs and more. To access the bundled programs: 1. Tap , then tap Programs. 2. Tap any of the icons to launch a specific application program. ASUS Programs Tapping the ASUS Programs icon displays the ASUS Backup utility, ASUS Camera, and ASUS Launcher icons. Tap the ASUS Backup icon if you wish to use the utility. See section “ASUS Backup” on page 2-23 for details. Tap the ASUS Camera icon if you wish to use the utility.
Games Tap the Games icon to display the available games. Calculator Tap the Calculator icon to use the calculator. File Explorer Tap the File Explorer icon to access your files. See page 2-12.
MSN Messenger Tap the MSN Messenger icon to use the service. See Chapter 5. Pocket MSN Tap the Pocket MSN icon to get connected to the Internet through the Pocket Internet Explorer. See Chapter 6. Pocket Word Tap the Pocket Word icon to create Pocket Word documents. See Chpater 5.
Pocket Excel Tap the Pocket Excel icon to create spreadsheet documents. See Chapter 5. Pictures Tap the Pictures icon to view .jpg pictures stored on your device or on a storage card. Refer to the online help on your device for details on using this feature. Terminal Services Client Tap the Terminal Services Client icon to connect to a terminal server. Refer to the online help on your device for more information.
Chapter 3 Microsoft® ActiveSync® ♦ Introduction ........................................................... 3-2 What is ActiveSync®? ............................................................... 3-2 ♦ Installing ActiveSync® ......................................................................... 3-3 Installing ActiveSync® on your computer .................................. 3-3 ♦ Synchronizing your device .................................. 3-5 Connecting your device to a computer ...................
Introduction What is ActiveSync®? The Microsoft® ActiveSync® is one of the important bundled programs in MyPal. With ActiveSync, you can synchronize the information on your desktop computer with the information on your device. Synchronization compares the data on your device with your desktop computer and updates both computers with the most recent information. For example: • • Keep Pocket Outlook data up-to-date by synchronizing your device with Microsoft Outlook data on your desktop computer.
Installing ActiveSync® The ActiveSync program is already installed on your device. To synchronize information on your device with your computer, you must also install ActiveSync on your computer. Install ActiveSync from the Companion CD that came with your product package. NOTE Before starting the ActiveSync installation, make sure that you have Microsoft® Outlook® installed on your computer. If you do not have Outlook, install the Microsoft® Outlook® 2002 from the Companion CD.
4. Read the Overview before installing ActiveSync 3.7 to make sure that you perform the installation sequence correctly. 5. If you have not installed Outlook, install it now. Click Install Outlook 2002 and follow the screen instructions to complete the installation. 6. Click Download Connection Wizard and read the overview to see if you require the wizard. Follow the screen instructions to install the wizard on your computer. Return to the Main Menu when done. 7. Click Install ActiveSync 3.
Synchronizing your device Connecting your device to a computer To connect your device to your computer with the cradle: 1. Place the device on the cradle. 2. Connect the USB sync cable on the back of the cradle 3. Connect the other end to a USB port on your computer. 1 2 3 To connect your device to your computer without the cradle: 1. Connect the 26-pin device plug to the 26-pin connector on the bottom of the device. 2. Connect the USB sync cable from the cradle to a USB port on your computer.
Setting up a partnership Immediately after you have completed the installation, the New Partnership wizard will start automatically to help you establish a partnership and customize your synchronization settings. At this point, you can decide exactly which types of information you would like to synchronize with your computer. A partnership is a file that allows you to synchronize your device with your desktop computer. This file is stored on your desktop computer.
On the Calendar Synchronization Settings window, for example, select from the options how you wish to synchronize the appointments on your device with your computer. Click OK. 4. Click Finish to complete setting a partnership. Immediately after you set up a partnership, ActiveSync® starts automatically and initiates the first synchronization between your device and your computer. Refer to the succeeding sections for more details on synchronization.
Checking synchronized information After your first synchronization, take a look at Calendar, Contacts, and Tasks on your device. You will notice that the calendar information in Microsoft Outlook on your computer was copied to your device, and the information that you have on your device was copied to your computer. NOTE 3-8 Open Microsoft Outlook on your desktop computer to see the details of copied information from your device.
Manually initiating synchronization Once you have set up ActiveSync and completed the first synchronization process, you can initiate synchronization from your device at any time. To manually initiate synchronization: 1. Tap , then tap ActiveSync to display the ActiveSync screen. Connection status Tap to connect and synchronize Tap to stop synchronization Tap to synchronize via IR or change synchronization settings 2.
Synchronization options The Microsoft ActiveSync program allows you to customize your synchronization settings at any time. You can select the items to synchronize, set the synchronization schedule, and specify the synchronization rules. To display the synchronization options: • • From the ActiveSync window on your desktop computer, click on the Options icon, or From the menu bar, click on Tools, then Options. To select items to synchronize: 1.
To set synchronization schedule: 1. Click on the Schedule tab. 2. Select your desired synchronization schedule. 3. Click OK when done. To specify synchronization rules: 1. Click on the Rules tab. 2. Select your desired settings from the available options. 3. Click OK when done.
3-12 Chapter 3