PARADYNE ADSL Wireless Modem Router Manual 6218-A1-XXX Manual PARADYNE ADSL Wireless Modem Router ¾ ¾ ¾ Do not open the housing! Use only the power supply provided with this device. Use only the cables provided with this device and do not perform any modification on them. Rev 0.
PARADYNE ADSL Wireless Modem Router Manual Before you begin Before installing your ADSL wireless modem router, please carefully check the following requirements with your computer. This ADSL wireless modem router is equipped with four 10/100Mbps RJ-45 Ethernet switch ports and 802.11g wireless Access Point. You can connect to the modem by Ethernet or wireless interface.
PARADYNE ADSL Wireless Modem Router Manual Getting Started Hardware Installation Please be sure to follow the steps in the sequence outlined below. Failure to do so could result in improper operation or damage of your ADSL wireless modem. Step 1: Connect a RJ-11 cable from wall phone jack feed to the connector “LINE” on the back of the modem.
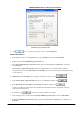
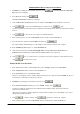
PARADYNE ADSL Wireless Modem Router Manual 1. Configuring Your Computers 1.1 Using Wired or Wireless Network Interface Card Before you start to access this unit via Ethernet or Wireless, please have to configure your PC’s TCP/IP address to be 192.168.1.x, where x could be any number between 2 to 254, subnet mask is 255.255.255.0, and Default gateway is 192.168.1.1 which is default IP address of ADSL modem.
PARADYNE ADSL Wireless Modem Router Manual TCP/IP Property @ Windows XP 6. Click twice to confirm your changes, and close the Control Panel. Windows® 2000 PCs: 1. In the Windows task bar, click the Start button, point to Settings, and then click Control Panel . 2. Double-click the Network and Dial -up Connections icon. 3. In the Network and Dial -up Connections window, right-click the Local Area Connection icon, and then select Properties.
PARADYNE ADSL Wireless Modem Router Manual 10. In the Local Area Connection Properties dialog box, select Internet Protocol (TCP/IP), and then click . 11. In the Internet Protocol (TCP/IP) Properties dialog box, click the radio button labeled Use the following IP address and type 192.168.1.x, 255.255.255.0 and 192.168.1.1 in the IP address field, Subnet Mask field and Default gateway, respectively. 12. Click twice to confirm and save your changes, and then close the Control Panel. Windows® Me PCs 1.
PARADYNE ADSL Wireless Modem Router Manual 3. If TCP/IP does not display as an installed component, click Type dialog box will display. 4. Select Protocol , and then click . Then Select Network Component . The Select Network Protocol dialog box displays. 5. Click on Microsoft in the Manufacturers list box, and then click TCP/IP in the Network Protocols list box. 6. Click to return to the Network dialog box, and then click again.
PARADYNE ADSL Wireless Modem Router Manual 8. In the Network dialog box, click the Protocols tab. 9. In the Protocols tab, select TCP/IP, and then click . 10. In the Microsoft TCP/IP Properties dialog box, click the radio button labeled Use the following IP address and type 192.168.1.x, 255.255.255.0 and 192.168.1.1 in the IP address field, Subnet Mask field and Default gateway, respectively. 11. Click twice to confirm and save your changes, and then close the Control Panel. 1.
PARADYNE ADSL Wireless Modem Router Manual 5. Click Status icon, then click IP Config to check IP address among 2~254 range. If it is true, then click Ping tab and run ping to do connection test between modem with your PC.
PARADYNE ADSL Wireless Modem Router Manual After finishing above steps, you are ready to login and start to configure modem now.
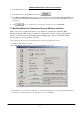
PARADYNE ADSL Wireless Modem Router Manual 2. Configuring Wireless Modem Router 2.1 Internet connection with NAT function: Please enter the modem’s default IP address http://192.168.1.1 into your PC’s web browser and press Enter button on keyboard. The Login screen will show as below, following enter Admin for Username and Admin for Password then click on Log In button. 2.
PARADYNE ADSL Wireless Modem Router Manual 2.3 Click SETUP tab. 2.4 Click Firewall/NAT Services icon to select Enable Firewall and NAT Service, then click on Apply tab. Now re-login modem again.
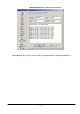
PARADYNE ADSL Wireless Modem Router Manual 2.5 Click SETUPÆNew Connection tab. 2.6 Input data Name column: It could be inputted anything you prefer. Type: There are listed five selections which you can choose from Type item Ϋ PPPoE, PPPoA, Static, DHCP and Bridge. Please select correct item which ISP gave you PPP Settings: Options: Select both NAT and Firewall functions. Encapsulation: Please select correct encapsulation from your ISP, but it is except for PPPoE.
PARADYNE ADSL Wireless Modem Router Manual QoS: Keep the default setting. Auto PVC: You also use this function to get correct VPI/VCI instead of inputting manually. Please click on Apply icon. 2.7 Go to the Status tab, then click on Connection Status. Under State of Connection Status, your WAN connection is now connected and you should be able to link to enjoy internet services.
PARADYNE ADSL Wireless Modem Router Manual 2.8 If you want to enable DHCP server embedded modem, please click on SETUP Æ LAN Configuration. Click on Configure tab under LAN group 1 sub-item. 2.9 Select “Enable DHCP Server” item, then click on Apply tab.
PARADYNE ADSL Wireless Modem Router Manual 2.10 Click on Tools tab, then select System Commands. Please click on Save All, all of your changes on settings will be saved into this unit; if you don’t run Save All process, you will lose all changes you did once power off or restart modem.
PARADYNE ADSL Wireless Modem Router Manual 3. Performing a Factory Reset There are two methods to perform a factory default settings on this unit Ϋ by software management or reset manually. 3.1 Software Management: Please first login into this unit using Username and Password, click on Tools Æ System Commands. You will find a Restore Defaults tab is showed on the screen. Use this button to restore factory default configurations.
PARADYNE ADSL Wireless Modem Router Manual Front panel system messages The following illustration shows the front panel of the ADSL Wireless Modem Router. LED Indicators The ADSL Wireless Modem Router is equipped with LEDs on the front panel as described in the table below.
PARADYNE ADSL Wireless Modem Router Manual Rear panel system messages The following illustration shows the rear panel of the ADSL Wireless Modem Router. Outlet The ADSL Wireless Modem Router is equipped with outlets on the rear panel as described in the table below.
PARADYNE ADSL Wireless Modem Router Manual FCC Statement This equipment has been tested and found to comply with the limits for a class B digital device, pursuant to part 15 of the FCC Rules. These limits are designed to provide reasonable protection against harmful interference in a residential installation. This equipment generates, uses and can radiate radio frequency energy and, if not installed and used in accordance with the instructions, may cause harmful interference to radio communications.