user manual
Table Of Contents
- Safety information
- About this guide
- P8H77-V specifications summary
- Chapter 1: Product introduction
- Chapter 2: Hardware information
- 2.1 Before you proceed
- 2.2 Motherboard overview
- 2.3 Building your computer system
- 2.3.1 Additional tools and components to build a PC system
- 2.3.2 CPU installation
- 2.3.3 CPU heatsink and fan assembly installation
- 2.3.4 DIMM installation
- 2.3.5 Motherboard installation
- 2.3.6 ATX Power connection
- 2.3.7 SATA device connection
- 2.3.8 Front I/O Connector
- 2.3.9 Expension Card installation
- 2.3.10 Rear panel connection
- 2.3.11 Audio I/O connections
- 2.4 Starting up for the first time
- 2.5 Turning off the computer
- Chapter 3: BIOS setup
- Chapter 4: Software support
- Chapter 5: Multiple GPU technology support
- Appendices
- http://csr.asus.com/english/Takeback.htm

ASUS P8H77-V
3-33
Chapter 3
• The screenshots in this section are for reference only. The actual BIOS information
vary by models.
• Refer to the software manual in the support DVD or visit the ASUS website at
www.asus.com for detailed software conguration.
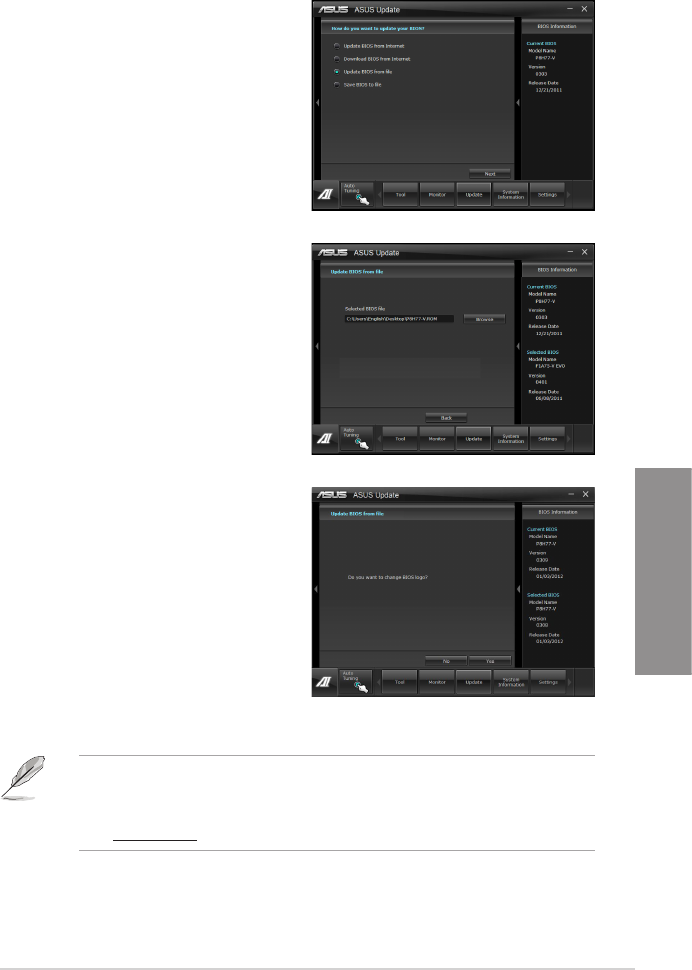
Updating the BIOS through a BIOS le
2. Locate the BIOS le from the Open
window, click Open, and click Next.
3. You can decide whether to change
the BIOS boot logo. Click Yes if you
want to change the boot logo or No to
continue.
4. Follow the onscreen instructions to
complete the update process.
To update the BIOS through a BIOS le:
1. From the ASUS Update screen,
select Update BIOS from le, and
then click Next.


