
user manual

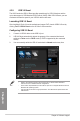

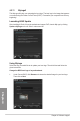
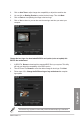


Table Of Contents
- Safety information
- About this guide
- P8H77-V specifications summary
- Chapter 1: Product introduction
- Chapter 2: Hardware information
- 2.1 Before you proceed
- 2.2 Motherboard overview
- 2.3 Building your computer system
- 2.3.1 Additional tools and components to build a PC system
- 2.3.2 CPU installation
- 2.3.3 CPU heatsink and fan assembly installation
- 2.3.4 DIMM installation
- 2.3.5 Motherboard installation
- 2.3.6 ATX Power connection
- 2.3.7 SATA device connection
- 2.3.8 Front I/O Connector
- 2.3.9 Expension Card installation
- 2.3.10 Rear panel connection
- 2.3.11 Audio I/O connections
- 2.4 Starting up for the first time
- 2.5 Turning off the computer
- Chapter 3: BIOS setup
- Chapter 4: Software support
- Chapter 5: Multiple GPU technology support
- Appendices
- http://csr.asus.com/english/Takeback.htm

4-20
Chapter 4: Software support
Chapter 4
5. Use the up/down arrow key to select a drive, and then press <Space> to select. A small
triangle marks the selected drive. Press <Enter> after completing your selection.
6. Use the up/down arrow key to select the stripe size for the RAID array (for RAID 0, 10
and 5 only),and then press <Enter>. The available stripe size values range from 4KB
to 128KB. The following are typical values:
RAID 0: 128KB
RAID 10: 64KB
RAID 5: 64KB
We recommend a lower stripe size for server systems, and a higher stripe size for
multimedia computer systems used mainly for audio and video editing.
WARNING: ALL DATA ON SELECTED DISKS WILL BE LOST.
Are you sure you want to create this volume? (Y/N):
9. Press <Y> to create the RAID volume and return to the main menu, or <N> to go back
to the CREATE VOLUME menu.
7. When the Capacity item is selected, enter the RAID volume capacity that you want
and press <Enter>. The default value indicates the maximum allowed capacity.
8. When the Create Volume item is selected, press <Enter>. The following warning
message appears: