
Install Instructions


2. Measure the length to be applied from corner to
corner, allowing an additional amount of overlapping.
Starting at the bottom of the wall, overlap the
foundation approximately 3”, keeping the top edge
parallel to the snap line. Wrap around the corner and
staple or tape in place.
4. Attach
to
opposi te
Snap a line as in Step 1. Measure and cut lengths.
A
ttach to corner on the inside lower corner of the
wall as in step 2. Roll out and begin securing to
purlins as in Step 3. Leave approximately 1” airspace
between wall and insulation. Continue per Steps 4
and 5, following recommended taping instructions on
page 6.
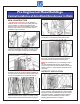
Horizont
al Installation of
AstroShield/AstroShield
in Walls
NEW CONSTRUCTION
3
1. Install
AstroShield & AstroArmour
fro m t he
botto m
up.
Snap a line across the entire wall length to
establish
a straight edge. Position line to
leave
approximately 3”
of insulation below the top of
the
foundation.
AstroShield
& AstroArmo
ur
3. Continue with the next length, installing it parallel to
the first length. Staple, screw or tape to purlins across
the entire length of the wall, overlapping the first layer
2” if edges don’t meet at the purlins. Secure
AstroShield & AstroArmour
only t o t he extent t hat t he
material will
stay
in
place until the metal skin is applied.
corner as in Step 2.
5. Follow the taping instructions found on page 6.
Continue along each wall until application is complete.
Attach metal sheeting directly over
AstroShield &
AstroArmour
in the conventional manner.
NOTE:
If the AstroShield product you are installing on walls is one of
the AstroShield 'White' products, and the reflective surface is facing
toward the outside, installation must include a method of insuring a
1" airspace between Astroshield and the metal siding.
RETROFIT APPLICATION