
Installation Guide

HOW TO INSTALL
Congratulations on your purchase of AstroGuard. In a few short steps, your home will
be safeguarded with the most advanced hurricane protection on the market.
First, gather your equipment. You will need:
Power hammer Drill for concrete or standard drill for wood
Drill Bits: 7/16” for deluxe anchor or 7/32” for Economy anchor
Driver Bit for anchor purchased
Cordless Screwdriver, Phillips head
AstroGuard Material
Clips and Hardware (purchased with AstroGuard)
Sharp Scissors or Box Cutter
Cutting Surface (a large sheet of cardboard works well)
Air Duster
4-foot Level or Straight Edge
Permanent Marker
Stepladder
1. STEP 1: CUT MATERIAL
Spread the AstroGuard material out on the cutting surface. Using a box cutter or
scissors, trim a piece to the size of your first measurement. Be sure you added a
four inch overlap for concrete openings and a one inch overlap for wood openings
when measuring.
2. STEP 2: ATTACH CLIPS
Double check which sides of the opening will need Clips. If top is being attached,
start with the top. If not, start on the left side.
Make a mark 2” from the corner. Using your tape measure, mark the other clip
positions all the way across that side. Repeat for the other sides that will be
attached. Remember to space clips at 12” apart, center-to-center, or use the proper
clip spacing for your area.
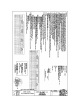
Attach the first clip. Put the top and bottom pieces of the clip together and slide
the fabric in between the pieces until the edge of the fabric is even with the first
notch.
Using your cordless screwdriver, attach 8 screws to the clip as shown. Attach the
remaining clips.
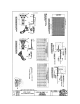
3. STEP 3: DRILL & HANG ASTROGUARD
Hold the fabric over the opening, make sure it is centered.
Using a permanent marker, place a mark in the upper Left hand corner where the
first clip will be attached.