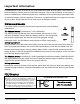
y VSS-204TW 2-WAY SECURITY AND CONVENIENCE SYSTEM OWNER’S MANUAL © 2006 ASTROFLEX ELECTRONICS
Table of contents What is included ...................................................................................................................................................................... 1 2-way LCD remote control....................................................................................................................................................... 1 LCD screen .......................................................................................................................
Diagnostics............................................................................................................................................................................. 17 Arming diagnostics .................................................................................................................................................................17 Disarming diagnostics .......................................................................................................................
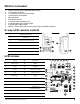
What is included Control module with integrated shock sensor 1 transceiver/antenna 1 four-button 2-way LCD transmitter 1 three-button transmitter Wire harnesses Dual diode harness A six-tone programmable siren In-vehicle status LED indicator light A push-button Valet switch Failsafe® Starter Kill ready circuitry (may require additional labour) 2-way LCD remote control 1 Auxiliary Channel Button 2 Arm Button 3 LCD Screen (see LCD Screen) 4 Disarm Button 5 Panic Button 6 Battery Compartment 7 Pr
Important information Congratulations on the purchase of your state-of-the-art vehicle security system. This system has been designed to provide years of trouble-free operation. Due to the complexity of this system, it must be installed by an authorized dealer only. Installation of this product by anyone other than an authorized dealer voids the warranty. This owner’s guide should help you to get the most out of your system. Please take the time to read it prior to using the system.
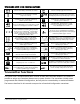
Remote control functions The remote control buttons are used to send commands to the system. The descriptions below reflect the standard configuration for this system. The buttons can be custom configured for the user’s specific needs by the installer. STANDARD CONFIGURATIONS BUTTON The arming function is controlled by pressing this button for one second. The panic feature is controlled by pressing this button for more than 5 seconds.
STANDARD LCD ICON CONFIGURATIONS (option) The transmit icon will be displayed while the remote control is transmitting a command to the vehicle. The receive icon will be displayed while the remote control is receiving a page from the vehicle. The signal icon will be displayed if a command is transmitted to the vehicle but the command page is not received.
Remote operation The system operates at 434 MHz. The high frequency combined with Binary Data communication achieves superior range with two way communication. SYSTEM SIGNAL PAGING FEATURES A page is the signal the control module sends to the remote control as confirmation of receipt of a command or alarm system status.
Programming LCD remote TO ENTER PROGRAMMING MODE Press and hold the button until one long beep is heard. Programming mode to customize the remote’s response is now entered. NOTE: If no buttons are pressed within 5-seconds, programming mode will exit with 2-beeps. BEEPS/VIBRATION ON/OFF Press to select beeps/vibration On/Off. Beeps alone, or vibration alone, or beeps and vibration, or no beeps or vibration can be selected. Refer to the table below for these settings.
PAGE NOTIFICATION The remote control can be programmed to notify the user of a page (audibly beeping if the vehicle’s status changes, e.g. door unlocked, engine started, vehicle violation, etc.). On the LCD remote press to select page On/Off. One beep is page On, Two beeps is page Off. When programmed off the remote will not give any notification that a page was received from the vehicle.
PASSIVE ARMING The system can be programmed to arm itself automatically (called passive arming). If the system is programmed for passive arming, it will automatically arm 30 seconds after the ignition is turned off and the system detects that you have left the vehicle by opening and closing a door. Whenever the system is in its 30-second passive arming countdown, the in-vehicle status LED will flash twice as fast as it does when the system is armed.
bypassed. Press a third time within five seconds: The parking lights flash three times. Zone 4 is now bypassed. Press a fourth time within five seconds: The parking lights flash four times. Zone 7 is now bypassed. Press a fifth time within five seconds: The parking lights flash five times. Zones 2 and 4 are now bypassed. Press a sixth time within five seconds: The parking lights flash six times. Zones 2 and 7 are now bypassed.
2. If a switch (Zone 1, 3, 5, or 6) triggered the system, the remote will emit 4 quick beeps and the LCD screen will indicate which switch (5-flashes) tripped the alarm. 3. If the system was triggered so many times that NPC is active the remote will emit the above notifications with 5 beeps instead of 4. DISARMING WITHOUT A TRANSMITTER This feature allows you to disarm the security system without the remote transmitter should it be lost or damaged.
(This is the factory setting.) SILENT MODE To temporarily turn off the arm or disarm chirps, use Silent Mode™. Simply press for less than one second before arming or disarming, and the confirmation chirp(s) will be eliminated for that one operation only. If you want the arm/disarm chirps turned off permanently, your dealer can do this for you. NOTE: The Warn Away® response to lighter impacts is bypassed if the system is armed using Silent Mode.
VALET MODE You can prevent your security system from automatically arming and triggering by using Valet Mode. This is very useful when washing the vehicle or having it serviced. In Valet Mode, the security system will not arm, even with the remote transmitter, but all convenience functions (door locks, trunk release, etc.) will continue to work normally. To enter or exit Valet Mode: 1. Turn the ignition on. 1. Turn the ignition off. 1. Press and release the Valet button within 10 seconds.
2. Turn the ignition On for more than 1-second and less than 3-seconds. 3. The siren will chirp once to indicate one-time bypass has been activated. To cancel one-time bypass perform one of the following: Arm then disarm the alarm. Turn the ignition On for more than 3-seconds. NUISANCE PREVENTION® CIRCUITRY Your system has Nuisance Prevention® Circuitry (NPC®).
Auxiliary outputs (options) This system also supplies outputs that can control convenience options such as remote control trunk release and window automation. Consult your dealer for available options for your system. Channel 2 Trunk release: When connected, pressing for 1.5 seconds will remotely release the vehicle trunk lid.
NOTE: The LCD transmitter will also have the zone 2 icon and the alarm icon indicating. 4. The in vehicle LED will illuminate continuously for the duration of shock adjustment mode. NOTE: When the shock sensor adjustment mode is entered, all other timers and operations are bypassed until shock sensor adjustment mode is exited. ADJUSTING THE SHOCK SENSOR SETTING NOTE: When adjusting the shock sensor, ensure that the vehicle’s doors are closed. 1.
NOTE: When the shock sensor adjustment mode is exited, the bar indicator will indicate continuously. For example if level 15 was being set (bars 1 through 7 indicating continuously, and bar 8 flashing), upon exiting adjustment mode bars 1 through 8 will indicate continuously. Bar No.1 Bar No.10 Sensor level setting Shown at mid-point 2. Decrease Sensitivity—Press and release the button to decrease shock sensor sensitivity by one step.
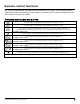
Diagnostics The microprocessor at the heart of your security system is constantly monitoring all of the switches and sensors that are connected to it. It detects any faulty switches and sensors and prevents them from disabling the entire system. The microprocessor will also record and report any triggers that occurred during your absence. Refer to the System Status Chirps and Table of Zones charts for diagnostic information.
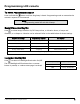
TABLE OF ZONES The zone number is the number of LED flashes used by the system to identify that input. The standard input assignments are listed below, along with spaces to write in any optional sensors or switches you have had installed. Zone - Number of LED Flashes Description 1 Instant trigger - often used for trunk pin switches 2 Shock sensor input - a light impact activates warn away and a heavier impact activates full alarm.
High frequency Your system transmits and receives at 434 MHz. This provides a cleaner spectrum with less interference and a more stable signal. Enjoy a phenomenal increase in range – even in areas with high radio interference. Owner recognition Using a hand-held programming tool, your dealer can program many of the system settings. The programmer makes it possible to program different settings for each transmitter that is used with the system.
Programming Programming options control what your system does during normal operation, and require few or no additional parts. However, some may require additional installation labour. The following is a list of the program settings, with the factory settings in Bold: Active arming (only with the remote) or passive arming (automatic arming 30-seconds after the last door has been closed). Arming/disarming confirmation siren chirps on or off.
RUN position and pressing the Valet® button the programmed number of times. AED is disabled when the system is in Valet® Mode. NOTE: This feature will only function if the Failsafe® Starter Kill relay has been installed. Full trigger response 30 or 60 seconds: This determines how long the full triggered sequence lasts. Some states have laws regulating how long a security system can sound before it is considered a nuisance.
VEHICLE RECOVERY SYSTEM (VRS® ) The optional VRS® feature is designed to ensure that any unauthorized user of your vehicle (even if using your keys and remote control) will not be able to permanently separate you from your vehicle. The VRS® cannot prevent a carjacking attempt; however, it does ensure that if your vehicle is taken by an unauthorized user, it will be disabled (after several progressive warnings) as safely as possible.
Fifteen seconds after the siren chirps begin, the siren’s output will change to a continuous blast. From this point on, when the ignition key is turned off, the VRS® will immediately turn on the starter kill. This will prevent the vehicle from being restarted, thus immobilizing it at that spot. Three minutes after the constant siren output begins, the flashing parking lights and the siren will stop. The starter kill will remain active until the system is disarmed.
Programming options See your dealer for further details on the options listed below available with this system. Automatic Engine Disable: Prevents the vehicle from being started even if the vehicle is not armed after turning the ignition Off and exiting the vehicle. Comfort Closure: Windows will close upon locking the vehicle. Dual Sensor Trigger: If programmed On both the onboard and at least one of the optional sensors need to be triggered within 1- second of each other for full alarm.
Security & convenience expansions Here we have listed only some of the many expansion options available. Please contact your dealer for a complete explanation of all the options available to you. Audio Sensor: Metal on glass, glass cracking, and breaking glass each produce distinctive acoustic signatures. The audio sensor uses a microphone to pick up sounds, and then analyzes them with proprietary acoustic software to determine if the glass has been struck.
Glossary of terms Automatic Engine Disable (AED): This feature protect the vehicle from being stolen at all times, regardless of whether or not the alarm is armed. If AED is programmed on, the starter of the vehicle will be disabled 30 seconds after the ignition is turned off. Control Unit: The "brain" of your system. Usually hidden under the dash area of the vehicle. It houses the microprocessor which monitors your vehicle and controls all of the system's functions.
QUICK REFERENCE GUIDE To arm using your remote You can activate, or arm, the system by pressing on your remote for one second. When the system arms, you will hear a short siren sound, or chirp, and the parking lights will flash once. If the vehicle’s power door locks have been connected to the system, the doors will lock. To disarm using your remote To disarm the system, press . You will hear two chirps, and the parking lights will flash twice.
The company behind this system is Astroflex Electronics, member of Directed Electronics, Inc. Call (888) 892-7876 for more information about our products and services. Astroflex Electronics is committed to delivering world class quality products and services that excite and delight our customers. Sherbrooke, Qc (Canada) J1R 0L1 www.astroflex.