
Install guide

AstroBoy
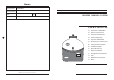
Quick install guide
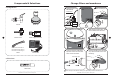
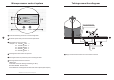
Water Inlet connection
Water can be diverted to the AstroBoy by either using the tap diverter or the opella valve.
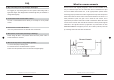
Tap diverter
From your main kitchen mixer tap unscrew the aerator at the end of the spout and screw the tap diverter
and black washer provided in its place. The diverter is supplied with male and female adaptors.
Unscrew the grip nut and push onto the ¼ “ White tube provided push the tubing firmly onto the
barbed spigot and secure by reattaching the grip nut and fully tightening.
Opella valve
using the instructions provided with the valve attached the opella to a cold water pipe. Push the ¼”
white tubing provided into the pushfit connection on the valve.
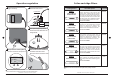
Connecting to the RO unit
Take the other end of the tube attached to either the tap diverter or opella and feed through the aperture
at the centre rear of the blue RO base. Then connect to the T push fit connection at the end of the in
line filter with the pink coloured label.
Waste Connection
Feed one end of the long orange tube provided through the smaller aperture at the rear left hand corner
cut out of the blue base unit when viewed from the front. This is deliberately a tight fit Unscrew the
white end nut from the valve connector attached to the internal orange tube. Place the nut over the long
orange tube and push the tube firmly into the connector. Secure into place by reattaching the white nut
to the connector. The waste end can then either be attached to the undersink waste pipe using the black
waste connector supplied or simply placed into the sink if you require more portability.
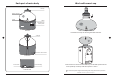
Overflow connector
Feed the lager diameter white pipe through the larger aperture next to the orange waste pipe aperture
and using the same method as the with the orange pipe connect to the large valve connector located to
the left of the green label filter if looking from the front. The overflow can then either be fitted to a
waste pipe or placed into a sink. (note we do not provide a connection to fit the overflow to a waste
pipe). The unit is designed to continually replenish the tank to keep the pure RO water fresh. Once the
tank is full the overflow will run unless the water inlet supply is turned off
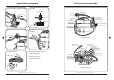
Electrical connection
The transformer connection is located next the on off switch to the front right of the blue base unit.
Ensure that the Three-pin plug is connected to a suitable 13-amp power supply.
Start up
Having first installed the water dispenser valve to the clear tank. Using the tap diverter or opella valve
turn the water supply and then the power supply on to the unit. At this point we recommend that you
observe to ensure no water leaks within the system. Once the tank has filled, turn off the water supply
and discard the first tank of water. On initial start up the first tank may contain impurities from the
filter flushing process. Once this first tank has been discarded turn the water supply back on and within
a few moments you can start to use the water.
If you intend to remove the storage tank from the system or switch the unit off we recommend that the
container is stored away from heat and direct sunlight and the pure water consumed within 8 hours.