
Assembly Instructions


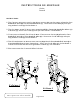
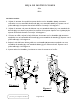

Figure 1
Figure 2
D
C
C
E
A
D
C
J
F
H
I
G
K
792 - 636
792 - 637
C
A
B
D
C
A
B
D
C
G
B
E
Page 2 of 2
INSTRUCTIONS:
1. Attach the Seat Frame to the Back Frame using Bolts (E&D) with a Lock Washer (B) and then a
Flat Washer (C) placed on the Bolts (E&D) first. Tighten with the Allen Wrench (G). Do not over
tighten! See Figure 1.
2. Attach the Seat Frame to the Front Legs using four Lock Washers (B), Flat Washers (C) and a
Nuts (A). Tighten with the Wrench (F). Do not over tighten! See Figure 1.
3. If you have an Arm Chair, attach the bottom of the Arm to the Seat Frame using the Bolts (H) with
a Lock Washer (I) then a Flat Washer (J). Tighten the Bolts (H) slightly with the Allen Wrench
(G). See Figure 2.
5. Tighten all the Bolts, Nuts and Screws before using your Chair.
J
H
I
G
G
H
I
K
L
C
E
B
G
C
G
B
D
C
A
B
F
Chair
4. Attach the top of the Arm to the Back using one Bolt (H) with a Lock Washer (I) and a Flat
Washer (J) placed on the Bolt (H) first for each Arm. Tighten the bolts with the Allen Wrench (G).
See Figure 2. Cover the bolts holes of the back leg with a Wood Cap (L). See Figure 2.
ASSEMBLY INSTRUCTIONS
Armchair
Thank you for purchasing furniture!