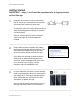
asTech Duo User Guide Getting Started IMPORTANT – Steps 1 and 2 must be completed prior to logging into the asTech Duo app. 1 Plug your asTech device into a vehicle with key on, engine off, check Internet connection, and ensure the firmware is up to date. If necessary, refer to the asTech Device Quick Start Guide (shipped with device) to connect it to the Internet. Refer to Confirm asTech Device Firmware Version on page 18 of this document if needed.
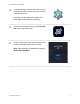
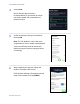
asTech Duo User Guide 4 From the Settings menu on your device, go to Bluetooth and pair your asTech device to your Android/IOS device. If needed, see the Appendix on page 19 for more detailed instructions on this step. 5 From the device home screen, tap the asTech Duo icon to launch the app. 6 On the Login screen, type your user name and password created with asTech Connect. Note: Video tutorials are available by tapping New to Duo? Get Help >.
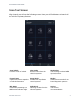
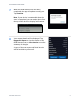
asTech Duo User Guide Scan Tool Screen After launch, you will see the following screen. Here you will find buttons to launch all asTech Duo’s primary features. Scan Vehicle Perform a scan of vehicle. Clear Codes Remove codes from the vehicle’s systems. Work Orders View existing Local and OEM reports/invoices. Freeze Frame Capture and view a snapshot of vehicle information. Smog Check Perform test of pollution control systems. Mode 6 Advanced test results for onboard diagnostic systems.
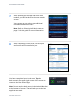
asTech Duo User Guide Performing a Local Scan 1 Connect the asTech device to the vehicle to be scanned. 2 Set the vehicle ignition to “on”. For keyed ignition, turn to the on position. For keyless ignition, follow the manufacturer’s recommendation; typically press and hold the On button for 5-10 seconds or pressing it twice. 3 In the asTech Duo app, from the Scan Tool screen, tap the Scan Vehicle button.
asTech Duo User Guide 4 Select Local. Notice that the app will make a recommendation to you based on vehicle year/make/model and our database of potential issues. 5 Select the desired scan type and method, then tap OK. Note: The “All Modules” scan is the most comprehensive and is usually recommended. Your scan will begin, and the screen will display a progress spinner letting you know it’s working. 6 When complete, the app will display the number of trouble codes found.
asTech Duo User Guide 7 After inputting the mileage and work order number, you will be taken to the scan results screen. You can tap on any code to get additional information about the code. Note: Refer to Clearing Individual Codes on page 13 of this guide for more information. 8 After completing a local scan, a scan report and invoice will be emailed to you. You have completed your Local scan. Tap the back arrow in the upper-right corner of the screen to return to the Duo Home Page.
asTech Duo User Guide Performing an OEM Scan 1 Connect the asTech device to the vehicle to be scanned. 2 Set the vehicle ignition to “on”. For keyed ignition, turn to the on position. For keyless ignition, follow the manufacturer’s recommendation; typically press and hold the On button for 5-10 seconds or pressing it twice. 3 In the asTech Duo app, from the Scan Tool screen, tap the Scan Vehicle button.
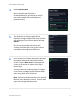
asTech Duo User Guide 4 Select Remote OEM. Notice that the app will make a recommendation to you based on vehicle year/make/model and our database of potential issues. 5 The New Service Request page will be displayed. Simply complete the form (just like our existing asTech Connect portal) and tap Submit. One of our specialized technicians will contact you when they receive your request and walk you through your OEM scan.
asTech Duo User Guide 7 When the OEM Remote scan has been completed, the app will update to notify you. Tap Continue. Note: If your device is unattended when the scan is completed, you can swipe down from the top of the device to display notifications. 8 Your request details will be displayed. Tap Diagnostic Report to view the results of the OEM Remote scan, or View Invoice to see the summary of charges. A copy of the scan report and Retail Invoice will be emailed to you as well.
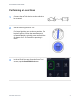
asTech Duo User Guide Your asTech Device during a Remote OEM scan 1 When you select Remote OEM scan from the Scan Vehicle screen, your asTech device will reconfigure itself to connect to our remote servers and tools. You’ll notice the CONNECTED light will turn off, and the screen on the asTech device will search for your local network. 2 Next the asTech device will obtain an IP address within your network. 3 Then the CONNECTED lamp will illuminate and the screen will display Connected & Waiting.
asTech Duo User Guide Reports & Invoice Once you have completed a scan, you will receive the report and retail invoice packaged into one email. Scan report For Local scans, a report of all trouble For Remote OEM scans, the detailed report, and recommendations from one of codes identified in the scan will be sent to you. our technicians will be sent to you.
asTech Duo User Guide Clear Codes Report When clearing codes, either individually or all, a Clear Report will be emailed to you showing details of the codes cleared. Retail Invoice Your invoice will provide the year, make, model, and VIN of vehicle scanned, type of scan performed, and retail price.
asTech Duo User Guide Clearing Individual Codes 1 With your completed Local Post-Scan displayed on the screen (and vehicle connected to the asTech device with Key On, Engine Off) tap the trash can icon next to the code you would like to clear. 2 The Confirm Clear dialog box will display. Tap OK to continue. 3 The screen will update to indicate codes are being cleared. 4 When the codes have been cleared, you will be returned to the Local Post-Scan report.
asTech Duo User Guide Clearing All Codes 1 With your vehicle connected to the asTech device and the Key On, Engine Off; tap the Clear Codes button on the app Home screen. 2 The Clear Trouble Codes dialog box will display. Tap the desired option to select codes you wish to clear. 3 The screen will update to indicate codes are being cleared.
asTech Duo User Guide 4 Once the codes have been cleared, the Summary dialog box will display. Enter the vehicle’s current odometer reading and your Repair Order Number in the provided spaces. Then tap Finish. A document titled Clear Report will be emailed to you. Refer to the example shown on page 12.
asTech Duo User Guide Changing Your asTech Device Wi-Fi settings 1 With your vehicle connected to the asTech device and the Key On, Engine Off; tap the Settings button on the app’s bottom navigation bar. 2 From the Settings page, tap Configure Wi-Fi.
asTech Duo User Guide 3 On the Configure Wi-Fi page, type the name of your Wi-Fi network, the password and select desired Security Type. Tap the Write Settings button to push these settings to your asTech device.
asTech Duo User Guide Confirm asTech Device Firmware Version 1 Your asTech device must have firmware version 2.01 (or higher) to pair with your Duo device via Bluetooth. To determine current firmware version, and with the device attached to a vehicle; press and release the red NO button three time in rapid succession. 2 The asTech device screen will display configuration information. The firmware version number is shown in the upper righthand corner of the screen.
asTech Duo User Guide Activating Duo on the asTech Device This only needs to be performed once as you will be using the Duo app for performing Local and submitting Remote OEM scans. 1 Your asTech device with firmware version 2.01 (or higher) can switch between communicating with the asTech Duo or being used in the standard mode to submit Remote OEM scans via asTech Connect. Pressing the yellow WPS button 8 times in rapid succession will switch the device between modes.
asTech Duo User Guide Changing Display Modes If you are having difficulty seeing the screen in the Duo app, try changing the display mode to Light or Dark. 1 From any screen in the asTech Duo app, tap Settings in the lower right-hand corner of the display. 2 On the Settings screen, tap the desired option for Dark/Light mode.
asTech Duo User Guide 3 The selected mode will display.
asTech Duo User Guide Frequently Asked Questions I can’t log into the Duo app on my device. You must create an asTech Connect login to log into the asTech Duo. If you have not received an email invitation from asTech to do so, or if your invitation has expired, contact our Customer Service team at 888-486-1166 to have one sent. I am locked out of my Duo account. Go to https://app.astech.com and click the Forgot Password link. This will reset your password.
asTech Duo User Guide Appendix Bluetooth Pairing Procedure 1 Find the Settings app on your Android/IOS device and open it. Android device screen shots are shown here, yours may vary slightly. 2 Find the Bluetooth option from within the Settings menu. Bluetooth options are usually found under “Connections”, “Connected Devices” or something similar. 3 Once on the Bluetooth screen, tap your asTech device to pair to the device.
asTech Duo User Guide 4 When prompted, tap “OK” or “pair” to confirm the pairing. 5 After successfully pairing to Bluetooth, the asTech screen will show “Connected”, and the Connected Light will be illuminated green.