Android User Manual Device Requirements Version: Android system requires Android 2.1 or above. Hardware: CPU 600MHz or above. IP Camera Network Connection Please refer to "Quick Start Guide" to configure the network connection.
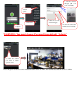
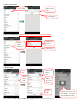
1. APP Installation Search “MIPC” in the Play Store, or Android Market or GoMarket. Click the “download” button and “install” on your phone. . 2. APP Overview The Mobile APP includes: Video online viewing, 2-way audio, PT control, snapshot, video recording / playback, software online upgrade, device settings and background alarm notification on the phone. 2.1 APP Login 2.1 Account registration/login and add camera Click “MIPC”, and login: 2.Click "Sign up" 3. Enter the email 4. Enter the password 1.
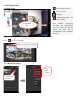
4. Add the cameras through QR code scan or manually 2.Click option 3.Add device 1. Sign in 5.Wait 30 seconds and click Apply Or enter the camera ID and Password manually WARNING: You must change Password from default “Admin” 6.
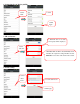
2.2 APP Operation: : Sound monitor button 2.2.1 Main menu : Two-way audio : Snapshot. :Manual(temporary) red indicates recording. Finger sliding, PT Note: Manual (temporary) recording will automatically stop if you leave the monitor screen, and video will be automatically saved to the Micro SD card. (Pan and Tilt only available for model CM-MV320) Press icon to save snapshot Click to save picture to your phone 2.2.2 Resolution settings: Choose desired resolution 1.
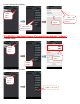
2.2.3 Account password change: 1.Click option button 4.Apply 3. Enter Old password and new password 2. Click Admin to change passwords WARNING: You must change Password from default “Admin” 2.2.4 APP settings: 1.Click option button Notification option 2.Click Settings 2.2.5 Signing out of the account 1. Click option button 2.
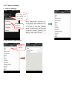
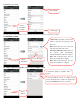
2.3 Camera settings: 1. Camera Settings 1. Long press the camera you need to set 2.Select "Settings" 2. Check Camera Information: 1.Select "About" Note: Important! You have to “Long press” the camera for 2 to 3 seconds to get the settings menu on the screen. If you just touch the camera quickly, you will get “live view” mode.
3. Enter camera name: 1.Select "Nick" 2.Enter desired name 3.Click Apply 4. Password modification: WARNING: You must change Password from default “Admin” 1.Select admin "Password" 2.Change the Password 3.Click Apply 5. Wi-Fi Setup: 1.Select Wi-Fi 2.Select “Client mode” 3.Select the wireless router 4.Enter the router password 5.Click Apply Note: After successfully linked, STATE1(STA1) flashing 3 times in each 3 second in green. 6.
6. Setting On Screen Display (OSD): 1.Select "OSD" 2.Select 3.Click Apply 7. SD card status: 2. With SD card in, its status and capacity will be displayed. 1.Select "SD card" 3. Format: While the Micro SD (T-FLASH) card be formatted, the original recording will all be cleared. Unmount: remove micro SD card from the camera 8. Alarm setting: 1.Select "Alert device" 2. Set the alarm device 3.
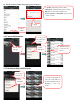
. Scheduled recording: 2.Set Schedule 1. Select "Scheduled recording”" 3. Click Apply Note: Video file is only available to store in the micro SD card for 30 minutes maximum for each file. 10. Date/Time settings: 1.Select "Date/Time" 3. Save and Apply 2. Time zones: depending on the camera location, select the corresponding local time zone.
12. Set the camera's audio, image flip, power frequency 2. Speaker: Adjust the speaker volume Microphone: Adjust the microphone volume Flip: Flip to view camera upside down Power frequency: 50HZ/60HZ options, based on user’s country 3. Apply 1.Select " Others" 2.4 Camera Information: Unread alarm messages 1. Long press the camera icon you want 2.Select "Messages" 3. Click the image to view and save to phone 2.5 Video Recording and Playback: 1.Long press camera icon 3. Select and playback the 2.
2.6 Remove Camera from account: 1. Long press the camera you want 2.Select " Delete" For support, Please contact toll free (866)368-8788 M-F 9-5 PST or Email: support@astak.