
Troubleshooting Guide


8
G lue Down installation Continued
I nstalling The Floor
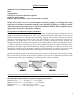
Spread the adhesive from the chalk line/straightedge out to approximately the width of two planks. Install
the first row of starter planks along the chalk line/straightedge and secure into position with the tongue
facing the starter wall. NOTE: Proper alignment is critical. Misaligned starter rows can cause side and
end gaps to appear in proceeding rows of flooring. When you have the starter rows complete, you can
begin the next row. When you are certain the first two starter rows are straight and secure, spread
adhesive 2 to 3 feet wide across the length of the room. Continue to install planks and push them into
place. Place the tongue of the board into the grooves of installed boards and press into the adhesive. As
you continue working across the floor try to maintain a 10” minimum space between end joints.
Randomly install different lengths to avoid a patterned appearance. NOTE: Never strike a rubber mallet
or hammer directly on the flooring to engage the tongue-and-groove. This practice can damage the
flooring and/or the finish. Remove excess adhesive from the surface of the installed flooring as you work
– this will help to save time and protect the finish. A damp rag with the appropriate adhesive remover or
mineral spirits will remove the excess adhesive. Frequently change towels to avoid leaving a haze on the
flooring surface. DO NOT use water to remove Urethane adhesives from the flooring.
As you approach the end wall it may be necessary to cut the width of the last row – be sure to allow for
the expansion space along the end wall. Once the final cuts are made set planks into place. After the
installation is complete, remove the straight edge and glue down the first two boards. Restrict foot traffic
for a minimum of 6-8 hours and wait 24 hours before permitting moving of furniture onto the floor. To
remove excess adhesive that has dried, use the same glue remover but pay close attention not to mar the
finish from excessive rubbing.
Aspen Flooring prohibits the use of any adhesive tape on the flooring at any time during
installation or thereafter. This includes tapes that are specially made for wood flooring, such as
blue or green masking tapes. Such use of tape may void this Warranty and no claims will be
addressed in regards to defects in the finish as a result of the use of tape.
Final Inspection
After the floor has been cleaned, inspect the floor for nicks, scratches, gaps or planks that may have
moved during installation, as well as any other imperfections that need attention. Touch up nicks and
scratches with touch-up products. In typical climates, the new floor can accept foot traffic within 24
hours. In areas where additional curing time is required, more time may be needed.
CAUTION: Adhesive that is not properly removed and allowed to dry on the finish surface can be
difficult to remove and may leave a haze or residue. Use the proper cleaning method recommended
by the adhesive manufacturer and ensure ALL traces of glue are removed from the surface.