
Troubleshooting Guide


10
N ail Down Installation Continued
After the subfloor has been properly cleaned and prepped cover the subfloor with an industry approved
moisture vapor retarder such as Aquabar. This material will help to keep the floor clean and help to
retard moisture from below (there is no complete moisture barrier system for staple or nail-down
applications).
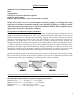
Select a starter wall. An outside wall is best: it's most likely to be straight and square with the room.
Measure out from this wall, at each end, the overall width of the plank (board width + tongue + the space
needed (3/8” or 1/2”) for expansion). Snap a chalk line from these points, parallel to that wall. Install the
first row of starter planks along the chalk line/straightedge and secure into position with the tongue
facing away from the starter wall. Face nail every 6” (in the dark grain); approximately 1” from the back
edge of the board to secure starter planks. Fill nail holes and remove excess filler from surface.
Blind nail at a 45° angle through the tongue 1”-2” from the end joints and every 6” in between along the
length of the starter boards. Depending on the width of the flooring it may be necessary to do this for the
first few rows prior to using a pneumatic stapler/nailer. NOTE: Proper alignment is critical. Misaligned
starter rows can cause side and end gaps to appear in proceeding rows of flooring.
Note: The use of a floating floor 2-in-1 Vapor Barrier Underlayment should be used when stapling
or nailing your flooring down. Follow manufacturer’s instructions for the correct application
when installing the 2-in-1 Vapor Barrier Underlayment.
Installing the Floor
Continue to install the flooring making sure to nail/staple 1”-2” from the ends and every 4”– 6”
thereafter. Make certain the tool is adjusted properly to ensure that the fastener is at the proper angle and
is flush within the nail pocket. As you continue working across the floor try to maintain a 10” minimum
space between end joints. Randomly install different lengths to avoid a patterned appearance. If needed
use a tapping block to help engage the boards together until the tongue-and- groove is flush and tight
and no gaps are present between adjacent planks. NOTE: Never use a rubber
mallet or hammer d irectly on the flooring to engage the tongue-and-groove. This can damage the
flooring and/or finish.
As you approach the end wall it may be necessary to cut the width of the last row – be sure to allow for
the expansion along the end wall. Once the final cuts are made set planks into place.
The last few rows will need to be fastened by hand. To fasten the final planks into place, you must either
manually blind nail and/or face-nail through the surface on the final planks. Countersink nails and fill
with appropriate colored wood filler – remove excess filler from surface with a clean rag and proper
cleaner.
Note: Larger rooms require additional expansion 1/16” to the width of the expansion space for every 3’
the room extends beyond 25’. Dimensions exceeding 40’in length or width – it is recommended to use
a T-Molding for proper expansion.
F loating Floor Installation
Floating floor installation is a widely used system in the floorcovering industry, However Aspen
Hardwood Flooring does not warrant or approve of the floating floor installation method for our products