
Specification

At this time verify that the tiles are lining up straight and square. If they are you can
rmly press on the tiles to secure them to the wall. If some of the tiles have come out
of alignment you can work backward and remove the tiles using a putty knife. Then
reapply the tiles making small adjustment to each tile to regain alignment. Place each
section as if placing a puzzle piece.
Caution: do not skip ahead in tile section placement as alignment issues may
occur; complete all tiles in a progressive manner.
At the beginning and end of each row, cuts to one mat will be required to tie into the
whole mats that are already installed. See cutting directions below.
Cutting tiles
When cutting the tiles use one of the recommended tools and methods listed above.
A wet saw with a glass-cutting blade is the recommended cutting method. Alternative
cutting methods include a glass tile nippers or a simple manual glass-cutting tool.
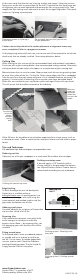
Measure where the cut must be made. Map out and mark the cut using masking tape
to cover the surface of the tile. Cut the tile. Debur sharp edges with le or sandpaper.
Take the cut tile to the work space and place it in its intended location, ensuring it ts
properly. Cut and install all remaining tiles using the same steps described above.
When tiles are installed to your satisfaction, press each again rmly with your hand.
This will ensure that the adhesive bonds to the substrate.
Allow 24 hours for the adhesive to set before exposing tile to a heat source (such as
a stovetop or oven). Clean or touch-up tiles with glass cleaner and soft cloth or paper
towels.
Tips and Techniques
For additional tips and techniques see aspectideas.com.
Deburring cut tiles
If desired, use a ne-grit sandpaper or a small metal le to debur the cut edges.
Caulking countertop seam
If desired, apply a 1/8” bead of caulk or
silicone sealant in the gap under the bottom
row. Wipe off excess sealant. Choose clear or
colored caulk according to your preference.
Edge nishing
To nish the edges of your tile backsplash,
Aspect trim is available online at
backsplashideas.com. A second option is to
seal the outside edges with caulk using the
same materials and method used to seal the
gap under the bottom row of tiles.
Adhering small pieces
Use tube adhesive for cut pieces of Aspect that
are less than a third of a full tile.
Removing tiles
If tiles need to be removed, use a putty knife
and a heat gun or hairdryer to make the
process easier. Note — by removing tiles, you
risk damaging your walls and the tiles will be
unusable.
Fitting around pipes
To t around pipes, make a cardboard pattern
as a guide and use it to draw an outline on
the tile. Cut to shape. A carbide-tipped hole
saw can also be used. Check the t before
peeling off backing paper. The tile should t
snugly, but don’t force it into place.
Measure,
map out,
and mark
where the
cut must be
made
Cut the tile
using the
recom-
mended
cutting
tools
Caulking the counter top seam
Do not apply pressure until you are sure
of your placement
Place each section as if placing a
puzzle piece
A34-97 (12.14)
Finishing option 2: Caulking outside
edges
Finishing option 1: Matching nish
trim piece
www.Aspectideas.com
Aspect Glass™ is a product of ACP.
Patent pending. Made in the USA.