
Specification

Read this installation manual in its entirety before you start. There is additional
information on this product and installation at AspectIdeas.com. If you have doubts
about doing this installation, you should contact a qualied contractor, carpenter or
professional installer.
Tools and supplies needed:
• Protective eyewear or safety goggles
• Measuring tape
• Straightedge or Speed Square
®
• Pencil or other nonpermanent marker
• Soft cloth
• Chalk line
• Level (2’ to 4’)
• Fine-grit sandpaper (400–600 grit)
• Caulk gun and caulk or Aspect trim (optional)
If cutting tiles, one of the following tools will be needed:
• Wet saw with glass-cutting blade (recommended)
• Safety gloves
• Masking tape
• Glass tile nippers (Two-wheel type)
• Simple manual glass cutter and oil
Before you begin
Installing Aspect peel & stick matted Glass tiles is a simple, exciting project that adds
instant style to your kitchen or bath. We have deliberately over-explained the tile
installation. Have fun with this project. It’s going to be easy and look great!
The adhesive on the back side of the
Aspect tiles is engineered to be aggressive and
pressure-sensitive. Proper wall preparation is
required. Aspect can be installed over most
structurally-sound substrates if they are clean,
at, smooth, dry and free of dust, wax, soap
scum and grease. Acceptable substrates are
drywall, plaster or clean, smooth tile (glazed,
porcelain-type tile; not porous or textured).
Any damaged, loose or uneven areas must
be repaired, patched, leveled and primed.
Fill cracks and irregularities with wallboard
compound or spackling, then sand smooth with
ne-grit sandpaper.
Occasionally, even after properly preparing the substrate, the surface can still have
bows, high spots, ridges, or uneven areas. Place a level against the wall. If there is
a 1/8” gap or greater, use a ller such as spackling or drywall compound to ll in
imperfections.
Allow the tiles and substrate to come to room temperature (65 to 100 degrees F.)
before installation.
Layout
Measure the rst area to be covered by Aspect material. We recommend you lay out
the entire project on a at surface, like the countertop, a table or the oor, before
adhering to the substrate, to be sure you have enough tiles and your design and
layout is correct. This will also give you a good reference as to how the tiles will look
on your wall.
As each project is different, be sure to plan for cutouts, corners or edge treatments
before applying tiles.
One popular layout method is to begin from the inside corner of your counter and
work across left to right. This method allows you to use two points of reference,
your vertical wall and horizontal counter top. Note — when using these two points
of reference, be sure to check them for level on the horizontal plane and 90 degrees
plumb on the vertical plane. This will prevent any problems as you build your
backsplash.
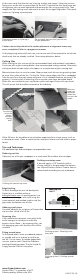
Lay a 4’ level on top of your counter top or backsplash return lip if you have one.
If the counter is level, use it as your reference. If not, identify the high point(s) of
the countertop. Draw a horizontal line using your level and snap a reference line
to indicate the high point. Snap a reference line to indicate the top of the rst row
of tiles. The top edge of the rst row will be installed along this line. Use a level or
measuring tape to mark the vertical termination point of your installation.
Installing your rst tile
Here’s where the fun begins. Be sure the substrate is clean and dry. Remove the
adhesive liner from the back of the matted tile and discard the liner. Align the tile
where you want it on the reference lines.
DO NOT bend tiles backwards as it could
damage the tiles or permanently stretch and
misshape the tile matting.
Lightly place the tile onto the wall using
your reference lines. DO NOT apply
pressure to the tile until you are sure of
your placement.
The aggressive nature of the adhesive does
not allow for repositioning after pressing
rmly. If it is in the right position, rmly apply even pressure across the entire tile.
When applying subsequent tiles, rst “dry t” the tiles with the adhesive liner in
place to ensure proper t. Dry t tile against the wall exactly where it will be placed.
Install the next 3 to 4 subsequent tiles by light tacking or pressing them on the wall.
Mark
horizontal
and
vertical
reference
points
Aspect Glass
™
Peel & Stick Matted Tile
proper surface preparation is essential
for a successful project
Failure to follow recommended surface preparation instructions
may void the warranty
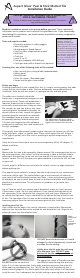
The adhesive on the back side of
the Aspect tiles is engineered to be
aggressive and pressure-sensitive
DO NOT bend the tile backwards
Installation Guide
Due to manufacturing
variations, we cannot
guarantee an exact color
match from lot to lot. Prior to
adhering Aspect tiles to your
wall, please unpackage & lay
out all purchased product to
ensure color consistency. If
you encounter unreasonable
color variation, please give
us a call at 1-800-434-3750
(7am-4:30pm CST, M-F) so
that we may assist you with
your project.