
User Manual

Now that your engine has been broken in, you can set the high and low
speed needle valves for optimum engine performance.
Note: Be careful to never lean out the engine too much. Remember
that the lubricants for your engine are suspended in the fuel. If you lean
out the fuel mixture too much you will also be lowering the amount of
lubricant entering your engine. Less lubricant means more chance of your
engine overheating and possible engine failure.
❑ Setting the High Speed Needle Valve
❑ 1) Start the engine and remove the power from the glow plug. Al-
low the engine to warm up for about 1 minute.
❑ 2) After the engine has warmed up, slowly lean the high speed mix-
ture until the engine reaches peak R.P.M. After reaching peak R.P.M. richen
the mixture slightly until an audible drop in R.P.M. is heard. If you are
using a tachometer this should be between a 200 - 300 R.P.M. drop.
❏ 3) With the engine running at full power, carefully lift the nose of the
airplane about 45º into the air. The mixture should not become too lean, but
you may hear a slight increase in R.P.M. This is normal. If the engine sags,
or loses R.P.M. when you hold the nose up, the mixture is too lean.
Note: R.P.M. will increase about 10% - 30% in the air. This is due to
the forward motion of the aircraft as it is flying. Because of this more air
is entering the carburetor, at a higher force, and causes the mixture to lean
out. Additionally, as the fuel level in the fuel tank goes down, fuel draw
becomes more difficult for the engine, especially during aerobatics, also
causing the mixture to go lean. It is imperative that you set the mixture
rich while on the ground to compensate for the leaning tendencies that will
happen in the air. Always watch the exhaust during your flight. The en-
gine should leave a noticeable white smoke trail at all times. It there is no
smoke trail, the engine is running too lean. You should land immediately
and reset the mixture.
❑ Setting the Low Speed Needle Valve
❑ 1) Start the engine and lean out the high speed needle valve as per
the previous steps. Close the throttle until the slowest reliable idle is
reached. Allow the engine to idle for about 30 seconds.
❑ 2) Quickly advance the throttle to full. If the engine just stops run-
ning as soon as the throttle is advanced, the idle mixture is too lean. With
the engine stopped, richen the idle mixture about 1/8 of a turn.
❑ 3) Repeat steps # 1 and # 2 until the engine will transition from idle
to full throttle smoothly. Minor hesitation in the transition is normal.
❑ 4) Working with one valve at a time, loosen the hex nut using a
small wrench. Use a screwdriver and turn the adjustment screw counter-
clockwise about 1/2 turn. This will open the gap slightly. Slide the .04mm
feeler gauge between the rocker arm and the valve stem. Carefully turn the
adjustment screw clockwise until the rocker arm touches the feeler gauge.
Using a small wrench, tighten the hex nut.
❑ 5) Remove the feeler gauge and double check the gap. Repeat step
# 4 if necessary to achieve the correct setting. Repeat for the second valve.
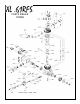
FINE TUNING THE XL .61RFS
❑ Adjusting the Valves
The valve clearances are preset from the factory, but do require periodic
adjustment. Reset the valves after the first 1 hour of engine running. After
that, the valves can be checked and adjusted about every 8 hours of run-
ning. The valves will need adjustment if you notice a severe loss of power
or after you have repaired or reassembled the engine.
❑ 1) With the engine cold, remove the rocker cover on top of the
cylinder head by unscrewing the two socket cap screws.
❑ 2) Rotate the crankshaft until the piston is at top dead center. Both
valves will be closed at this point.
❑ 3) The required valve clearance is between .04mm and .10mm mea-
sured between the valve stem and the rocker arm. Use feeler gauges to
check the clearance. The .04mm gauge should pass through the gap with
only slight friction. The .10mm feeler gauge should be tight.
VALVE ADJUSTMENTS
❑ 5) After the engine has been running for about 1 minute, remove
the power from the glow plug. Advance the throttle barrel to full throttle.
Adjust the high speed needle valve so that the engine is running very rich.
You should notice excessive white smoke coming from the exhaust and the
engine should sound like it’s running very rough. Let the engine run for
approximately 5 minutes, then stop the engine.
❑ 6) Let the engine cool for approximately 10 minutes, then restart it.
Set the high speed needle valve mixture to a slightly leaner setting, about
1/4 turn more in. Let the engine run for about 5 minutes at this setting,
then stop the engine and let it cool for approximately 10 minutes.
❑ 7) Repeat the procedure in step # 6, while leaning the needle valve
slightly more each time. In all, you should run the engine about a total of
30 minutes of actual running time. After 30 minutes of run time the engine
is ready for flight. Fly the airplane with the engine set as rich as possible,
but with adequate power to fly the airplane. After each flight, lean the
mixture slightly. Continue to do this for about 5 flights. At this point the
engine should hold a good setting on the high speed needle valve and you
can begin to fine tune the needle valve settings to increase performance.
❑ 4) If you quickly advance the throttle from idle to full throttle and
the engine seems to be very rich during transition (i.e., lots of smoke com-
ing from the exhaust and very rough sounding), the mixture is too rich.
With the engine stopped, lean the idle mixture about 1/8 of a turn.
❑ 5) Repeat steps # 1 and # 4 until the engine will transition from idle
to full throttle smoothly. Minor hesitation in the transition is normal.
❑ Avoid running the engine under dusty conditions. If you are in a dusty
environment we suggest using an air filter over the carburetor. A small
piece of women’s nylon stocking placed over the carburetor opening and
held in place with a small rubber band works well.
❑ At the end of every flying day, purge the engine of fuel by disconnect-
ing or pinching the fuel line and allowing the engine to run dry of fuel.
❑ Use a high quality after-run oil in the engine after you have purged the
engine of fuel. Inject the oil into the engine through the carburetor and
through the glow plug hole. (Remove the glow plug.) Flip the propeller
several times to distribute the lubricant inside the engine. After-run oil will
coat the internal parts of the engine, most importantly the ball bearings,
preventing rust from building up.
❑ Wipe the outside of the engine dry using a soft cloth.
❑ Use a fuel filter between the fuel tank and the carburetor to prevent
debris from getting into the carburetor’s spray bar assembly.
❑ After about every 20 flights, use the two hex wrenches provided with
the engine to double check the tightness of all of the engine bolts.
MAINTENANCE