INSTRUCTIONS FOR USE Washing machine W2084C.W.AU WM75.B Carefully read the instructions for use before using the washing machine.
Dear Customer, We thank you for purchasing this quality ASKO product. We hope it meets all your expectations. Scandinavian design combines pure lines, everyday functionality, and high quality. These are the key characteristics of all our products, and the reason why they are highly appreciated across the globe. We kindly recommend you to read these instructions before using the appliance for the first time. The instruction manual also includes information on how you can help protect the environment.
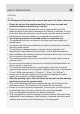
SAFETY PRECAUTIONS GENERAL Please read the instruction manual and save it for future reference. • Please do not use the washing machine if you have not read and understood these instructions or use first. • Failure to observe the instructions for use or inappropriate use of the washing machine may result in damage to the laundry or machine, or injury to the user. Keep the instruction manual handy, near the washing machine. • Instructions for use are available on our website at www.asko.com.
• Bleaches that contain chlorine can be replaced with oxygen-based bleaches. Otherwise, a neutralization cycle should be performed by running the Cotton program at the highest temperature. For best results, use hydrogen peroxide or oxygen-based detergents. • Do not use colourants (dyes) or bleaching substances (substances for discolouration or removal of colourants) as they contain sulphuric compounds that could cause corrosion.
regarding safe use of the washing machine, and if they understand the hazards of inappropriate use. Make sure children do not play with the appliance. Make sure the children do not clean the washing machine or perform any maintenance tasks without supervision. DANGER OF HOT SURFACE • At higher washing temperatures, the door glass will heat up. Be careful to avoid burns. Make sure children do not play near the door glass.
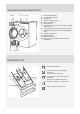
WASHING MACHINE DESCRIPTION 87 6 9 1 2 1. 2. 3. 4. 5. 6. 7. Main switch (ON/OFF) Program selector knob Display unit Program settings buttons Button (start/pause) Dispenser tray QR and AUID code (on the inside of the washing machine door) 8. Rating plate with information about the washing machine (on the inside of the washing machine door) 9. Washing machine door 10. Drain filter cover 11. Water release hose 12.
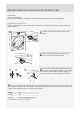
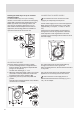
BEFORE USING THE APPLIANCE FOR THE FIRST TIME PACKAGING Remove all packaging. Please sort the materials in compliance with local recommendations (see chapter ”DISPOSAL”). TRANSPORT PROTECTION Before using the appliance, remove the three transport bolts and plastic plugs which protect the appliance during transport. 1 2 3 1 Release and remove the bolts as shown in the figures. 2 To remove the plastic plugs holding the bolts, squeeze them and then pull them out.
CLEANING Disconnect the washing machine from the power mains and open the door. Clean the washing machine drum with a damp cloth and a mild detergent. Connect the washing machine to the power mains and run the dedicated drum cleaning program. See chapter "WASHING PROCESS; STEP BY STEP (1–8)" /STEP 5: CHOOSE THE PROGRAM. No program can be started while the door is open.
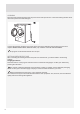
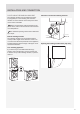
INSTALLATION AND CONNECTION POSITIONING THE WASHING MACHINE Clearances around the washing machine The washing machine can be installed as a builtin (integrated) or a free-standing unit. Place the machine on a level surface so that the power outlet on the wall is accessible. min. 50 mm Before connecting the washing machine to the power mains, wait for at least 2 hours until it reaches room temperature. The ventilation openings must not be obstructed by a carpet. min. 50 mm min.
Stacking an ASKO dryer on top of an ASKO washing machine To stack an ASKO dryer on top of a washing machine, use the extra vacuum feet and the tipping guard (A+B), supplied in the cardboard box in the ASKO dryer drum. If the washing machine and dryer are not of matching dimensions or if you have installed a hidden helper between the two appliances, then binding plates are available as optional accessories at the service unit.
CONNECTING TO HOT/COLD WATER SUPPLY INSTALLING THE DRAIN HOSE (Only available in some models) If your appliance has connections for both hot and cold water, then connect one hose to the cold water connection and the other hose to the hot water connection, as indicated on the back of the appliance: COLD = cold and HOT = hot. Hot water is supplied for programs operating at 40 °C or more. Connecting to both hot and cold water will save time and electric energy when washing.
CONNECTING TO THE POWER MAINS After installation, the washing machine should stand still for two hours before it is connected to the power mains. Connect the appliance to an earthed power outlet. After installation, the wall outlet should be freely accessible. The outlet should be fitted with an earth contact (in compliance with the relevant regulations). Connection upon delivery TYPE: WMXX.XXXXX MODEL: XXXXXX.X Art.No.: XXXXXX/XX Ser.No.
TIPS BEFORE WASHING This chapter includes several tips on how to prepare the laundry for washing. LAUNDRY SYMBOLS Observe the laundry symbols. Textile maintenance symbols: LAUNDRY SORTING Sort the laundry according to: • how soiled it is, • colour, • material. Washing Normal CLOTHING 1. Close the zips and hook-and-loop fasteners so that they do not damage the fabric. 2. New dyed items may contain excess dye; therefore, they have to be washed separately several times. 3. Turn delicate items inside out.
DYED COTTON ECONOMY AND EFFICIENCY Laundry made of dyed cotton which is to be washed at 60 °C should be first washed at a temperature of 60 °C to remove the excess dye. If this is not done, there is danger of dye being washed out of such items. To maintain the colour of the fabric, use bleach-free detergent. You can save a lot of energy by not using the programs operating at higher temperatures. Choose the Quick program if you wish to only refresh the laundry; or use the Time program.
WASHING PROCESS, STEP BY STEP (1 – 8) STEP 1: SORT THE LAUNDRY See chapter "TIPS BEFORE WASHING" Use a washing net for underwire bras. Empty the pockets. Coins, nails etc. could damage the machine and the fabric. STEP 2: TURN ON THE MAIN SWITCH. Turning on Press the on/off button. Turning off Press the on/off button. If the machine does not accept the on/off command correctly, wait for at least 8 seconds before pressing any other button. STEP 3: OPEN THE WASHING MACHINE DOOR AND INSERT THE LAUNDRY.
STEP 4: ADD THE DETERGENT AND THE CONDITIONER. Recommended amount of detergent is usually specified on the detergent packaging. When washing a smaller amount of laundry, the amount of detergent used can be decreased. Observe manufacturers' recommendations regarding the type of detergent suitable for certain temperatures, load size, and water hardness. Powder detergent Add powder detergent into the main wash detergent compartment.
STEP 5: CHOOSE THE PROGRAM. Choose the program by rotating the Program selector knob in either direction. The Program selector knob can be used when arrows appear on the display. Choose the program depending on the type of laundry and how heavily soiled it is (see chapter "TIPS BEFORE WASHING"). Estimated program duration will appear on the display. Extra program settings can also be selected for each program. See STEP 6. Choose between the following programs: Program Description 1.
Program Description 7. AUTO This program automatically adjusts the duration of the main wash and number of rinses depending on the amount of laundry in the machine. No extra program settings are possible. 8. QUICK Quick program for laundry that only needs refreshing. The program operates at certain temperatures; therefore, observe the instructions indicated on the clothing. A lower temperature setting will result in shorter duration of the wash. Spinning speed can be set to your preference. 9.
STEP 6: CHOOSING THE PROGRAM SETTINGS Using the program settings, the washing programs can be further adjusted to your wishes. Some program settings may not be available for your selected program. Selected program settings will remain stored after the end of the washing cycle and may be changed subsequently (except for delayed start which is not stored after the wash is complete). 1 1. Washing mode 2. Temperature 3. Spin speed 2 3 4 5 6 4. Super Rinse 5.
3. Spin speed By consecutively pressing the button 3, you can set the spin speed, choosing from the following available values: NO d (no drain) /... / max. (rpm) (max rpm = depends on the model) Default setting is 1400 rpm; it depends on the selected program (spin rate can be changed – reduced or increased (only in some models)). The actual available spin speed will depend on the selected washing program.
6. Delay start Press the button 6 to choose the delayed start when you wish the washing program to start after a certain period of time (30´ to 24 hours after you press the Start button). The estimated time remaining until the Everyday wash Allergy 40°C 1400 Off OK 2:11 end of the washing program will be indicated above the button 6. Press the button 6 for the arrows to appear.
STEP 7: START THE WASH Close the washing machine door and press the Start/Pause button. Start (short press of the button – start/resume) Pause (short press of the button – pause) Stop (press and hold for 3 seconds – stop or cancel) 2:20 Starting Remaining time Depending on the selected program, anticipated washing time will be displayed in hours and minutes. Actual washing time will depend on the selected program, load, type of laundry, spin speed etc.
Pausing, stopping or changing the program Stop program Paused Add clothes To pause the program, shortly press the Pause button. To resume a program, press the Start button again. 1 To stop the washing program, press the Start/Pause button and hold it for 3 seconds. Use the button 1 to choose "Stop program". The program is canceled and the water is pumped out of the machine if necessary. Only then will you be able to open the washing machine door. Use the Program selector knob to select a new program.
STEP 8: END OF PROGRAM Cycle completed succsessfully Start new Add fav After the end of the washing program, the display will indicate that the program has been successfully completed ("Cycle completed successfully"). 5 Anti creasing Stop Anti creasing Cycle completed succsessfully If you have selected the Anti-Crease extra function, gentle tumbling will continue after the end of the washing program in order to prevent creasing.
Changing a favourite program If you wish to store a program after the end of the washing cycle, but there is no more room for another favourite program (only 4 favourite program slots are available), then one of the existing stored favourite programs can be substituted with a new one. Use the button 2 to scroll through the Fav. list position: 1. Favourite Confirm Back list of Favourite programs. Press the button 4 to confirm the program to be replaced. 2 1.
SYSTEM SETTINGS In the main menu, use the Program selector knob to select System Settings. Confirm the selection by pressing the button 2. Enter System settings 2 Then, use the Program selector knob to scroll the list of the following settings that you can adjust: • Child Lock, • Language (language selection), • Temperature (temperature unit), • Programs (set of programs), • Display (display unit: contrast & logo), • Sounds (acoustic signals), • Reset.
LANGUAGE Russian Language OK 3 6 Russian Language Back 3 You can choose between 25 languages. Press the button 3 for the arrows to appear. Use the Program selector knob or the button 3 to scroll the list of languages. Use the button 6 to confirm the selected language. Use the button 6 to return to System Settings. 6 TEMPERATURE (TEMPERATURE UNIT) Choose either °C or °F. Temperature C° F° Info Back Back Use button 1 to select °C; Use button 2 to select °F.
DISPLAY UNIT Display Contrast Logotype 1 Contrast 1 Back Set the contrast and logo display. 3 2 3 4 5 Back Use the buttons 1 to 5 to set the contrast. 1 Logotype Back 1 Use the button 1 to toggle logo display on or off . If you choose on , the logo will be displayed on the display unit when the washing machine is turned on. 6 Use the button 6 to return to System Settings. SOUNDS Choose whether audible signals are switched on or off.
CLEANING AND MAINTENANCE CLEANING THE FILTER The washing machine has a filter that will retain smaller objects such as coins, buttons, hair etc. Before cleaning, drain the water from the washing machine using the Drain program, and disconnect the washing machine from the power mains. 1 Open the pump filter cover using appropriate tools (emergency door opening tool is located on the back side of the dispenser). 2 Release the water drain hose from the holder.
CLEANING THE DISPENSER TRAY AND DOOR RUBBER GASKET 1 A B Press the tab to completely remove the dispenser tray from its housing. Rinse and thoroughly clean the tray. You may also remove the cap from the plug in the conditioner compartment (A). Clean any residue from the cap and tube. 2 Clean the dispenser tray (B) interior. Replace the cap on the plug. 3 Use a brush to clean the nozzles on the upper side of the dispenser tray housing.
CLEANING THE APPLIANCE EXTERIOR Wipe the washing machine exterior and the display unit using a soft damp cotton cloth and mild detergent. Do not use any solvents or cleaning agents that could damage the washing machine (please observe the recommendations and warnings provided by the manufacturers of the cleaning agents). Do not clean the washing machine with a jet of water! Always disconnect the washing machine from the power mains before cleaning.
CLEANING THE RINSING HOLES (UNDER THE AGITATOR IN THE DRUM) If you believe that objects like nails or paper clips fell into the washing machine drum, check the area underneath the agitator. Such objects may rust (corrode) and cause stains on your clothes. Nails and other sharp objects can also cause holes in the fabric. Proceed as follows: 1 Insert a screwdriver or a similar tool into the slot in the rib and carefully push it to the left. 2 Hold the rib with the other hand and pull it towards you.
ERRORS – WHAT TO DO? Disturbances from the environment (e.g. the power grid) may result in various error reports (see Troubleshooting table). In such case: • Switch off the appliance, wait for 1 minute, switch the appliance back on, and repeat the washing program. • If the error persists, call an authorized service unit. • You will be able to solve most of the problems in appliance operation by yourself (see Troubleshooting table below). • Repairs may only be carried out by an adequately trained person.
Problem/error Cause There are traces • The laundry was very greasy. of grease (or grease rolls) on the clothes. There are still stains on the laundry. What to do? • Wash the laundry again. When your laundry is this heavily soiled, add more washing powder or use a liquid detergent in combination with a more powerful (longer) program. • You used bleach-free liquid • Use a detergent that contains bleach. detergent or powder detergent for coloured laundry. • You selected an unsuitable program.
Manual opening of washing machine door Washing machine door may be opened manually if the appliance is not connected to the power mains and if the water has been pumped out of the machine. A Choose the Spinning or Drain program to pump the water from the machine. If this does not work, water has to be drained from the washing machine drum manually. See chapter "Cleaning the trap and drain pump" in the chapter "CLEANING AND MAINTENANCE".
FAILURE DISPLAY In case of a failure while a program is in progress, the relevant Error X is indicated on the display unit. Press the INFO button to display the Error 3 Info EXIT error description. Switch off the appliance and turn it back on. 5 Errors indicated on the display unit may include the following: Error 36 Error indication on the display unit What to do? E1 THERMISTOR ERROR Temperature sensor error. • Inlet water too cold. Repeat the washing program.
Error Error indication on the display unit What to do? E22 DOOR LOCK ERROR Error while locking the door. Door is closed, but it cannot be locked. Close the door again. Turn the washing machine off, then restart the washing program. If the error reoccurs, call a service technician. E23 DOOR UNLOCK ERROR Error while unlocking the door. Door is closed, but it cannot be unlocked. Turn off the washing machine, then turn it back on. If the error reoccurs, call a service technician.
SERVICE BEFORE CALLING A SERVICE TECHNICIAN 1, 2, 3 When you contact a service centre, please state the model (1), type (2), and serial number (3) of your washing machine. Model, type, and serial number are indicated on the rating (type) plate located on the washing machine door casing. In case of a failure, only use approved spare parts by authorized manufacturers. Repair or any warranty claim resulting from incorrect connection or use of the washing machine shall not be covered by the warranty.
TECHNICAL INFORMATION Information for test institute ENERGY LABELLING Australian standard AS/NZS 2040.1:2005 Washing program Normal, 40 °C, 8 kg cotton Connection Cold water 20 °C Test method for noise measurement IEC-60704-2-4 Power requirement when machine turned off < 0,3 W Power requirement for Delayed Start < 6,0 W Power requirement when program finished < 3,0 W Detergent, PBIS and Anti-Sudsing Agent (16 ml) must be added via the detergent compartment.
Loading procedure for standard test: Detergent, PBIS and Anti-Sudsing Agent (16ml) must be added via the detergent compartment. Loading procedure for standard test: When loading the machine for testing according to AS/NZS 2040:2005 it shall be loaded according to the table below. Garments are placed on top of each other in layers and the soil swatches should be placed inside the wash drum in the direction shown in the table, seen from above.
TECHNICAL INFORMATION Height 850 mm Width 595 mm Depth 580 mm Weight 74 kg Drum volume 60 l Rated power See rating plate Heater power See rating plate Water pressure 0,1–1 MPa 1–10 kp/cm2 10–100 N/cm2 Material for the drum and dispenser Stainless steel Housing material Hot-dip galvanized and powder coated sheet metal, or stainless steel sheet (depending on the model) Water connection 1.5 m pex hose Drain hose 1.
Prewash Temp. [°C] Spin speed [rpm] Max load [kg] Water con. [L] Energy con. [kWh] Time [h:min] PROGRAM TABLE 1. Normal* X 40 1400 8 59 0,69 3:36 2. Cotton X 60 1400 8 55 1,07 2:16 3. Mix/Synthetics X 40 1000 3,5 50 0,35 1:43 4. Wool/Hand 30 800 2 58 0,28 0:52 5. Dark wash 40 1000 3 40 0,53 1:15 30 1000 2 / / / 7. Auto 40 1200 8 / / / 8. Quick Cold 1200 3 40 0,50 0:50 60 1400 8 95 2,00 3:34 30 0,06 0:29 Program 6. Time program 9.
Adjustment of the displayed washing time Advanced technology allows the appliance to sense the amount of laundry and add the required amount of water during the washing process. Depending on the washing load, washing time can be longer or shorter and the time displayed will be adjusted accordingly. Moreover, displayed washing time may change due to differences in inlet water temperature. At low inlet water temperatures, washing time can be longer; at higher temperatures, it can be shorter.
TABLE WASHING MODE/TEMPERATURE Intense Mode 1. Normal -90°C 20°C-90°C 40°C-90°C 2. Cotton -90°C 20°C-90°C 40°C-90°C 3. Mix/Synthetics -60°C 20°C-60°C 40°C-60°C Program Normal mode Green mode Washing mode 4. Wool/Hand ,30°C-40°C 5. Dark wash ,30°C-40°C 6. Time program -60°C 7. Auto -90°C 8. Quick ,40°,60°,90°C 9. Heavy -90°C 40°C 10. Rinse 11. Spin 12. Drain 13. Easy care -60°C 14. Drum cleaning 15.
TABLE OPTIONS 1. Normal 1400 2. Cotton 1400 3. Mix/Synthetics 1000 4. Wool/Hand 800 5. Dark wash 1000 6. Time program 1000 7. Auto 1200 8. Quick 1200 9. Heavy 1400 10. Rinse 1400 11. Spin 1400 12. Drain 0 13. Easy care 14. Drum cleaning 15.
DISPOSAL Disposal / recycling of packaging Our product packaging is made of environmentally friendly materials that can be recycled, disposed of, or destroyed without any hazard to the environment. To this end, packaging materials are labelled appropriately. The symbol on the product or its packaging indicates that the product should not be treated as normal household waste. The product should be taken to an authorized collection centre for waste electric and electronic equipment processing.
QUICK GUIDE SORT THE LAUNDRY. 1. Close the zippers fasteners. Empty the pockets and turn them inside out. Check the laundry care symbols. Sort the laundry based on how heavily soiled it is, by colour, and by material. SWITCH ON THE MAIN ON/OFF SWITCH (ON/OFF) 2. 3. OPEN THE WASHING MACHINE DOOR AND INSERT THE LAUNDRY. Before doing so, make sure the drum is empty. ADD THE DETERGENT AND THE CONDITIONER. 4. Recommended detergent amount is usually indicated on the packaging.
www.asko.com WM75.