INSTALLATION INSTRUCTIONS TD85 Carefully read the instructions for use before using the dryer.
Dear Customer, Read these instructions carefully and completely before you install the machine. The installation should be carried out by a qualified person who is familiar with all local codes and ordinances for electrical and plumbing connections. See also the general Safety Instructions in the Use & Care Guide. Cosmetic damage must be reported to the ASKO dealer within five days from the date of purchase. As soon as you unpack the machine, thoroughly check it for cosmetic damage.
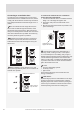
Never block the air exhaust (evacuation opening). At least two persons are required to install the tumble dryer on top of a washing machine. Free-standing appliance The dryer may be placed adjacent to a washing machine. If the friction between the dryer feet and the floor is not sufficient, the dryer may move during operation. To prevent the dryer from sliding around, use a nonslip support or pad. Do not place the dryer on a carpet with long fibres as this may impede air circulation.
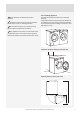
Stacking on top of a washing machine To stack the dryer on top of a washing machine, use the extra vacuum feet and the tipping guard (A+B), supplied in the cardboard box in the dryer drum. Tipping guard part B is designed to fit on ASKO washing machines and it may be hard or impossible to mount on appliances of other brands.
How to stack a dryer onto the washing machine (ASKO): There is a cardboard box in the dryer drum, containing the vacuum feet and the tipping guard. 1 A B The tipping guard consists of two metal parts (A + B). Use two screws to attach the A part to the back of the dryer. 2 Undo the screw on the back side of the washing machine. 3 Use the screw to attach the tipping guard (B part) to the back of the washing machine. 4 Level the washing machine so that it is stable. 1.
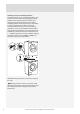
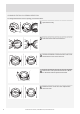
CHANGING THE DOOR OPENING DIRECTION To change the direction of door opening, proceed as follows. 6 1 Open the door fully. 2 Undo the screws and remove the door. 3 Use the screwdriver to remove the door lock cover and undo the screw on the door lock. 4 Push the door lock upwards and remove it. Move it to the other side and push it downwards. 5 Fasten the screw on the door lock. Replace the door lock cover. Customer Care Center, 1-800-898-1879, www.askousa.
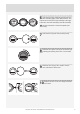
Undo the door hinge assembly (left) and the door latch assembly (right), switch their positions, and replace the screws (door hinge assembly to the righthand side, door latch assembly to the left-hand side). 6 Use the screwdriver to remove the plastic part more easily. 7 Undo the door ring and remove it temporarily. Rotate the door glass cover by 90°so that the sign indicating the opening of the door is on the other side.
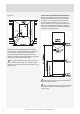
BUILT-IN Closet Install- Ventilation Requirements ASKO's front panel controls make it possible to install the washers and dryers in a closet. Make sure there is a ½” (12 mm) minimum clearance between units and cabinet or wall. To ensure proper ventilation, we recommend louvered doors. Otherwise there must be ventilation openings in the door.
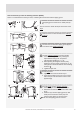
AIR EXHAUST The tumble dryer must only be operated when it is correctly fitted with exhaust duct. Connecting the exhaust duct to the dryer You will need to purchase a UL-CSA-approved 4" ridged metal exhaust duct. The dryer is delivered with the stub pipe attached to the rear exhaust outlet, though the exhaust duct can be attached to either the left or the right exhaust outlet. To connect the exhaust duct to the left or right side outlet, follow the steps below: 1.
Connecting to a ventilation duct You will need a UL-CSA-approved, 4-inch ridged metal exhaust duct. If a flexible duct is used, it must comply with the Outline for Clothes Dryer Transition Duct. Subject 2158A and maximum length of 2.4 m (8 feet). The more bends and the longer the duct, the less air will circulate through the machine, which will impede drying performance. We recommend that you cut off any excess exhaust duct and run the duct with as few bends as possible.
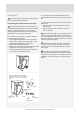
ELECTRICAL INSTALLATION The receptacle on the rear of the machine is designed to accommodate ASKO washers ONLY (rated 208–240 V.) To use this receptacle, you must use the ready-fitted plug supplied with the washing machine or an equivalent. ASKO washers rated 208–240 V have two internal fuses of 15 A each. The machine should only be connected to a grounded wall socket. This appliance must be properly grounded. Refer to the “Important Safety Instructions” for grounding instructions.
3. Use the strain relief attached below the terminal block opening. 4. Loosen or remove center terminal block screw. 1. Turn the power off at the breaker/fuse box. 2. Remove terminal block cover. 3. Use the strain relief attached below the terminal block opening. 4. Remove center terminal block screw. 4 4 5 7 6 6 5. Connect ground (center) wire of power supply cord to the center, silver-colored terminal screw. Tighten screw. 6. Connect the other wires to outer screws. 7. Tighten the strain relief screws.
NOTES Customer Care Center, 1-800-898-1879, www.askousa.
NOTES 14 Customer Care Center, 1-800-898-1879, www.askousa.
NOTES Customer Care Center, 1-800-898-1879, www.askousa.
www.askousa.com We reserve the right to modifications.