
Use & Care Guide


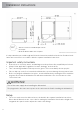


Table Of Contents
- Front page
- Contents
- Your dishwasher
- Important safety instructions
- Before washing for the first time
- Greener dishwashing
- Loading the dishwasher
- Using the dishwasher
- Add detergent
- The main power switch
- Select program
- Select program mode
- Select option
- Starting the dishwasher
- Time remaining
- Status light™
- Stopping or changing a program
- If you want to load more dishes
- If the dishwasher is turned off due to a power failure
- Once the program has finished
- How to get the best drying results
- Unloading the dishwasher
- Program chart
- Settings
- Care and maintenance instructions
- Troubleshooting
- Installation instructions
- Service
- Technical information

['']
**Door length.
Nominal dimensions. Actual measurements may vary.
***Fit the trim kit if the widths of 24''is required.
*Remove lock nuts for an installed height of 32 1/4''.
It is important that you read through and follow the instructions and directions below. Conduct instal-
lation and connection in accordance with the separate installation instructions.
Important safety instructions
• Connections to electricity, water, and drainage must be performed by a qualified professional.
• Always follow applicable regulations for water, drainage, and electricity.
• Take care during installation! Wear protective gloves! There must always be two people!
• Place a drip tray on the floor beneath the dishwasher to prevent damage from any water leaks.
• Before screwing the dishwasher into place, test the dishwasher by running the Rinse and hold
program. Check that the dishwasher fills with water and drains. Also check that none of the
connections leak.
WARNING!
Turn off the water supply when installing the dishwasher!
The plug must be disconnected or power to the outlet turned off while installing the dishwasher!
Setup
• The recess and connection dimensions are included in the separate installation instructions.
Check that all dimensions are correct before starting the installation. Note that the height of the
integrated door panel can be adjusted to match other fittings.
36
Installation instructions