RTA1030W ADSL Rout er Use r ’s M a n u a l Rev: 1.0 2005/ 5/ 16 No part of t his publicat ion m ay be reproduced in any form by any m eans wit hout t he prior writ t en per m ission. Ot her t radem arks or brand nam es m ent ioned her ein ar e t radem arks or regist ered t radem ark s of t heir respect ive com panies. This m anual current ly suit s for RTA1030W.
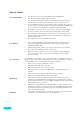
Sa fe t y N ot e s For I n st a lla t ion For Usin g For Se r vice W a r n in g Ca u t ion ii Use only the type of power source indicated on the marking labels. Use only power adapter supplied with the product. Do not overload wall outlet or extension cords as this may increase the risk of electric shock or fire. If the power cord is frayed, replace it with a new one. Proper ventilation is necessary to prevent the product overheating.
ADSL Rout er User Manual FCC This equipment must be installed and operated in accordance with provided instructions and a minimum 20 cm spacing must be provided between computer mounted antenna and person’s body (excluding extremities of hands, wrist and feet) during wireless modes of operation. FCC Cla ss B N ot ice This device complies with Part 15 of the FCC Rules.
iv
Cont ent s Con t e n t s Pr e fa ce ..................................................................................................ix Feat ures ........................................................................................................... ix Unpacking ........................................................................................................ xi Subscript ion for ADSL Service ..............................................................................
ADSL Rout er User Manual Ch a pt e r 4 : W e b Con figu r a t ion ............................................................. 3 7 Using Web- Based Manager ................................................................................. Out line of Web Manager ........................................................................... To Have t he New Set t ings Take Effect ........................................................ Language ..................................................................
Cont ent s Problem s wit h WAN ........................................................................................... 93 Problem s wit h Upgrading ................................................................................... 94 Ch a pt e r 6 : Glossa r y ............................................................................. 9 5 Appe n dix A: Spe cifica t ion s .................................................................. 9 9 Appe n dix B: Se r ve r Se t u p for 8 0 2 .
ADSL Rout er User Manual viii
Preface Pr e fa ce Thank you for choosing the Asymmetric Digital Subscriber Line (ADSL) Router. With the asymmetric technology, this device runs over standard copper phone lines. In addition, ADSL allows you to have both voice and data services in use simultaneously all over one phone line. RTA1030W Wireless ADSL2+ Router is a DSL broadband access device which allows ADSL connectivity while providing 802.11g wireless LAN capabilities for home or office users.
ADSL Rout er User Manual ³ Operating Frequency: 2.4 ~ 2.5 GHz ³ Operating Channels: depending on local regulations. For example, 11Channels (Northern America), 13 Channels (Europe), and 14 Channels (Japan) ³ RF Output Power: ³ Antenna Connectors: Hardware diversity support. One external and one internal antenna are provided.
ADSL Rout er User Manual ³ Time protocol can be used to get current time from network time server ³ Support IP/Bridge QoS for prioritize the transmission of different traffic classes Se cur it y Fe a t ur e s ³ PAP (RFC1334), CHAP (RFC1994), and MS-CHAP for PPP session ³ Firewall support IP packets filtering based on IP address/Port number/Protocol type ³ Bridge packet filtering (optional) ³ URL filtering (optional) ³ Support DoS (Deny of Services) which detect & protect a number of attacks (suc
ADSL Rout er User Manual xii
Chapt er 1: Overview Ch a pt e r 1 : Ove r vie w This chapter provides you the description for the LED and connector for front and rear view of the router. Before you use/install this router, please take a look at this information first.
ADSL Rout er User Manual Funct ion Color Definit ion Solid Green DSL line connect ion is up. Off Power is off. Solid Green Power is on and the device operates normally. Solid Red Power on self-test in progress The device enters the console mode of the boot loader. Pow e r Power on self-test failure if the led always stays solid red. Flash Red Firmware upgrades in progress Re a r Pa n e l The following figures illustrate the rear panel of your ADSL Router.
Chapt er 2: Syst em Requirem ent and I nst allat ion Ch a pt e r 2 : System Requirem ent and I n st a lla t ion Syst em Requirem ent To access the ADSL Router via Ethernet, the host computer must meet the following requirements: With Ethernet network interface. Must have TCP/IP installed. Set client PC with obtain an IP address automatically or set fix IP address. With a web browser installed: Internet Explorer 5.x or later.
ADSL Rout er User Manual Connect ing t he ADSL Rout er Follow the steps below to connect the related devices. n o p q r 4 Connecting the ADSL line. Connect the DSL port of the device to your ADSL wall outlet with RJ-11 cable. Please attach one end of the Ethernet cable with RJ-45 connector to the LAN port of your ADSL Router. Connect the other end of the cable to the Ethernet port of the client PC.
Chapt er 3: Configurat ion For connecting through a hub, please refer to the following diagram for an example. USB Driver I nst allat ion If the ADSL Router is connected to a PC through USB interface, you will be prompted for the USB drivers when plugging the USB cable to the PC. Refer to the relevant operating system to install the USB drivers. Otherwise, you may skip this chapter. Not e: This sect ion is for t he m odel wit h USB int erface only.
ADSL Rout er User Manual p When the welcome screen appears, click Next for next step. q When the InstallShield Wizard Complete appears, click Finish. r Plug the USB cable between your router and PC. N ot e : I f t he USB device is not det ect ed, check t he USB cable bet ween t he PC and t he device. Also verify t hat t he device is power on. s t u The system will detect the USB driver automatically. When the system detects it, a dialog of Digital Signature Not Found will appear.
Chapt er 3: Configurat ion q Unplug the USB cable between your router and your PC. For W in dow s 2 0 0 0 For uninstall the USB driver, please do the following. n o p q Run the USB installation program from the CD provided by your router package. The InstallShield Wizard screen will appear. Please wait for a moment. A dialog appears to ask you confirm if you want to remove the USB driver or not. Please click Ok. When the Maintenance Complete screen appears, the USB driver is removed successfully.
ADSL Rout er User Manual For W in dow s 9 8 1. Click on the Start menu, point to Settings and click on Control Panel. 2. Double-click the Network icon 3. The Network window appears. On the Configuration tab, check out the list of installed network components. Option 1: If you have no TCP/IP protocol, click Add. Option 2: If you have TCP/IP protocol, go to Step 6 Your network interface card. Check out if TCP/IP for your NIC is installed or not. 4. 8 Highlight Protocol and click Add.
Chapt er 3: Configurat ion 5. On the left side of the windows, highlight Microsoft and then select TCP/IP on the right side. Then click OK 6. When returning to Network window, highlight TCP/IP protocol for your NIC and click Properties. 7. On IP Address tab: Enable Specify an IP address option. Enter the IP Address: 192.168.1.x (x is between 2 and 254) and Subnet Mask: 255.255.255.0 as in figure below. On Gateway tab: Add a gateway IP address: 192.168.1.
ADSL Rout er User Manual 10 8. When returning to Network window, click OK 9. Wait for Windows copying files. 10. When prompted with System Settings Change dialog box, click Yes to restart your computer.
Chapt er 3: Configurat ion For W in dow s M E 1. 2. 3. 4. 5. 6. Click on the Start menu, point to Settings and click on Control Panel. Double-click the Network icon. The Network window appears. On the Configuration tab, check out the list of installed network components. Option 1: If you have no TCP/IP protocol, click Add. Option 2: If you have TCP/IP protocol, go to Step 6. Highlight Protocol and click Add. On the left side of the windows, highlight Microsoft and then select TCP/IP on the right side.
ADSL Rout er User Manual 9. Wait for Windows copying files. 10. When prompted with the System Settings Change dialog box, click Yes to restart your computer. For W in dow s N T 12 1. Click Start, point to Settings, and then click Control Panel. 2. Double-click the Network icon. 3. The Network window appears. On the Protocols tab, check out the list of installed network components. Option 1: If you have no TCP/IP Protocol, click Add. Option 2: If you have TCP/IP Protocol installed, go to Step 7.
Chapt er 3: Configurat ion 5. Click Yes to use DHCP. 6. Insert the Windows NT CD into your CD-ROM drive and type the location of the CD. Then click Continue. 7. Returning to the Network window, you will find the TCP/IP Protocol among the list. Select TCP/IP Protocol and click Properties. 8. Enable Specify an IP address option. Enter the IP Address: 192.168.1.x (x is between 2 and 254) and Subnet Mask: 255.255.255.0 and Default Gateway: 192.168.1.1 as in figure below.
ADSL Rout er User Manual 14 9. When returning to Network window, click Close. 10. When prompted with Network Settings Change dialog box, click Yes to restart your computer.
Chapt er 3: Configurat ion For W in dow s 2 0 0 0 1. From the Start menu, point to Settings and then click Network and Dial-up Connections. 2. Right-click the Local Area Connection icon and then click Properties. 3. On the General tab, check out the list of installed network components. Option 1: If you have no TCP/IP Protocol, click Install. Option 2: If you have TCP/IP Protocol, go to Step 6.
ADSL Rout er User Manual 16 4. Highlight Protocol and then click Add. 5. Click Internet Protocol (TCP/IP) and then click OK. 6. When returning to Local Area Connection Properties window, highlight Internet Protocol (TCP/IP) and then click Properties. 7. Under the General tab, enable Use the following IP Address. Enter the IP address: 192.168.1.x (x is between 2 and 254), Subnet Mask: 255.255.255.0 and Default gateway: 192.168.1.1. Then click OK.
Chapt er 3: Configurat ion For W in dow s XP From the Start menu, point to Control Panel and then click Network and Internet Connections. Click Network Connection and then click Properties. Click Network Connection and then click Properties.3. On the General tab, check out the list of installed network components. Option 1: If you have no TCP/IP Protocol, click Install. Option 2: If you have TCP/IP Protocol, go to Step 6. Highlight Protocol and then click Add.
ADSL Rout er User Manual Configure PC t o get I P address from DHCP If your ADSL Router operates as a DHCP server for the client PCs on the LAN, you should configure the client PCs to obtain a dynamic IP address. Please follow the previous section to install TCP/IP component. Only that you do not need to specify an IP address when configuring TCP/IP properties.
Chapt er 3: Configurat ion For W in dow s N T On the IP Address tab, click on the drop-down arrow of Adapter to select required adapter. Enable Obtain an IP address from a DHCP server and then click OK.. When prompted with the message below, click Yes to continue. For W in dow s 2 0 0 0 Enable Obtain an IP address automatically and then click OK.
ADSL Rout er User Manual For W in dow s XP On the IP Address tab, select Obtain an IP address automatically. Then click OK. Renew I P Address on Client PC There is a chance that your PC does not renew its IP address after the ADSL Router is on line and the PC cannot access the Internet. Please follow the procedures below to renew PC’s IP address. For W in dow s 9 8 M E 20 1. Select Run from the Start menu. 2. Type winipcfg in the dialog box and the click OK.
Chapt er 3: Configurat ion 3. When the figure below appears, click Release and then Renew to get an IP address. For W in dow s N T 1. Select Run from the Start menu. 2. Select Run from the Start menu. 3. Type cmd in the dialog box and the click OK. 4. Type ipconfig at prompt. Then you will see the IP information from DHCP server. If you want to get a new IP address, type ipconfig /release to release the previous IP address and then type ipconfig /renew to get a new one. 5.
ADSL Rout er User Manual For W in dow s 2 0 0 0 1. 2. 3. From the Start menu, point to Programs, Accessories and then click Command Prompt. Type ipconfig at prompt. Then you will see the IP information from DHCP server. If you want to get a new IP address, type ipconfig /release to release the previous IP address and then type ipconfig /renew to get a new one. For W in dow s XP 1. 2. 3. 4. 22 Type ipconfig at prompt. Then you will see the IP information from DHCP server.
Chapt er 3: Connect ing and Accessing I nt ernet Ch a pt e r 3 : Connecting and Accessing I nternet This chapter is to help you accessing into Internet with a quick and convenient way. If you need more detailed information for web configuration, please get into the next chapter for the advanced configuration. Prior to configuring the ADSL Router, you must decide whether to configure the ADSL Router as a bridge or as a router. This chapter presents some deployment examples for your reference.
ADSL Rout er User Manual PPP over ATM ( PPPoA) Mode D e fa u lt Pr iva t e I P 1 9 2 .1 6 8 .1 .1 D yna m ic Public I P a ssi g n e d b y BRAS I SP 1 9 2 .1 6 8 .1 .3 STM - 1 Lo o p ( I n t e r n e t Se r v i ce Pr o v i d e r ) Et h e r n e t BRAS D S LA M AAA RD AI US Se r v e r * BRAS: Br o a d b a n d Re m o t e Acce ss Se r v e r AD SL Rou t e r Hub 1 9 2 .1 6 8 .1 .
Chapt er 3: Accessing I nt ernet PPP over ATM ( PPPoA) I P Ext ension Mode D e fa u lt Pr iva t e I P 1 9 2 .1 6 8 .1 .
ADSL Rout er User Manual PPP over Et hernet ( PPPoE) Mode D e fa u lt Pr iva t e I P 1 9 2 .1 6 8 .1 .1 D yn a m ic Pu blic I P a ssi g n e d b y BRAS 1 9 2 .1 6 8 .1 .3 I SP STM - 1 ( I n t e r n e t Se r v i ce Pr o v i d e r ) Lo o p Et h e r n e t BRAS D S LA M AAA AD SL Rout e r 1 9 2 .1 6 8 .1 .
Chapt er 3: Accessing I nt ernet PPP over Et hernet ( PPPoE) I P Ext ension Mode D e fa ult Pr iva t e I P 1 9 2 .1 6 8 .1 .
ADSL Rout er User Manual Num bered I P over ATM ( I PoA) D e fa ult Pr iva t e I P 1 9 2 .1 6 8 .1 .1 I SP ( I n t e r n e t Se r v i c e Pr o v i d e r ) STM - 1 1 0 .3 .7 5 .5 1 Lo o p 1 0 .3 .7 5 .4 9 S/ W 1 0 .3 .7 0 .1 BR AS D S LA M AAA AD SL Rou t e r 1 0 .3 .7 5 .
Chapt er 3: Accessing I nt ernet 7. Check the network information. Make sure the settings match the settings provided by ISP. Click Finish. 8. Set TCP/IP for your computer. Specify an IP Address, subnet mask and set default gateway. eg: IP Address: 10.3.75.51 Subnet Mask: 255.255.255.248 Gateway: 10.3.75.49 9. Now the router is well configured. You can access to Internet.
ADSL Rout er User Manual Num bered I P over ATM ( I PoA) + NAT D e scr ipt ion : In this deployment environment, we make up a private IP network of 192.168.1.1. NAT function is enabled (on ADSL Router or use another NAT box connected to hub) to support multiple clients to access the Router and some public servers (WWW, FTP). If you apply for multiple IP addresses from your ISP, you can assign these public IP addresses to the ADSL Router and public server, e.g., Web or FTP server.
Chapt er 3: Accessing I nt ernet LAN. Primary IP Address: 192.168.1.1 Subnet mask: 255.255.255.0 Start IP Address: 192.168.1.2 End IP Address: 192.168.1.254 7. Check Configure the second IP Address and Subnet Mask for LAN Interface and type in the second IP address and subnet mask. Then click Next. Secondary IP Address: 10.3.75.49 Subnet mask: 255.255.255.248 8. Check the network information. Make sure the settings match the settings provided by ISP. Click Finish. 9. Now the router is well configured.
ADSL Rout er User Manual Unnum bered I P over ATM ( I PoA) D efa ult Pr iva t e I P 1 9 2 .1 6 8 .1 .1 I SP ( I n t e r n e t Se r v i ce Pr o v i d e r ) STM - 1 1 0 .3 .7 5 .5 1 Lo o p 1 0 .3 .7 5 .4 9 S/ W BRAS D S LA M AAA AD SL Rout e r Hub 1 0 .3 .7 5 .
Chapt er 3: Accessing I nt ernet 8. Set TCP/IP for your computer. Specify an IP Address, subnet mask and set default gateway. eg: IP Address: 10.3.75.51 Subnet Mask: 255.255.255.248 Gateway: 10.3.75.49 9. Now the router is well configured. You can access to Internet.
ADSL Rout er User Manual Unnum bered I P over ATM ( I PoA) + NAT D e scr ipt ion : If you apply for multiple IP addresses from your ISP, you can assign these public IP addresses to the ADSL Router and public server, e.g., Web or FTP server. Typically the first IP is network address, the second is used as router IP address and the last one is subnet broadcasting. Other remaining IP addresses can be assigned to PCs on the LAN. The following example uses the LAN IP address ranging from 10.3.75.49 to 10.3.75.
Chapt er 3: Accessing I nt ernet Start IP Address: 192.168.1.2 End IP Address: 192.168.1.254 7. Check Configure the second IP Address and Subnet Mask for LAN Interface and type in the second IP address and subnet mask. Then click Next. Secondary IP Address: 10.3.75.49 Subnet mask: 255.255.255.248 8. Check the network information. Make sure the settings match the settings provided by ISP. Click Finish. 9. Now the router is well configured. You can access to Internet.
ADSL Rout er User Manual Bridge Mode D e fa u lt Pr iva t e I P 1 9 2 .1 6 8 .1 .1 I SP Lo o p STM - 1 ( I n t e r n e t S e r v i c e Pr o v i d e r ) BRAS D S LA M PPPoE Cl i e n t S / W AD SL Rou t e r Hub AAA RD AI U S Se r v e r * BRAS: Br o a d b a n d Re m o t e Ac ces s Se r v e r P C( S ) P P P o v e r Et h e r n e t Br id g e M o d e D e scr ipt ion : In this example, the ADSL Router acts as a bridge which bridging PC IP address from LAN to WAN.
Chapt er 5: Connect ion Mode Ch a pt e r 4 : W e b Con figu r a t ion Some users might want to set specific configuration for the router such as firewall, data transmission rate… and so on. This chapter will provide you advanced information of the web pages for the router for your reference. Using Web- Based Manager Once your host PC is properly configured, please proceed as follows: 1. Start your web browser and type the private IP address of the ADSL Router in the URL field: 192.168.1.1. 2.
ADSL Rout er User Manual Ou t lin e of W e b M a n a ge r For configure the web page, please use admin as the username and the password. The main screen will be shown as below. Title: It indicates the title of this management interface. Main Menu: Includes Quick Start, Status, Advanced, Wireless and Management. Main Window: It is the current workspace of the web management, containing configuration or status information.
Chapt er 5: Connect ion Mode Quick St art The pages for the Quick Start provide user a quick way to set for the router. If you do not know more about the router, you can use the Quick Start pages to adjust basic settings to make your router activating. Con n e ct t o I n t e r n e t This is a quick way to connect to Internet by using PPPoE interface, click Connect to Internet to open the web page. Enter the user name and password for your ADSL router and click Connect.
ADSL Rout er User Manual After clicking on the Next button from the VPI/VCI web page, the following screen will appear. Please choose the connection type and encapsulation mode that you want to use and click Next for next page. For example, PPP over Ethernet (PPPoE) in this screen is selected. Next, we are going to tell you different webpage for different protocol that you choose in this page.
Chapt er 5: Connect ion Mode PPP ove r ATM / PPP ove r Et h e r n e t If the type you choose is PPP over ATM or PPP over Ethernet, please refer to the following information. According to the ISP’s configuration on the server, you can choose PPPoE and PPPoA modes. If the ISP provides PPPoE service, the connection type selection will be decided as whether the LAN side device is running a PPPoE client or the router is to run the PPPoE client. This router supports both situations simultaneously.
ADSL Rout er User Manual PPP Username: Type in the username that you got from your ISP. PPP Password: Type in the password that you got from your ISP. Always On: Check this button to make the connection is always active. Dial on Demand: Click this button to make a connection while Please type the username and password that you got in demand. Enter the timeout to cut off the network connection if there is no activity for from your ISP. Then click Next. this router.
Chapt er 5: Connect ion Mode PCs. Start IP Address: Type in the start point IP address. End IP Address: Type in the end point IP address. Leased Time: Type in the duration for the time. The default is 1day. DHCP Server Off: Check this item if DHCP service isn’t needed on the LAN. You can check it at this time. If you find something is incorrect, click Back to change the settings. If everything is OK, click Finish to accept these settings.
ADSL Rout er User Manual I P ove r ATM If the type you have to choose is IP over ATM, please refer to the following information. IPoA is an alternative of LAN emulation. It allows TCP/IP network to access ATM network and uses ATM quality of service’s features. Choose IPoA and click Next. None: If it is not necessary to set the WAN IP address, please click this button. Obtain an IP address automatically: Click this button to make the system get an IP address automatically.
Chapt er 5: Connect ion Mode In the Configure LAN side Settings web page, you have to fill in the data requested here. Primary IP Address: Type in the first IP address that you got from your ISP for your LAN connection. Subnet Mask: Type in the subnet mask that you got from your ISP for your LAN connection.
ADSL Rout er User Manual You can check it at this time. If you find something is incorrect, click Back to change the settings. If everything is OK, click Finish to accept these settings. And the following page will appear. Now, the system will reboot to activate the new settings that you have done in this section. Please wait for 2 minutes for restarting the router.
Chapt er 5: Connect ion Mode Br idgin g If the type you choose is Bridging, please refer to the following information. The bridging mode can configure your router to send packets received on any port such as ATM PVC or Ethernet with a broadcast MAC address to all other ports. Choose Bridging and click Next. None: If it is not necessary to set the WAN IP address, please click this button. Obtain an IP address automatically: Click this button to make the system get an IP address automatically.
ADSL Rout er User Manual Primary IP Address: Type in the IP address that you got from your ISP for LAN interface. Subnet Mask: Type in the subnet mask that you got from your ISP for LAN interface. MTU: It means the maximum size of the packet that transmitted in the network. The packet of the data greater than the number set here will be divided into several packets for transmitting. Type in the number into the field of MTU. The default setting is 1500.
Chapt er 5: Connect ion Mode St at us Ove r vie w This page is displaying the current status for the DSL connection. It includes if the wireless network is enabled or not, lists the LAN IP address, default gateway, DNS servers IP address, firmware version, the period of activating the router, and so on. The system status will be changed according to the settings that you configured in the web pages.
ADSL Rout er User Manual AD SL Lin e This page shows all information for ADSL. For knowing the quality of the ADSL connection, please click ADSL BER Test button to have advanced information. Click More Information to show more detailed information about ADSL Line Status. AD SL BER Te st This test determines the quality of the ADSL connection. It is done by transferring idle cells containing a known pattern and comparing the received data with this known pattern to check for errors.
Chapt er 5: Connect ion Mode When the test is over, the result will be shown on the following dialog for your reference. Click Close to close this dialog. I n t e r n e t Con n e ct ion This page displays the connection information for your router, such as PVC name, category, protocol, invoking NAT or not, IP address, link status and so on. Tr a ffic St a t ist ics This table shows the records of data going through the LAN and WAN interface.
ADSL Rout er User Manual W ir e le ss Clie n t This table shows the MAC address for all of wireless LAN clients currently associated to your DSL Router. Rou t in g Ta ble This table shows the routing method that your router uses. ARP Ta ble This table shows the IP address record for IP-to-Physical translation in your router.
Chapt er 5: Connect ion Mode Advanced Set up Loca l N e t w or k - I P Addr e ss This page is the same as you can see in the Configure LAN side Settings page while running the Quick Setup. It allows you to set IP Address and Subnet Mask values for LAN interface. Primary IP Address: Type in the first IP address that you got from your ISP for your LAN connection. Subnet Mask: Type in the subnet mask that you got from your ISP for your LAN connection. Host Name: List the host name of this device.
ADSL Rout er User Manual DHCP Server On: Check this item if DHCP service is needed on the LAN. The router will assign IP address, gateway address for each of your PCs. Start IP Address: Type in the start point IP address. End IP Address: Type in the end point IP address. Leased Time: Type in the duration for the time. The default is 1day. Relay On: Click this button to have a relay setting. And type in the Server IP in this field.
Chapt er 5: Connect ion Mode The new one will be shown on the dialog right away. That is, the specified address will be reserved and not be assigned by DHCP for other computer.
ADSL Rout er User Manual Loca l N e t w or k – UPn P The UPnP is available only for Windows XP. If you are not user of Windows XP, this page does not have any meaning to you. This page allows you to enable the UPnP function through the web page for your router. I n t e r n e t - Con n e ct ion s Se t t in g To set WAN settings for each service, please open Advanced– Internet Setting. This page allows you to add new WAN settings, to edit or remove created WAN settings.
Chapt er 5: Connect ion Mode If you choose Non Realtime VBR, you have to type in the following data. The range for Peak Cell Rate is from 1 to 1690. The range for Sustainable Cell Rate is from 1 to 1689 and must be smaller than Peak Cell Rate. The range for Maximum Burst Size is from 1 to 100. After click Next, you will see the web page listed as the right. Choose the protocol that you want. And click Next again. The WAN IP settings will differ slightly according to the protocol that you choose.
ADSL Rout er User Manual I n t e r n e t - D N S Se r ve r If Enable Automatic Assigned DNS checkbox is selected, this router will accept the first received DNS assignment from one of the PPPoA, PPPoE or MER/DHCP enabled PVC(s) during the connection establishment. If the checkbox is not selected, it is necessary for you to enter the primary and optional secondary DNS server IP addresses. After type in the address, click Apply button to save it and invoke it.
Chapt er 5: Connect ion Mode I n t e r n e t - AD SL Se t t in gs Enable ADSL Port: Check this box to enable this function. It simply invokes the line mode that you choose here for the router. Select the support of line modes: There are several selections for your choosing. Select the one that you need. For Example, if you want to change one or more physical layer parameters while the ATU-x is in data transfer state, and the transmission errors will not be present, please choose ADSL2.
ADSL Rout er User Manual settings. Adding a N e w On e To add a static route, please choose Static Route - Add. Type the destination network address, subnet mask and gateway that you get from ISP and click Apply. Destination Network Address: The destination IP address of the network where data packets are to be sent. Subnet Mask: Type in the subnet mask that you got from ISP. Gateway IP Address: Click this button to invoke this function. Type in the gateway that you got from ISP.
Chapt er 5: Connect ion Mode For routers which must forward packets to another router before reaching the Router’s local router, the Gateway IP Address is the address of the intermediate router. Ex a m ple – St a t ic Rout e Here provides you an example of Static Route. For t h e Rou t e r ’s Rout in g Ta ble For the LAN shown above, with 2 routers and 3 LAN segments, the Router requires to add 2 static routes as follows: ADSL Router Destination 192.168.10.0 Subnet Mask 255.255.255.
ADSL Rout er User Manual Vir t u a l Se r ve r s- Por t For w a r din g The Router implements NAT to let your entire local network appear as a single machine to the Internet. The typical situation is that you have local servers for different services and you want to make them publicly accessible. With NAT applied, it will translate the internal IP addresses of these servers to a single IP address that is unique on the Internet.
Chapt er 5: Connect ion Mode I P Addr e ss se e n by I n t e r ne t Use r s Please note that, in the above picture, both Internet users are connecting to the same IP address, but using different protocols. To Internet users, all virtual servers on your LAN have the same IP Address. This IP Address is allocated by your ISP. This address should be static, rather than dynamic, to make it easier for Internet users to connect to your Servers.
ADSL Rout er User Manual From Internet Host IP Address: Select the initial place for port forwarding. If you choose SINGLE, a box will appear for you to fill in the IP address for the specific host. And, if you choose SUBNET, the boxes of IP and Subnet will appear for you to fill in the IP address and subnet mask for the specific host as the start point. Forwarded to Internet Host IP Address: Type in the address for the host used as the place that information will be forwarded.
Chapt er 5: Connect ion Mode Or define by yourself by typing the words into the field of User defined. Click Apply to complete the setting. Vir t u a l Se r ve r s - D M Z H ost Direct Mapping Zone (DMZ) uses a technology that makes Router forwarding all incoming packet to internal specific server. To close the function of DMZ Host, please click Discarded.
ADSL Rout er User Manual Vir t u a l Se r ve r s - D yn a m ic D N S The Dynamic DNS (Dynamic Domain Name System) combines both functions of DNS and DHCP to map a dynamic IP into a fixed domain name. This page allows you to access into virtual servers with a domain name and password. Dynamic DNS: Selects Enable to enable DDNS; select Disabled to disable this function. Internet Connection: Selects the interface that you want to use for connecting Internet.
Chapt er 5: Connect ion Mode Fir e w a ll The firewall is a software that interrupts the data between the Internet and your computer. It is the TCP/IP equivalent of a security gate at the entrance to your company. All data must pass through it, and the firewall (functions as a security guard) will allow only authorized data to be passed into the LAN.
ADSL Rout er User Manual Then, to add a new IP Filtering, click Add. This page provides some settings for you to adjust for adding a new outbound IP Filtering. Allow Traffic: No stops the data transmission, Yes lets the data pass through. Protocol: Here provide several default policies for security levels for you to choose. If you don’t want to use the predefined setting, you can use User Defined to set a customized protocol for your necessity.
Chapt er 5: Connect ion Mode A new IP filtering setting for Outbound traffic is created in the web page. To edit the setting, please click the pencil mark to get into the editing page. To delete the setting, click the trash mark to erase it. To set another IP filtering, click Add again. For adding a new Inbound IP Filtering, click Inbound traffic in the item of Select the direction to filter packets. Use the same way to add a new one as stated above.
ADSL Rout er User Manual is the default setting. IP type of Service: The system provides some types of service for you to choose. The meaning of each type is the same as the denotation. The default one is No change. I PQoS To classify the upstream traffic by assigning the transmission priority of the data for different users, please use IP QoS to prioritize the data transmission. The IP QoS allows you to set the settings based on layer three IP packets.
Chapt er 5: Connect ion Mode you want to invoke the QoS traffic rule. Destination Port: Type in the destination port for the traffic rule. The range is from 0 to 65535. Traffic Priority: There are three options – Low, Medium, and High that you can choose. It decides the order of each data transmitted through this device. IP Precedence: The number you choose here decides the type of the IP address processed. No change is the default setting.
ADSL Rout er User Manual Group Name: Type in a name here as a group name. It must be unique. The word length must not be over the length of the field. Available Interfaces: The available interfaces (such as Ethernet, USB, wireless, etc.) will be displayed in the left side box. When you choose it and click Add, it will be transferred into the right side box of Grouped Interfaces.
Chapt er 5: Connect ion Mode Wireless The Wireless setting must match the other Wireless stations. Ba sic To set the basic configuration for the wireless features, please open Basic item from the Wireless menu. Enable Wireless Network: Click this check box to enable the wireless network function. Hide Wireless Network: Checking this box can hide the SSID of this access point. Then other people in the network cannot find the SSID of this device.
ADSL Rout er User Manual Transmission Rate: It decides the speed of data transmission. Choose any one of it by using the drop-down menu. This setting will change by the transmission mode that you set above. If you choose 802.11b only as the transmission mode, the transmission rate settings include 1, 2, 5.5, 11Mbit/s and auto. If you choose 802.11g, the transmission rate settings include 1, 2, 5.5,6,9, 11,12,18,24,36,48, 54Mbit/s and auto. If you choose mixed mode, only Auto is available.
Chapt er 5: Connect ion Mode Se cu r it y To configure security features for the Wireless interface, please open Security item from Wireless menu. This web page offers four authentication protocols for you to secure your data while connecting to networks. There are four selections including None WPA, 802.1X,WPA, and WPA-PSK. Different item leads different web page settings. Please read the following information carefully.
ADSL Rout er User Manual Sh a r e d Ke y m eans t hat a bridge or rout er will send an unencrypt ed t ext st ring t o any client at t em pt ing t o com m unicat e wit h t he rout er. The client request ing aut hent icat ion encrypt s t he t ext and sends back t o t he rout er.
Chapt er 5: Connect ion Mode t ext and sends back t o t he rout er. Bot h unencrypt ed and encrypt ed can be m onit ored, yet it leaves t he bridge open t o at t ack from any int ruder if he calculat es t he WEP key by com paring t he t ext st rings That is why shared key aut hent icat ion can be less secure t han open aut hent icat ion. Format: Choose the typing method of encryption key. You have to click either Hexadecimal digits or ASCII characters and type the keys on the fields of Key 1 to Key 4.
ADSL Rout er User Manual For 8 0 2 .1 X W ir e le ss N e t w or k When a wireless client requests access to a network, it is required to be authenticated by a central authentication server (RADIUS Server). Only an authenticated user can be granted by the network access and thereby unauthorized is blocked. Wireless Security: Choose 802.1x as the authentication protocol, your data transmission between the router and the clients will be protected with the settings that you set in this web page.
Chapt er 5: Connect ion Mode Authentication Mechanism For W PA ( W i- Fi Pr ot e ct e d Acce ss) WiFi-Protected Access: The WPA is suitable for enterprises. It must be used in conjunction with an authentication server such as RADIUS to provide centralized access control and management. It can provides stronger encryption and authentication solution than others WPA mode. Data Encryption (WPA): Select the data encryption for the WPA mode. There are three types that you can choose, TKIP, AES, TKIP+AES.
ADSL Rout er User Manual For W PA- PSK/ W PA2 - PSK/ M ix e d W PA- PSK WiFi-Protected Access: WPA-PSK is useful for small places such as home environment without having authentication servers. It allows the use of manually-entered keys or passwords and is designed to be easy to set up for home users. Format: Choose the typing method of encryption key. You have to click either Hexadecimal digits or ASCII characters and type the keys on the field of Pre-Share Key.
Chapt er 5: Connect ion Mode For W PA- 2 ( W i- Fi Pr ot e ct e d Acce ss) / For M ix e d W PA2 / W PA WiFi-Protected Access: The WPA2 is suitable for enterprises. It must be used in conjunction with an authentication server such as RADIUS to provide centralized access control and management. It can provides stronger encryption and authentication solution than others WPA mode. Data Encryption (WPA): Select the data encryption for the WPA mode. There are three types that you can choose, TKIP, AES, TKIP+AES.
ADSL Rout er User Manual RADIUS-authentication port described in RFC 2138. Earlier RADIUS clients use port 1945. The default value will be shown on this box. You can keep and use it. RADIUS Share Secret: A share secret is like a password, which is used between IAS and the specific RADIUS client to verify identity. Both IAS and the RADIUS client must be use the same shared secret for successful communication to occur. Type in the words for the share secret.
Chapt er 5: Connect ion Mode Acce ss Con t r ols The web page allows you to enable the wireless MAC control configuration. Access Control: Click Off to disable this function. Click On in Allow mode to make any wireless MAC address can be linked to. And click On in Deny mode to disturb any wireless MAC address to be linked to. View Access Control List: Click this button to view the wireless access control list and to add a new access control.
ADSL Rout er User Manual Re pe a t e r The web page allows you to configure the wireless distribution system for the wireless network. AP Mode: Choose either one of the selection as the AP mode. Search Other Repeaters: Click the Scan Now button to scan search other repeater in the wireless network. The result will be shown under below. Click Apply to invoke the wireless repeater options.
Chapt er 5: Connect ion Mode Managem ent D ia gn ost ics To check the link status for the network and your computer, a diagnostic test can guide you to detect the network problem. The testing items are listed and accomplished one by one. If the previous one is failed, than the items below that failed one will be failed too. Use this diagnostic test to detect the connectivity mistakes whenever you happen to the linked problem.
ADSL Rout er User Manual Adm in Accou n t This page allows you to type in the password for accessing into your DSL Router. For the Admin Account, the default setting for user password is admin. If you want to change the username and the password, please retype the new password in the Confirm field for confirmation. Then click Apply. Re m ot e Acce ss There are four interfaces for the remote access. Please choose one of them if you want to enable the remote access control.
Chapt er 5: Connect ion Mode I n t e r n t e t Tim e The router’s clock must synchronize with global Internet’s time. The time you set in the screen will be adapted to system log. Update: Click this button to refresh the current time. Set Time by: The default setting is Manual. If you select Time Server, you don’t need to type in the time setting manually. The system will set automatically.
ADSL Rout er User Manual There are 8 types for log level and display level for your choose. The default is Debugging. The mode selection includes Local, Remote and Both. The default one is Local. If you choose Remote or Both, all the events will be sent to the specified UDP port of the specified log server. Vie w ing Syst e m Log For viewing the system log, please click the View System Log button. The screen will be shown immediately for your reference.
Chapt er 5: Connect ion Mode SN M P Se t t in g The SNMP, the abbreviation of Simple Network Management Protocol, is used to refer to a collection of specifications for network management that include the protocol itself, the definition of data structures and associated concepts. A management station performs the monitoring function by retrieving the value of MIB objects. The management station and agents are linked by a network management protocol that is SNMP.
ADSL Rout er User Manual workstation by way of SNMP agent. Ba ck u p Con fig To backup your configuration for the router to your computer, you can use Backup Config web page to save the settings. And when you want to restore the settings in the future, simply open Backup Config web page and use Browse button to locate the file and click Restore.
Chapt er 5: Connect ion Mode UPn P for XP Universal plug and play (UPnP) is an architecture for pervasive peer to peer network connectivity of intelligent appliances and PCs of all form factors. It is designed to bring easy-to-use, flexible, standards-based connectivity to ad-hoc or unmanaged networks whether in the home, in a small business, public spaces, or attached to the Internet. Only Windows XP supports UPnP function. Please follow the steps below for installing UPnP components. 1.
ADSL Rout er User Manual 7. Now, the NAT traversal function will be provided. The ADSL router will create a new virtual server automatically for mapping while the router detecting the computer running some Internet applications.
Chapt er 5: Troubleshoot ing Ch a pt e r 5 : Tr ou ble sh oot in g If the suggested solutions in this section do not resolve your issue, contact your system administrator or Internet service provider. Problem s wit h LAN PCs on the LAN cannot get IP addresses from the ADSL Router. The chances are that the interface used as DHCP server is modified and the client PCs do not renew IP addresses.
ADSL Rout er User Manual Request time out Then the DNS is not reachable. Check your DNS setting on the ADSL Router. Problem s wit h Upgrading The following lists the error messages that you may see during upgrading and the action to take. Error: All the ADSL LEDs light up and cannot light off as usual. Possible cause: When users execute firmware upgrade and save settings to the router, the power for the router is lost for some unknown reasons, the normal web page for the router might be damaged.
Chapt er 6: Glossary Ch a pt e r 6 : Glossa r y ARP (Addr e ss Re solu t ion Pr ot ocol ) ARP is a TCP/ I P prot ocol for m apping an I P address t o a physical m achine address t hat is recognized in t he local net work, such as an Et hernet address. A host wishing t o obt ain a physical address broadcast s an ARP request ont o t he TCP/ I P net work. The host on t he net work t hat has t he I P address in t he request t hen replies wit h it s physical hardware address.
ADSL Rout er User Manual configured and m apped t o a privat e workst at ion address when accesses are m ade t hrough t he gat eway t o a public net work. For exam ple, t he ADSL Rout er is assigned wit h t he public I P address of 168.111.2.1. Wit h NAT enabled, it creat es a Virt ual LAN. Each PC on t he Virt ual LAN is assigned wit h a privat e I P address wit h default value of 192.168.1.2 t o 192.168.2.254.
Chapt er 7: Glossary t he cells belonging t o t he sam e connect ion can be dist inguished. A unique and separat e VPI / VCI ident ifier is assigned in advance t o indicat e which t ype of cell is following, unassigned cells, physical layer OAM cells, m et asignaling channel or a generic broadcast signaling channel. Your I SP should supply you wit h t he values.
ADSL Rout er User Manual 98
Appendix A: Specificat ions Appe n dix A: Spe cifica t ion s I nt erface Regulat ory Approvals and Com pliance Power Requirem ent and Operat ion Environm ent Requirem ent Physical z z One RJ- 11 port for ADSL connect ion One RJ- 45 port s for I EEE 802.3/ 802.3u 10/ 100 Base-T aut o- sensing and aut o- crossover Et hernet connect ion z One USB client port compliant to USB 1.1 z On- board wireless LAN m odule for I EEE 802.11g ( 2.
ADSL Rout er User Manual 100
Appendix B: Server Set up for 802.1x Client Appe n dix B: Se r ve r Se t u p for 8 0 2 .1 x Clie n t Ge t t in g Clie n t Ce r t ifica t e 1. 2. 3. 4. Please connect the client to a network that doesn’t require port authentictaion. Open up Microsoft Explorer in Windows XP, and go to http:///certsrv. Authenticate to the server using your account that you created at the end of the server setup. (e.g. 123) and click OK. A dialog box might appear for you to choose.
ADSL Rout er User Manual 102 5. Make sure that User certificate request: User Certificate is selected, and click Next. 6. Click Submit in this dialog. 7. Now, you'll see status messages on the screen, then your certificate will be returned to you. Click Install this certificate. 8.
Appendix B: Server Set up for 802.1x Client En a ble 8 0 2 .1 x a u t h e n t ica t ion a n d En cr ypt ion for w ir e le ss ca r d 1. Open up the properties for your wireless connection, either by right-click on My Network Places on the desktop, select Properties, or Open up the Control Panel, select Network Connections (located under Network and Internet Connections if in Category View) 2. Right click on the Wireless Network Connection, and select Properties.
ADSL Rout er User Manual 104 6. Select Data encryption (WEP enabled), and ensure The key is provided for me automatically is also selected. 7. Now you're ready to configure your router (AP) with 802.1x authentication.