>>>>>>> In Europe: InFocus International B.V. Strawinskylaan 585 1077 XX Amsterdam,The Netherlands Phone: +31 20 579 2000 Fax: +31 20 579 2999 In Asia: InFocus Systems Asia Pte Ltd. #07-01, Tanglin Shopping Centre 19 Tanglin Road Singapore 247909 Telephone: (65) 6334-9005 Fax: (65) 6333-4525 User’s Guide InFocus Corporation 27700B SW Parkway Avenue Wilsonville, Oregon 97070-9215 1-800-294-6400 • 503-685-8888 Fax: 503-685-8887 http://www.infocus.
EDX Ref Guide.fm Page 1 Friday, June 30, 2006 10:48 AM Declaration of Conformity Canada Manufacturer: InFocus Corporation, 27700B SW Parkway Ave.
EDX Ref Guide.fm Page 2 Friday, June 30, 2006 10:48 AM For complete details on connecting and operating the projector, refer to this User’s Guide. Electronic versions of this User’s Guide in multiple languages are available on our website. The website also has technical specifications (an interactive image size calculator, laptop activation commands, connector pin outs, a glossary, the product data sheet), a web store to buy accessories, and a page for online registration.
EDX Ref Guide.fm Page 3 Friday, June 30, 2006 10:48 AM • Locate the projector in a well-ventilated area without any obstructions to intake or exhaust vents. Do not place the projector on a tablecloth or other soft covering that may block the vents. • Locate the projector at least 4' (1.2 m) away from any heating or cooling vents. • Use only approved ceiling mounts. • Use only the power cord provided. A surge-protected power strip is recommended.
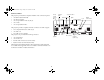
EDX Ref Guide.fm Page 4 Friday, June 30, 2006 10:48 AM Introduction Projector components and features: front Your new multimedia projector provides two computer, three video, and two audio inputs, one audio output, and RS-232 and Network control. It has XGA 1024x768 resolution. Optional user-changeable short, fixed short, long and ultra long throw lenses make this a flexible product suitable for many different uses. The projector is easy to connect, easy to use, and easy to maintain.
EDX Ref Guide.
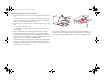
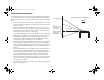
EDX Ref Guide.fm Page 6 Friday, June 30, 2006 10:48 AM Positioning the projector To determine where to position the projector, consider the size and shape of your screen, the location of your power outlets, and the distance between the projector and the rest of your equipment. Here are some general guidelines: • • 10 ft high image 9:1 1:1 Position the projector on a flat surface at a right angle to the screen. The projector (with the standard lens) must be at least 3 feet (0.
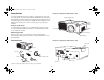
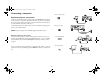
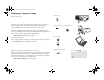
EDX Ref Guide.fm Page 7 Friday, June 30, 2006 10:48 AM Connecting a computer connect computer cable Required computer connections Connect one end of the VESA computer cable to the Computer 2 connector on the projector. Connect the other end to the video port on your computer. If you are using a desktop computer, you first need to disconnect the monitor cable from the computer’s video port. Connect the black power cable to the connector on the back of the projector and to your electrical outlet.
EDX Ref Guide.fm Page 8 Friday, June 30, 2006 10:48 AM If you are using a desktop computer and want to see the image on your computer screen as well as on the projection screen, plug the monitor cable to the Monitor out connector on the projector. connect monitor cable You can control the projector from an LCD control panel, touch screen, or other control device or computer by connecting an RS-232 cable to the projector’s Serial Control connector.
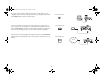
EDX Ref Guide.fm Page 9 Friday, June 30, 2006 10:48 AM Displaying a computer image remove lens cap Remove the lens cap. Press the power switch on the back of the projector to the on (I) position. The Power light on the Status Indicator Panel (page 14) lights green. press Power switch press Power button I O 2 Press the Power button on the top of the projector or the remote. The Power light blinks green and the fans start to run.
EDX Ref Guide.fm Page 10 Friday, June 30, 2006 10:48 AM adjust height Adjusting the image Adjust the height of the projector, if necessary, by pressing the release buttons on each side of the projector’s front to extend the elevator feet. release button elevator foot release button elevator foot adjust distance Position the projector the desired distance from the screen at a 90 degree angle (perpendicular) to the screen. See page 37 for a table listing screen sizes and distances.
EDX Ref Guide.fm Page 11 Friday, June 30, 2006 10:48 AM Connecting a video device connect A/V cable Standard video connections Plug the audio/video (A/V) cable’s yellow connector into the video-out connector on the video device. Plug the other yellow connector into the yellow Video 3 connector on the projector. Plug a white connector into the left audio out connector on the video device and plug a red connector into the right audio out connector on the video device.
EDX Ref Guide.fm Page 12 Friday, June 30, 2006 10:48 AM Displaying a video image remove lens cap Remove the lens cap. Press the power switch on the back of the projector to the on (I) position. The Power light on the Status Indicator Panel (page 14) lights green. I press Power button 2 O press Power switch Press the Power button on the top of the projector or the remote. The Power light blinks green and the fans start to run.
EDX Ref Guide.fm Page 13 Friday, June 30, 2006 10:48 AM Adjust the zoom or focus by rotating the Zoom or Focus rings inside the lens door until the desired image size and focus are produced. adjust Zoom and Focus If the image is not on the screen or viewing area, adjust it by using the lens shift dials inside the lens door. adjust Lens Shift Use the right dial to shift the lens left or right. Use the left dial to shift the lens up or down. Adjust the volume in the Audio menu.
EDX Ref Guide.fm Page 14 Friday, June 30, 2006 10:48 AM The Status Indicator Panel on top of the projector indicates the state of the projector and can help you troubleshoot. Shutting down the projector The projector automatically blanks the screen after no active source is detected for 5 minutes. This blank screen helps preserve the life of the projector. The image returns when an active source is detected or a remote or keypad button is pressed.
EDX Ref Guide.fm Page 15 Friday, June 30, 2006 10:48 AM Problem Solution Result No startup screen Plug power cable in, press power switch and power button. Remove lens cap.
EDX Ref Guide.
EDX Ref Guide.
EDX Ref Guide.
EDX Ref Guide.
EDX Ref Guide.fm Page 20 Friday, June 30, 2006 10:48 AM Image not centered on screen Move projector, adjust zoom or lens shift, adjust height Correct image Adjust horizontal or vertical position in Picture>Advanced menu Still having problems? If you need assistance, visit our website or call us. See the inside of the back cover for a list of all relevant web addresses. This product is backed by a limited warranty. An extended warranty plan may be purchased from your dealer.
EDX Ref Guide.fm Page 21 Friday, June 30, 2006 10:48 AM Using the keypad buttons power–turns the projector on (page 9) and off (page 14). menu–opens the on-screen menus (page 25). up/down arrows–navigates to and adjusts settings in the menus (page 25). select–confirms choices made in the menus (page 25). source–switches among active sources Using the remote control The remote uses two (2) AA batteries.
EDX Ref Guide.fm Page 22 Friday, June 30, 2006 10:48 AM Using the audio connect audio cable To play sound from the projector, connect your source to the Audio In connector on the projector. To adjust the volume, mute, or loudness, use the Audio menu (see page 29). Troubleshooting audio If there is no sound, check the following: • Make sure the audio cable is connected. • Make sure mute isn’t active. • Make sure the volume is turned up enough.
EDX Ref Guide.fm Page 23 Friday, June 30, 2006 10:48 AM Optimizing computer images Presentation features After your computer is connected properly and the computer’s image is on the screen, you can optimize the image using the onscreen menus. For general information on using the menus, see page 25. Several features are provided to make giving presentation easier. The following is an overview, details are found in the menu section on page 25.
EDX Ref Guide.fm Page 24 Friday, June 30, 2006 10:48 AM Optimizing video images Customizing the projector After the video device is connected properly and the image is on the screen, you can optimize the image using the onscreen menus. For general information on using the menus, see page 25. You can customize the projector for your specific setup and needs. See page 29 to page 33 for details on these features. • For rear projection, turn Rear mode on in the Settings>System menu.
EDX Ref Guide.fm Page 25 Friday, June 30, 2006 10:48 AM Using the menus To open the menus, press the menu button on the keypad or remote. (The menus automatically close after 60 seconds if no buttons are pressed.) The Main menu appears. Use the arrow buttons to move up and down to highlight the desired submenu, then press the Select button.
EDX Ref Guide.fm Page 26 Friday, June 30, 2006 10:48 AM Picture menu To adjust the following six settings, highlight the setting, press Select, use the up and down arrows to adjust the values, then press select to confirm the changes. Keystone Vertical increasing keystone Keystone Vertical: adjusts the image vertically and makes a squarer image by using an adjustable scale band. Keystone Horizontal: adjusts the image horizontally and makes a squarer image by using an adjustable scale band.
EDX Ref Guide.fm Page 27 Friday, June 30, 2006 10:48 AM Presets: The provided Presets optimize the projector for displaying computer presentations, photographs, film images, and video images. (Film input is material originally captured on a film camera, like a movie; video input is material originally captured on a video camera, like a TV show or sporting event.) Save Settings There are also user-definable presets.
EDX Ref Guide.fm Page 28 Friday, June 30, 2006 10:48 AM Advanced settings Sharpness: changes the clarity of the edges of a video image. Select a sharpness setting. Color Space: This option applies to computer and component video sources (except 480i/576i). It allows you to select a color space that has been specifically tuned for the input signal. When Auto is selected, the projector automatically determines the standard.
EDX Ref Guide.fm Page 29 Friday, June 30, 2006 10:48 AM Settings menu Audio: allows adjustments to the Volume. Also allows you to turn on and off the Internal speakers, and projector startup Chime. Settings menu Sources: allows you to assign a particular input to a specific source key when using the Integrator remote. Also allows selection of a default Startup Source and enables or disables Autosource.
EDX Ref Guide.fm Page 30 Friday, June 30, 2006 10:48 AM Power Save: automatically turns the lamp off after no signals are detected for 20 minutes. After 10 additional minutes with no signal, the projector powers down. If an active signal is received before the projector powers down, the image will be displayed. Screen Save Screen Save: automatically blanks the screen after no signals are detected for five minutes.
EDX Ref Guide.fm Page 31 Friday, June 30, 2006 10:48 AM Custom Key (for use with optional remote only): allows you to assign a different function to the Custom key on the optional remote to quickly and easily use the effect. Only one effect can be enabled at a time. The default is Source Info; highlight an effect and press Select to choose a different one. Custom Key Blank: shows an empty screen. Mute: turns off all sound. Aspect Ratio: sets the ratio of the image width to image height.
EDX Ref Guide.fm Page 32 Friday, June 30, 2006 10:48 AM Language: allows you to select a language for the onscreen display of menus and messages. Language Service: to use these features, highlight them and press Select. Factory Reset: restores all settings (except Lamp and Filter Hours and Network settings) to their default after displaying a confirmation dialog box. Reset Lamp Hours: resets the lamp hours counter in the Service Info menu to zero. Do this only after changing the lamp.
EDX Ref Guide.fm Page 33 Friday, June 30, 2006 10:48 AM Maintenance clean the lens with a soft dry cloth and non-abrasive cleaner Cleaning the lens 1 Apply a non-abrasive camera lens cleaner to a soft, dry cloth. Avoid using an excessive amount of cleaner, and don’t apply the cleaner directly to the lens. Abrasive cleaners, solvents or other harsh chemicals might scratch the lens. 2 Lightly wipe the cleaning cloth over the lens in a circular motion.
EDX Ref Guide.fm Page 34 Friday, June 30, 2006 10:48 AM Replacing the projection lamp The lamp hour timer in the Service Info menu counts the number of hours the lamp has been in use. Twenty hours before the specified end of the lamp’s life, the message “Change lamp” briefly appears on the projected screen. Service Info menu NOTE: You can order new lamp housings from www.infocus.com (in select areas), your retailer or your dealer.
EDX Ref Guide.fm Page 35 Friday, June 30, 2006 10:48 AM 4 Loosen the three captive screws (marked by the arrows) on the lamp module. loosen the captive screws on lamp module 5 Carefully remove the lamp module by grasping and lifting the handle. Dispose of the lamp in an environmentally proper manner. lamp module handle 6 Install the new lamp module, making sure that it is properly seated, and tighten the three captive screws.
EDX Ref Guide.fm Page 36 Friday, June 30, 2006 10:48 AM Cleaning the dust filter 1 Turn off the projector and unplug the power cable. turn off and unplug the projector 2 Wait 45 minutes to allow the projector to cool thoroughly. WARNING: To avoid burns, allow the projector to cool for at least 45 minutes before you clean or replace the dust filter. wait 45 minutes 3 Remove the dust filter cover on the side of the projector by pressing up on the two tabs at the cover’s bottom.
EDX Ref Guide.fm Page 37 Friday, June 30, 2006 10:48 AM Appendix Table 3: Projection sizes: Short Fixed lens (0.8:1 throw ratio) Projection Distance (inch/m) Projected image size NOTE: Visit the Service section of our website for interactive image size calculators for the standard and optional lenses. Screen Size (inch/m) Table 2: Projection sizes: Standard lens (1.5 - 1.8:1 throw ratio) Minimum Image Maximum Image Minimum 40/1 24/0.6 60/1.5 35/0.9 70/1.8 43/1.1 100/2.5 63/1.6 120/3 75/1.
EDX Ref Guide.fm Page 38 Friday, June 30, 2006 10:48 AM Table 4: Projection sizes: Short Zoom lens (1.2 -2.0:1 throw ratio range) Table 5: Projection sizes: Long Throw lens (1.9 - 3.9:1 throw ratio range Projection Distance (inch/m) Projection Distance (inch/m) Screen Size (inch/m) Screen Size (inch/m) Minimum Maximum 40/1 39/1.0 63/1.6 60/1.5 59/1.5 70/1.8 Minimum Maximum 40/1 59/1.5 122/3.1 94/2.4 60/1.5 94/2.4 185/4.7 67/1.7 110/2.8 70/1.8 110/2.8 217/5.5 100/2.5 98/2.
EDX Ref Guide.fm Page 39 Friday, June 30, 2006 10:48 AM Table 6: Projection sizes: Ultra Long Throw lens (3.9 - 7.4:1 throw ratio range Projection Distance (inch/m) Screen Size (inch/m) Minimum Maximum 40/1 122/3.1 236/6.0 60/1.5 189/4.8 354/9.0 70/1.8 220/5.6 513/10.5 100/2.5 315/8.0 594/15.1 120/3 382/9.7 717/18.2 150/3.8 476/12.1 898/22.8 200/5.1 638/16.2 1197/30.4 250/6.4 799/24.4 1496/45.6 300/7.6 961/28.5 1795/53.3 400/10.2 1283/32.6 2398/60.9 500/12.7 1602/40.
EDX Ref Guide.fm Page 40 Friday, June 30, 2006 10:48 AM A read command returns the range and the current setting, for example: RS-232 commands Communication Configuration Read Command Examples Visit our website for additional RS-232 settings and information.
EDX Ref Guide.
EDX Ref Guide.
EDX Ref Guide.
EDX Ref Guide.
EDX Ref Guide.
EDX Ref Guide.
EDX Ref Guide.
EDX Ref Guide.