7185C440C450_UG.qxd 1/21/05 2:19 PM Page 1 >>>>>>> InFocus Corporation 27700B SW Parkway Avenue Wilsonville, Oregon 97070-9215 1-800-294-6400 • 503-685-8888 Fax: 503-685-8887 http://www.infocus.com In Europe: InFocus International B.V. Strawinskylaan 585 1077 XX Amsterdam,The Netherlands Phone: +31 20 579 2000 Fax: +31 20 579 2999 In Asia: InFocus Systems Asia Pte Ltd.
Declaration of Conformity Canada Manufacturer: InFocus Corporation, 27700B SW Parkway Ave.
If you are experienced in setting up presentation systems, use the included Quick Set Up card. For complete details on connecting and operating the projector, refer to this User’s Guide. Electronic versions of this User’s Guide in multiple languages are available on the included CD and on our website.
Important Operating Considerations for Safety • Place the projector in a horizontal position no greater than 15 degrees off axis. • Locate the projector in a well-ventilated area without any obstructions to intake or exhaust vents. Do not place the projector on a tablecloth or other soft covering that may block the vents. • Locate the projector at least 4' (1.2 m) away from any heating or cooling vents. • Use only InFocus-approved ceiling mounts. • Use only the power cord provided.
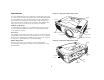
Introduction Projector components and features: front Your new multimedia projector provides three computer, three video, and two audio inputs, one audio output, and RS-232 control. The C440 and C450 have XGA 1024x768 resolution while the C460 has SXGA+ 1400x1050 resolution. Optional user-changeable short, fixed short, long and super long throw lenses make this a flexible product suitable for many different uses. The projector is easy to connect, easy to use, and easy to maintain.
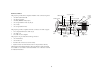
Connector Panel The projector provides three computer and three video connection options: • one M1-D (DVI with USB) • one VESA computer • one BNC (RGBHV and Pr, Pb, Y) • one component RCA video (Pr, Pb, Y) • one S-video • one composite RCA video VESA computer M1-D computer monitor component video RS232 serial control wired remote RJ-45 lock The projector provides computer and video connectors for audio support: • two composite RCA stereo audio (L, R) • one audio out • two audio ins for
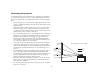
Positioning the projector To determine where to position the projector, consider the size and shape of your screen, the location of your power outlets, and the distance between the projector and the rest of your equipment. Here are some general guidelines: • Position the projector on a flat surface at a right angle to the screen. The projector (with the standard lens) must be at least 3 feet (0.9m) from the projection screen.
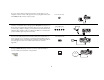
Connecting a computer connect computer cable Required computer connections Connect one end of the VESA computer cable to the Computer 2 connector on the projector. Connect the other end to the video port on your computer. If you are using a desktop computer, you first need to disconnect the monitor cable from the computer’s video port. Connect the black power cable to the connector on the back of the projector and to your electrical outlet.
If you are using a desktop computer and want to see the image on your computer screen as well as on the projection screen, plug the monitor cable to the Monitor out connector on the projector. connect monitor cable You can also connect to your computer using a BNC cable. Connect the BNC connectors on the BNC cable to the appropriate Computer 3 connectors on the projector. Connect the other end to the video port on your computer.
Displaying a computer image remove lens cap Remove the lens cap. Press the power switch on the back of the projector to the on position, then press the Power button on the top of the projector or the remote. I The LED flashes green and the fans start to run. When the lamp comes on, the startup screen is displayed and the LED is steady green. It can take a minute for the image to achieve full brightness. press Power button 2 O press Power switch 1 ? No startup screen? Get help on page 19.
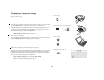
First-time projector use with Windows 98 a The first time you connect a computer running Windows 98 to the projector, the computer recognizes the projector as “new hardware” and the Add New Hardware Wizard appears. Follow these instructions to use the Wizard to load the correct driver (which was installed with your Windows operating system). If you are running Windows 2000, Windows ME, or Window XP, skip these steps and go to “Adjusting the image” on page 13.
Skip this page if you did not connect a USB mouse cable For Windows 98: • If you connected the USB cable, the Add New Hardware Wizard appears again. Drivers must be installed to use the USB functionality. • The Wizard launches two times. The first time it detects a USB Human Interface Device (for the keyboard). The second time it detects a USB Human Interface Device (for the mouse). For Windows 2000, Windows ME, and Windows XP: • The USB drivers are automatically installed.
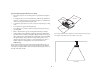
Adjusting the image adjust height Adjust the height of the projector, if necessary, by pressing the release buttons on each side of the projector’s front to extend the elevator feet. release button release button elevator foot elevator foot Position the projector the desired distance from the screen at a 90 degree angle (perpendicular) to the screen. adjust distance See page 43 for a table listing screen sizes and distances.
Connecting a video device connect A/V cable Standard video connections Plug the audio/video (A/V) cable’s yellow connector into the video-out connector on the video device. Plug the other yellow connector into the yellow Video 3 connector on the projector. Plug a white connector into the left audio out connector on the video device and plug a red connector into the right audio out connector on the video device.
You can also connect to your video device using a BNC cable. Connect the BNC connectors of the BNC cable to the appropriate Computer 3 connectors on the projector. Connect the other end to the video port on your video device. Use the A/V cable’s audio connectors as described on the previous page (the yellow connectors on the A/V cable are not used). connect BNC cables R When 4 BNCs are connected, the projector handles a composite synch on H.
Displaying a video image Press the power switch on the back of the projector to the on position, then press the Power button on the top of the projector. press Power switch I remove lens cap The LED flashes green and the fans start to run. When the lamp comes on, the startup screen is displayed and the LED is steady green. It can take a minute for the image to achieve full brightness. press Power button 2 O Remove the lens cap. 1 ? No startup screen? Get help on page 19.
Adjust the zoom or focus by pressing the power Zoom or power Focus buttons on the keypad until the desired image size and focus are produced. adjust Zoom and Focus zoom focus You can also adjust the zoom and focus via the menus. See page 32 If the image is not on the screen or viewing area, adjust it by pressing the lens shift button on the keypad. adjust Lens Shift lens shift Press the upper Lens Shift button to shift the lens upward. Press the lower Lens Shift button to shift the lens downward .
Shutting down the projector Troubleshooting your setup The projector automatically blanks the screen after no active source is detected for 50 minutes. This blank screen helps preserve the life of the projector. The image returns when an active source is detected or a remote or keypad button is pressed. If your image appears correctly on the screen, skip to the next section. If it does not, troubleshoot the setup.
Source Troubleshooting Problem Solution Result No startup screen Plug power cable in, press power switch, press power button. Remove lens cap.
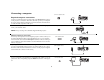
No computer image, just the words “Signal out of range” A Adjust computer refresh rate in Control Panel>Display>Settings>Advanced> Adapter (location varies by operating system) Signa l rang out of e Computer image projected A You may also need to set a different resolution on your computer, as shown in the following problem, “Image fuzzy or cropped” 20 A
Image fuzzy or cropped A A Set your computer’s display resolution to the native resolution of the projector (Start>Settings>Control Panel>Display>Settings tab, select1024x768 for C440/450, 1400x1050 for C460) Image clear and not cropped A For a laptop, disable laptop monitor or turn-on dualdisplay mode Remote control navigation buttons not working with my computer Connect USB cable (page 8) then load USB drivers, if needed (page 11). Or, connect wired remote cable and reboot your computer (page 8).
Projector troubleshooting Problem Solution Result Image not square Adjust keystone the Picture menu Square image Image not sharp Adjust the focus on the keypad or Sharpness in the Picture>Advanced menu Correct image AB AB Image does not fit 16:9 screen Change aspect ratio to 16:9 in Picture>Aspect ratio menu 22 Correct image
Turn on/off Ceiling in Settings>System menu Image upside down AB BA Image reversed left to right Turn on/off Rear in Settings>System menu A Projected colors don’t match source Correct image Correct image AB Adjust color, tint, color temperature, brightness, contrast in the menus COLOR Correct image COLOR 23
Lamp won’t turn on, Temp LED solid red (page 44) solid red Make sure vents aren’t blocked; allow projector to cool for one minute Unplug projector; wait one minute; plug in projector and turn it on: lamp lights star tu scre p en temp lamp Lamp won’t turn on, Lamp LED blinking red (page 44) Lamp may need to be replaced (page 40) star tu scre p en temp blinking red Lamp turns on lamp 24
Image not centered on screen Move projector, adjust zoom or lens shift on keypad, adjust height Adjust horizontal or vertical position in Picture>Advanced menu Still having problems? If you need assistance, visit our website or call us. See the inside of the back cover for a list of all relevant web addresses. This product is backed by a limited two-year warranty. An extended warranty plan may be purchased from your dealer.
Using the keypad buttons Most buttons are described in detail in other sections, but here is an overview of their functions: power–turns the projector on (page 10) and off (page 16). lens shift–shifts the projected image up or down zoom–moves the projected image closer or further away. focus–adjusts the clarity. menu–opens the on-screen menus (page 31). up/down arrows–navigates to and adjusts settings in the menus (page 31). select–confirms choices made in the menus (page 31).
Using the remote control LED navigation buttons The remote uses two (2) provided AAA batteries. They are easily installed by sliding the cover off the remote's back, aligning the + and - ends of the batteries, sliding them into place, and then replacing the cover. laser button To operate, point the remote at the projection screen or at the projector (not at the computer). The range of optimum operation is about 30 feet (9.14m).For best results, aim the remote directly at the projector.
Using the audio connect audio cable To play sound from the projector, connect your source to the Audio In connector on the projector. To adjust the volume, use the buttons on the keypad or remote. To adjust the balance, or loudness, use the Audio menu (see page 35). To mute the sound, press the Mute button. Troubleshooting audio adjust volume If there is no sound, check the following: • Make sure the audio cable is connected. • Make sure mute isn’t active.
Optimizing computer images Presentation features After your computer is connected properly and the computer’s image is on the screen, you can optimize the image using the onscreen menus. For general information on using the menus, see page 31. Several features are provided to make giving presentation easier. The following is an overview, details are found in the menu section on page 31. • Adjust the Keystone, Contrast, or Brightness in the Picture menu. • Change the Aspect Ratio.
Optimizing video images Customizing the projector After the video device is connected properly and the image is on the screen, you can optimize the image using the onscreen menus. For general information on using the menus, see page 31. You can customize the projector for your specific setup and needs. See page 35 to page 39 for details on these features. • For rear projection, turn Rear mode on in the Settings>System menu.
Using the menus Dot To open the menus, press the menu button on the keypad or remote. (The menus automatically close after 60 seconds if no buttons are pressed.) The Main menu appears. Use the arrow buttons to move up and down to highlight the desired submenu, then press the Select button. Menu button To change a menu setting, highlight it, press Select, then use the up and down arrow buttons to adjust the value, select an option using radio buttons, or turn the feature on or off using check boxes.
Picture menu To adjust the following six settings, highlight the setting, press Select, use the up and down arrows to adjust the values, then press select to confirm the changes. Keystone Vertical increasing keystone Zoom: allows you to adjust a lens to zoom in and out. Highlight Zoom, then press the up or down arrows on the keypad or remote. Focus: allows you to adjust the lens focus for an image. Highlight Focus, then press the up or down arrows on the keypad or remote.
Presets: The provided Presets optimize the projector for displaying computer presentations, photographs, film images, and video images. (Film input is material originally captured on a film camera, like a movie; video input is material originally captured on a video camera, like a TV show or sporting event.) You can use the preset as a starting point, then further customize the settings for each source. The settings you customize are saved in the preset for each source.
Advanced settings Sharpness: (video sources only on C440 and C450) changes the clarity of the edges of a video image. Select a sharpness setting. Sharpness Color Space: This option applies to computer and component video sources. It allows you to select a color space that has been specifically tuned for the input signal. When Auto is selected, the projector automatically determines the standard.
Settings menu Audio: allows adjustments to the Balance and Volume. Also allows you to turn on and off the Internal speakers, and projector startup Chime. Settings menu Sources: allows you to assign a particular input to a specific source key when using the Integrator remote. Also allows selection of a default Startup Source and enables or disables Autosource. Audio Sources>Power-up Source: this determines which source the projector checks first for active signal during power-up.
Screen Save: automatically blanks the screen after no signals are detected for five minutes. The image returns when an active source is detected or a remote or keypad button is pressed. Screen Save is disabled when Power Save is enabled. Screen Save Startup Logo: allows you to display a blank Black, White, or Blue screen instead of the default screen at startup and when no source is detected. It also allows you to capture and display a custom startup screen.
PiP: (Picture in Picture) allows you to overlay a smaller window showing the video source on top of the larger computer source window. Only video sources 2 and 3 (composite and S-video) support PiP. You must have both a computer and video source connected to use PiP. You can’t show a computer image in the smaller PiP window, only a video image. You can select a small, medium, or large window.
Network: The projector has an RJ45 Ethernet connector that supports network connections and TCP/IP protocols. This will allow for the control and management of the projector over a corporate network. The following fields are accessible when DHCP is not checked and available for manual entry of data. IP Address: Identifies the projector on the network. Network Network Info Subnet mask: Separates the network address part of the IP address. Default gateway: The IP address of the local router.
Maintenance clean the lens with a soft dry cloth and non-abrasive cleaner NOTE: When you are performing maintenance activities on your projector, keep in mind that you should only remove screws that are single-slot, or flathead, screws. Any other type of screw, such as a phillips or star should not be removed. These types of screws should only be removed by technical support experts. Cleaning the lens 1 Apply a non-abrasive camera lens cleaner to a soft, dry cloth.
6 To remove a lens, push the lever inside the lens housing and turn the lens counterclockwise until it stops. Remove the lens. lever inside lens housing 7 To install a new lens, place it in the opening through the front of the projector, aligning the red dot (near the base of the lens) with the red dot on the projector. Turn clockwise until you feel the lens click into place. 8 Tighten the captive screw to the lens housing door.
WARNINGS: • To avoid burns, allow the projector to cool for at least 60 minutes before you replace the lamp. • Do not drop the lamp module. The glass may shatter and cause injury. Do not touch the glass lamp screen. Fingerprints can obscure projection sharpness. • Be extremely careful when removing the lamp housing. In the unlikely event that the bulb ruptures, small glass fragments may be generated.
Cleaning the dust filter 1 Turn off the projector and unplug the power cable. turn off and unplug the projector 2 Wait 60 minutes to allow the projector to cool thoroughly. WARNING: To avoid burns, allow the projector to cool for at least 60 minutes before you clean or replace the dust filter. wait 60 minutes 3 Remove the dust filter grill door on the side of the projector by pulling down on the two tabs at the grill’s top. 4 Press the tab on the center of the dust filter and lift it off.
Appendix Projected image size NOTE: Visit the Service section of our website for interactive image size calculators for the standard and optional lenses. Table 1: Projection sizes: Standard lens (1.5 - 2.2:1 throw ratio) Minimum Image Maximum Image Diagonal Image (feet/m) Image Width (feet/m) Diagonal Image (feet/m) Image Width (feet/m) Min Distance 3/0.9 1.7/0.52 1.46/.42 2.5/0.76 1.82/0.55 5/1.5 2.84/0.87 2.27/.69 4.17/1.27 4.55/1.39 10/3.0 5.68/1.73 4,46/1.36 8.33/2.54 6.56/2.
LED Behavior LED color/behavior Meaning Power: blinking green Temp: N/A Lamp: N/A The power switch has been toggled on and the software is initializing, or the projector is powering down and the fans are running to cool the lamp. Power: blinking green (once) Temp: N/A Lamp: N/A Power Save or Screen Save. Lamp has exceeded lamp hours limit. Power: solid green Temp: N/A Lamp: N/A The power switch has been toggled on and the software has initialized or the projector has been powered off via the remote.
A read command returns the range and the current setting, for example: RS-232 commands Communication Configuration Read Command Examples Visit our website for additional RS-232 settings and information.
Write Command Examples Command Min Max Default About 0: n/a 1: enable ABT at W 0 1 n/a Aspect Ratio 0: Native 1: 16:9 2: 4:3 ARZ at RW 0 2 2 Auto Image 0: n/a 1: enable AIM at W 0 1 n/a The projector cannot respond to commands coming in at a high-rate. Therefore, a delay must occur between commands to ensure that the command gets properly executed. To assure the projector can process a command, wait 3 seconds before entering the next command.
Blue Gain BCG at RW 0 100 50 2 Brightness BRT at RW 96 160 128 1 Ceiling 0: disable 1: enable CEL at RW 0 1 0 Chime 0: disable 1: enable ACE at RW 0 1 1 Color CLR at RW 65 191 128 Color Space 0: RGB 1: SMPTE240 2: REC709 3: REC601 7: Auto CSM at RW 0 7 7 Color Temp 0: 9300K 1: 6500K 2: 7200K 3: User TMP at RW Contrast CON at RW 96 160 128 Display Messages 0: disable 1: enable DMG at RW 0 1 1 0 3 1 2 1 47 Effect 0: blank 1: mute 2: aspect ratio 3: source 4: a
IR Receiver front 0: disable 1: enable IRF at RW 0 1 1 IR Receiver rear 0: disable 1: enable IRR at RW 0 1 1 IR Receiver top 0: disable 1: enable IRT at RW 0 1 0 Language 0 = English 1 = French 2 = German 3 = Spanish 4 = Traditional Chinese 5 = Japanese 6 = Korean 7 = Portuguese 8 = Russian 9 = Norwegian 10 = Simplified Chinese 11 = Italian LAN at RW 0 11 0 Lamp Hours LMP at R 0 32766 Lamp Lit 0: not lit 1: lit LML at R 0 Lamp Reset 0: not reset 1: reset LRT at W 0 Number of La
Menu Navigation 0: up 1: down 4: select NAV at W 0 4 n/a PiP Position 0: upper left 1: upper right 2: lower left 3: lower right 4: user PPO at RW 0 4 2 Motorized Focus Far MFF at W 0 100 0 1 Motorized Focus Near MFN at W 0 100 0 1 PiP Size Selection 0: off 1: small 2: medium 3: large PSS at RW 0 3 0 Motorized Vertical Down MVD at W 0 100 0 1 Motorized Vertical Up MVU at W 0 100 0 1 Motorized Zoom In MZI at W 0 100 0 1 Power 0: disable 1: enable PWR at RW 0 1
Presets 0: presentation 1: photography 2: film 3: video 10: user 1 11: user 2 12: user 3 PST at RW 0 12 c: 0 v: 3 Rear 0: disable 1: enable REA at RW 0 1 0 Red Gain RCG at RW 0 100 50 Save User 1 0: not saved 1: saved US1 at W 0 1 n/a Save User 2 0: not saved 1: saved US2 at W 0 1 n/a Save User 3 0: not saved 1: saved US3 at W 0 1 n/a Screen Save 0: 5 minutes 1: 10 minutes 2: 15 minutes 3: 20 minutes 4: 25 minutes 5: 30 minutes SSV at RW 0 5 0 2 50 Sharpness 5 = Sharpest
Source 3 0: computer 1 1: computer 2 2: video 1 3: video 2 4: video 3 5: computer 3 SR3 at RW 0 5 2 Source 4 0: computer 1 1: computer 2 2: video 1 3: video 2 4: video 3 5: computer 4 SR4 at RW 0 5 3 Startup Logo 0: blank screen 1: default 2: captured DSU at RW 0 2 1 Tint TNT at RW 114 142 128 1 Tracking MTS at RW def: -128 def: +128 auto 1 Unit Total Time On ONL at R 0 214748 3646 0 Vertical Keystone DKC at RW 78 178 128 1 Vertical Position VPS at RW 0 def: auto x 2
D Default gateway 38 DHCP 38 Display Messages 35 displaying computer image 10 PiP 37 video image 16 Drivers 11 USB 12 Windows 98 12 dust filter, cleaning 42 E Effect Key 37 elevator foot 13, 16 F Factory Reset 38 Filter Reset 38 first time use driver installation 11 focus 13, 17 Freeze 37 fuzzy image 21 H HDTV sources 14, 15 INDEX Numerics 1024x768 resolution 5 A About 37 Aspect Ratio 37 audio 28 Audio In connector 8, 14 Auto Image 37 Auto Power 35 Autosource 35 B Blank 37 BNC 9, 15 BNC connectors 15 Brigh
M Magnify 37 Main menu 31 menu system 31 Monitor connector 9 mouse, using your 8 Mute 37 N Network 38 Network connector 9 Network Info 38 NND 35 no computer image 20 no startup screen 19 O only startup screen appears 19 Overscan 34 P Picture in Picture 37 Picture menu 32 PiP 37 Power button 16 power cable 8, 14 Power Save 35 Power-up Source 35 presentation features 29 projection distance 7 projector connector panel 6 customizing 30 positioning 7 setting up 7 shutdown 18 troubleshooting problems 18 projector
U USB, using your mouse 8 V video 15 Video button 16 video connections optional 14 standard 14 Video connector 14 video images optimizing 30 Video Standard 34 volume adjustment 17 W warranty 25 Windows 2000 12 Windows 98 11 Windows ME, XP 12 wired 8 wired remote 8 X XGA 5 Z zoom 13, 17 R Rear 35 remote 8 remote control 27 not working 21 replacing the lamp 40 RS-232 cable 9 connecting 6 S security lock 42 Serial connection 9 serial connection 6 Service 38 Service Code 38 Settings menu 35 shutdown projector
Limited Warranty no further obligation under the foregoing Limited Warranty if the Product has been damaged due to abuse, improper ventilation, fire, water, disaster, mispackaging, shipping, lightning or other acts of nature, misuse, neglect, smoke exposure (cigarette or otherwise), accident, unusual physical or electrical stress and/or power surges, unauthorized modifications (including use of an unauthorized mount), tampering, alterations, service other than by InFocus or its authorized agents, or failur
by InFocus. When returning Product to InFocus, a Return Material Authorization Number (RMA #) is required and must be clearly displayed on the outside of the shipping carton or a similar package affording an equal degree of protection. InFocus or the service facility authorized by InFocus will return the repaired/replaced Product freight prepaid to the purchaser.