
Specifications


Guide to Dan Wesson
16101, 16182, 16183, 17115, 17176, 17177
Procedure for mounting of gasket repair kit – 17131
Side 3 – NC – 001 - 2012
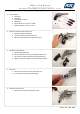
8. Removal of outer gasket:
a. Pry the gasket out, using the needle pin
b. A small flat driver can also be used
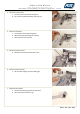
9. Opening of the cylinder:
a. Use the special valve tool (15268)
b. Unscrewing is don counter clockwise
c. Take note of the order and alignment of the parts inside the
valve while taking out – it IS important !
10. Content of valve section:
a. Note that the gaskets on each side off the brass cover have
been taken off using the needle pin.
b. Picture shows the order the part when assembled
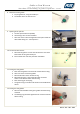
11. Placing the new gaskets:
a. Place the new gasket in the brass lid and the valve housing.
b. Take care not to scratch the gaskets
c. Note the direction of the aluminium ring
d. Note that the green o-ring should be under the metal
washer in the bottom of the valve housing
e. Place the firing pin and spring
f. The green O-ring on the brass lid should not be visible when
closed.
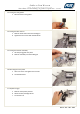
12. Placing the new gaskets:
a. Note the raised middle of the green gasket should be facing
outwards
b. The holding ring should be tightened until it is flush with the
valve housing.