
User's Manual
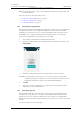
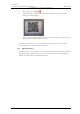
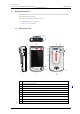
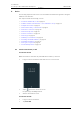
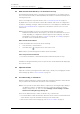
Table Of Contents
- Contents
- 1. Introduction User Manual
- 1.1 Abbreviations and Glossary User Manual
- 1.2 Features
- 2. Quick Installation Steps for Administrators
- 2.1 Insert SIM Card
- 2.2 Install and Configure the Handset
- 3. Handset Description
- 3.1 Handset Overview
- 3.2 Accessories
- 4. Basics
- 4.1 Turn the Handset On, or Off
- 4.2 Wake and Unlock the Handset, or Lock and Put It to Sleep
- 4.3 Adjust the Volume
- 4.4 Use Vibrator Only, or Silent Mode
- 4.5 Use the Touchscreen
- 4.6 Use the Keyboard
- 4.7 The User Interface
- 4.8 Use Apps
- 4.9 Battery Level Indication
- 4.10 Charge the Handset Battery
- 4.11 Change the Battery
- 4.12 Log In, or Log Out
- 4.13 Availability Status
- 5. Calling
- 5.1 Answer or Reject a Call
- 5.2 Make a Call
- 5.3 End a Call
- 5.4 Functions During a Call
- 5.5 Headset
- 5.6 Voicemail
- 5.7 Push-to-Talk Group Call
- 6. Contacts
- 6.1 Look up a Contact in the Central Phonebook
- 6.2 Look up a Contact in the Local Phonebook
- 6.3 Add a New Local Contact
- 6.4 Favorites
- 7. Alerts
- 7.1 Alert View
- 7.2 Alert Indication
- 7.3 Alert Classification
- 7.4 Alert Response Options
- 7.5 View Alerts on a Locked Handset
- 8. Messaging
- 8.1 Write and Send Message
- 8.2 Reply to Message
- 8.3 Search for Message
- 8.4 Copy, Delete and Forward Messages
- 8.5 Delete Conversations
- 8.6 Call Contact from a Message
- 8.7 Add Contact from a Message
- 9. Connectivity
- 9.1 Ascom IR Location
- 9.2 NFC
- 10. Personal Alarm
- 10.1 Top Button Alarm
- 10.2 Man-Down and No-Movement Alarm
- 10.3 Automatic Call after Alarm
- 11. Notifications
- 11.1 Sound and Vibration
- 11.2 Color-Coded LED Signals
- 11.3 Top Display Notification
- 11.4 Lock Screen Notifications
- 11.5 Status Bar
- 11.6 Notifications
- 11.7 Notification Drawer
- 11.8 Icons Used for Notification
- 12. Apps
- 12.1 Stock Apps
- 13. Camera and Gallery
- 13.1 Camera
- 13.2 Gallery
- 13.3 Screenshot
- 14. Barcode Scanning
- 15. My Services
- 16. Settings
- 16.1 Display Settings
- 16.2 Sound Settings
- 16.3 Languages Settings
- 16.4 Time and Date Settings
- 16.5 Telephony Settings
- 16.6 Admin Settings
- 16.7 About Phone Settings
- 17. Operation Notice
- 17.1 Accessibility and Voice Quality
- 18. Maintenance
- 18.1 Cleaning the Handset
- 18.2 Battery Maintenance
- 18.3 Replace the Color Pad for the Hinge-Type Clip
- 19. Troubleshooting User Manual
- 19.1 Operational Problems
- 19.2 Warning Messages
- 20. Related Documents User Manual
- 21. Document History User Manual
- Appendix A. Safety Precautions

TD 93066EN
2 June 2017 / Ver. PG5
User Manual
Ascom Myco Wi-Fi and Cellular Smartphone
9
3. Handset Description
3.1.1 Home Button
• Press to return to the Alert view (refer to 4.7.1 Alert View on page 16).
• Press to wake the display from sleep mode (refer to 4.2 Wake and Unlock the Handset,
or Lock and Put It to Sleep on page 13). The Power button can also be used for this
functionality.
3.1.2 Volume Button, Up and Down
• Press up to increase, or press down to decrease the speaker and loudspeaker volume
(refer to 4.3 Adjust the Volume on page 13).
• Press the volume down button repeatedly to mute notification- or call sounds (refer to
4.4 Use Vibrator Only, or Silent Mode on page 13).
To specify the default volume, refer to 16.2.1 Volumes on page 72.
3.1.3 Power Button
• Long press to turn the handset on (refer to 4.1 Turn the Handset On, or Off on page 12).
• Press to wake the display from sleep mode (refer to 4.2 Wake and Unlock the Handset,
or Lock and Put It to Sleep on page 13). The Home button can also be used for this
functionality.
• Press to put it to sleep (refer to 4.2 Wake and Unlock the Handset, or Lock and Put It to
Sleep on page 13).
• Long press to turn off the handset (refer to 4.1 Turn the Handset On, or Off on page 12).
11 Color-coded LED priority beacon (11.2 Color-Coded LED Signals on page 58)
12 Loudspeaker
13 Rear microphone
14 Camera (13. Camera and Gallery on page 68.)
15 GSM antenna
16 Battery cover lock
17 Battery Pack
18 Clip
19 WLAN antenna, and GPS antenna
20 Color pad for clip (3.1.10 Color Pad for Clip on page 11.)
21 Back button
22 Overview button
23 Ascom IR location
a.This feature is system dependent.