
User's Manual
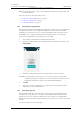
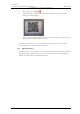
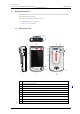
Table Of Contents
- Contents
- 1. Introduction User Manual
- 1.1 Abbreviations and Glossary User Manual
- 1.2 Features
- 2. Quick Installation Steps for Administrators
- 2.1 Insert SIM Card
- 2.2 Install and Configure the Handset
- 3. Handset Description
- 3.1 Handset Overview
- 3.2 Accessories
- 4. Basics
- 4.1 Turn the Handset On, or Off
- 4.2 Wake and Unlock the Handset, or Lock and Put It to Sleep
- 4.3 Adjust the Volume
- 4.4 Use Vibrator Only, or Silent Mode
- 4.5 Use the Touchscreen
- 4.6 Use the Keyboard
- 4.7 The User Interface
- 4.8 Use Apps
- 4.9 Battery Level Indication
- 4.10 Charge the Handset Battery
- 4.11 Change the Battery
- 4.12 Log In, or Log Out
- 4.13 Availability Status
- 5. Calling
- 5.1 Answer or Reject a Call
- 5.2 Make a Call
- 5.3 End a Call
- 5.4 Functions During a Call
- 5.5 Headset
- 5.6 Voicemail
- 5.7 Push-to-Talk Group Call
- 6. Contacts
- 6.1 Look up a Contact in the Central Phonebook
- 6.2 Look up a Contact in the Local Phonebook
- 6.3 Add a New Local Contact
- 6.4 Favorites
- 7. Alerts
- 7.1 Alert View
- 7.2 Alert Indication
- 7.3 Alert Classification
- 7.4 Alert Response Options
- 7.5 View Alerts on a Locked Handset
- 8. Messaging
- 8.1 Write and Send Message
- 8.2 Reply to Message
- 8.3 Search for Message
- 8.4 Copy, Delete and Forward Messages
- 8.5 Delete Conversations
- 8.6 Call Contact from a Message
- 8.7 Add Contact from a Message
- 9. Connectivity
- 9.1 Ascom IR Location
- 9.2 NFC
- 10. Personal Alarm
- 10.1 Top Button Alarm
- 10.2 Man-Down and No-Movement Alarm
- 10.3 Automatic Call after Alarm
- 11. Notifications
- 11.1 Sound and Vibration
- 11.2 Color-Coded LED Signals
- 11.3 Top Display Notification
- 11.4 Lock Screen Notifications
- 11.5 Status Bar
- 11.6 Notifications
- 11.7 Notification Drawer
- 11.8 Icons Used for Notification
- 12. Apps
- 12.1 Stock Apps
- 13. Camera and Gallery
- 13.1 Camera
- 13.2 Gallery
- 13.3 Screenshot
- 14. Barcode Scanning
- 15. My Services
- 16. Settings
- 16.1 Display Settings
- 16.2 Sound Settings
- 16.3 Languages Settings
- 16.4 Time and Date Settings
- 16.5 Telephony Settings
- 16.6 Admin Settings
- 16.7 About Phone Settings
- 17. Operation Notice
- 17.1 Accessibility and Voice Quality
- 18. Maintenance
- 18.1 Cleaning the Handset
- 18.2 Battery Maintenance
- 18.3 Replace the Color Pad for the Hinge-Type Clip
- 19. Troubleshooting User Manual
- 19.1 Operational Problems
- 19.2 Warning Messages
- 20. Related Documents User Manual
- 21. Document History User Manual
- Appendix A. Safety Precautions

TD 93066EN
2 June 2017 / Ver. PG5
User Manual
Ascom Myco Wi-Fi and Cellular Smartphone
5
2. Quick Installation Steps for Administrators
2. Quick Installation Steps for Administrators
An administrator should perform the following steps to get the handset started:
NOTE: Remove the protective plastic sheet attached to the display, for proper function of the
touchscreen.
1 Insert the micro-SIM card (Cellular handset versions only). Refer to 2.1 Insert SIM Card
on page 5.
NOTE: Only a micro-SIM size card can be used in the handset.
2 Close the battery cover, and lock it. Refer to 4.11 Change the Battery on page 22.
TIP: The battery has an approximately 50% charge at delivery, and doesn't need to be
charged before use.
3 Change the language (if other than the default english). Refer to 16.3 Languages
Settings on page 73.
4 Enter the handset ID (Easy deployment). Refer to 2.2 Install and Configure the
Handset on page 5.
NOTE: If not already done as prerequisite, perform Easy deployment. Refer to the
Configuration Manual, Ascom Myco Wi-Fi and Cellular Smartphone.
5 Configure parameter settings for the site, or for the handset user. Refer to the
Configuration Manual, Ascom Myco Wi-Fi and Cellular Smartphone for further
information.
2.1 Insert SIM Card
NOTE: Cellular handset version only. Only micro-SIM size cards can be used in the handset.
1 Unlock the battery cover lock, and then remove the battery from the handset.
2 The SIM card slot is located under the clip. Press the upper part of the clip to open it
fully, and insert the micro-SIM in the SIM card slot, in the direction as shown on the
label.
TIP: If needed, use a tweezer to hold the SIM card, and then push it into the slot.
3 Close the battery cover, and then lock it. The handset starts within seconds, if the
battery is charged.
TIP: If the handset does not start, charge the battery, and then long press the Power
button to turn the handset On.
Remove SIM Card
1 Open the battery cover lock. Press the clip to open it fully, and remove the Battery
Pack.
2 Remove the micro-SIM card by using a 3-4 mm screwdriver, or similar tool, in the hole
above the SIM card slot, and pull outwards, until the micro-SIM card can be removed
(with your fingers, or with a tweezer).
CAUTION: Be careful not to damage the inside of the SIM card slot.
2.2 Install and Configure the Handset
The recommended method to install and configure a handset is through Easy Deployment,
by using a pre-configured staging WLAN. If Easy Deployment isn't configured in the system,
use QR code setup, or install the handset manually through the admin settings menu.