
User`s guide


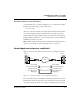


Table Of Contents
- Ascend Customer Service
- How to use this guide
- What you should know
- Documentation conventions
- How to use the on-board software
- Manual set
- Configuring WAN Connections
- Configuring IP Routing
- Introduction to IP routing on the Pipeline
- Managing the routing table
- Parameters that affect the routing table
- Static and dynamic routes
- Configuring static routes
- Specifying default routes on a per-user basis
- Enabling the Pipeline to use dynamic routing
- Route preferences
- Viewing the routing table
- Fields in the routing table
- Removing down routes to a host
- Identifying Temporary routes in the routing table
- Configuring IP routing connections
- Ascend Tunnel Management Protocol (ATMP)
- IP Address Management
- Connecting to a local IP network
- BOOTP Relay
- DHCP services
- Dial-in user DNS server assignments
- Local DNS host address table
- Network Address Translation (NAT) for a LAN
- Configuring IPX Routing
- How the Pipeline performs IPX routing
- Adding the Pipeline to the local IPX network
- Working with the RIP and SAP tables
- Configuring IPX routing connections
- Configuring the Pipeline as a Bridge
- Defining Filters and Firewalls
- Setting Up Pipeline Security
- Pipeline System Administration
- Pipeline 75 Voice Features
- IDSL Implementations
- APP Server utility
- About the APP Server utility
- APP Server installation and setup
- Configuring the Pipeline to use the APP server
- Using App Server with Axent SecureNet
- Creating banner text for the password prompt
- Installing and using the UNIX APP Server
- Installing and using the APP Server utility for DO...
- Installing and using the APP Server utility for Wi...
- Installing APP Server on a Macintosh
- Troubleshooting
- Upgrading system software
- What you need to upgrade system software
- Displaying the software load name
- The upgrade procedure
- Untitled

Configuring IPX Routing
Configuring IPX routing connections
4-30 Preliminary January 30, 1998 Pipeline User’s Guide
Site B is a home office that consists of one PC and a Pipeline. It is not an existing
Novell LAN, so the Pipeline configuration creates a new IPX network (for
example, 1000CFFF).
Note:
The new IPX network number assigned to site B cannot be in use
anywhere on the entire IPX wide-area network. (It cannot be in use at site A or
any network to which site A connects.)
The example assumes that the Ethernet profile and Answer profile have already
been set up to enable IPX routing. Because no static routes are used, the initial
connection between the two Ascend units should be manually dialed (using the
DO menu).
To configure the Pipeline at site A:
1
Assign the Pipeline a name if it does not already have one.
To assign the Pipeline a name, open the System profile and specify the name
in the Name parameter. For example:
Name=SITEAGW
2
Open the Connection profile for site B.
Set up the Connection profile as follows:
Station=SITEBGW
Active=Yes
Encaps=MPP
Dial #=555-1212
Route IP=No
Route IPX=Yes
Bridge=No
Dial brdcast=N/A
Encaps options...
Send Auth=CHAP
Recv PW=*SECURE*
Send PW=*SECURE*
IPX options...
IPX RIP=Both
IPX SAP=Both
NetWare t/o=30
3
Close the Connection profile.