
User`s guide


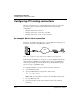


Table Of Contents
- Ascend Customer Service
- How to use this guide
- What you should know
- Documentation conventions
- How to use the on-board software
- Manual set
- Configuring WAN Connections
- Configuring IP Routing
- Introduction to IP routing on the Pipeline
- Managing the routing table
- Parameters that affect the routing table
- Static and dynamic routes
- Configuring static routes
- Specifying default routes on a per-user basis
- Enabling the Pipeline to use dynamic routing
- Route preferences
- Viewing the routing table
- Fields in the routing table
- Removing down routes to a host
- Identifying Temporary routes in the routing table
- Configuring IP routing connections
- Ascend Tunnel Management Protocol (ATMP)
- IP Address Management
- Connecting to a local IP network
- BOOTP Relay
- DHCP services
- Dial-in user DNS server assignments
- Local DNS host address table
- Network Address Translation (NAT) for a LAN
- Configuring IPX Routing
- How the Pipeline performs IPX routing
- Adding the Pipeline to the local IPX network
- Working with the RIP and SAP tables
- Configuring IPX routing connections
- Configuring the Pipeline as a Bridge
- Defining Filters and Firewalls
- Setting Up Pipeline Security
- Pipeline System Administration
- Pipeline 75 Voice Features
- IDSL Implementations
- APP Server utility
- About the APP Server utility
- APP Server installation and setup
- Configuring the Pipeline to use the APP server
- Using App Server with Axent SecureNet
- Creating banner text for the password prompt
- Installing and using the UNIX APP Server
- Installing and using the APP Server utility for DO...
- Installing and using the APP Server utility for Wi...
- Installing APP Server on a Macintosh
- Troubleshooting
- Upgrading system software
- What you need to upgrade system software
- Displaying the software load name
- The upgrade procedure
- Untitled

Configuring IPX Routing
Configuring IPX routing connections
4-26 Preliminary January 30, 1998 Pipeline User’s Guide
Load 3c509 name=ipx-card frame=ETHERNET_8023
Bind ipx ipx-card net=1234ABCD
The NetWare server at site B is configured as follows:
Name=SERVER-2
internal net 013DE888
Load 3c509 name=net-card frame=ETHERNET_8023
Bind ipx net-card net=9999ABFF
To configure the Pipeline at site A:
1
Assign the Pipeline a name if it does not already have one.
To assign the Pipeline a name, open the System profile and specify the name
in the Name parameter. For example:
Name=SITEAGW
2
Open the Connection profile for site B.
For sake of example, the Connection profile for site B is profile #5. A
profile’s number is the unique part of the number it is assigned in the
Connections menu. For example, the Connection profile defined as 20-105 is
#5.
Set up the Connection profile as follows:
Station=SITEBGW
Active=Yes
Encaps=MPP
Dial #=555-1212
Route IP=No
Route IPX=Yes
Bridge=No
Dial brdcast=N/A
Encaps options...
Send Auth=CHAP
Recv PW=*SECURE*
Send PW=*SECURE*
IPX options...
IPX RIP=None
IPX SAP=Both
NetWare t/o=30