
User Guide


7
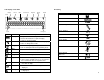
Basic Steps to Install
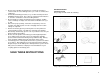
1. Place the base and POD units on a flat and stable surface.
2. Connect the output plug of the base adapter to the socket on the
bottom of the base unit and the adapter to the main wall outlet. The
power LED on the base should become steadily lit.
3. Connect one end of the telephone line to the
socket on the bottom
of the base unit and the other end to the wall phone socket.
4. Plug the battery pack (rated 7.2V 1800mAh), observing the mating
orientation of the plug with the connector. Slide the battery door firmly.
5. Connect the output plug of the POD adapter to the
socket on the
top of the POD unit and the adapter to main wall outlet. The battery
must be charged for at least 15 hours before first use.
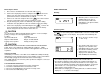
CAUTION
Use only the base adapter supplied with this telephone. Incorrect adapter
polarity or voltage can seriously damage the unit.
For Base: For POD:
Input: 230 VAC 50 Hz Input: 230 VAC 50 Hz
Output: 7 VDC 400 mA Output: 12 VDC 500 mA
Polarity: Center positive Polarity: Center positive
CAUTION
RISK OF EXPLOSION IF BATTERY IS REPLACED BY AN INCORRECT
TYPE. Refer to the original type supplied with this telephone. NiMH
batteries must be disposed of in accordance with applicable waste disposal
regulations.
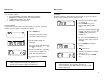
Charging the POD
If the battery icon flashes or the LED’s on the POD flashes RED periodically
during phone mode, the battery pack needs recharging. Connect the POD to
the AC adapter plugged to the main wall outlet to start charging.
Note: POD shall take 30 seconds to power up when the adapter is connected
to a flat battery pack.
To Ensure Better Performance
1. Locate the conference telephone in a quiet environment.
2. Position the POD within 100 feet from the base unit.
3. Do not use the POD with the other phone in a single room.
4. Do not move the POD during a call.
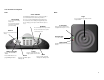
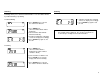
BASIC OPERATIONS
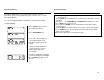
Standby
• When the phone is not in use, the
POWER LED on the base is
turned on and the LCD on the
POD displays your phone number,
if programmed.
Answering Calls
When there is an incoming call, the GREEN LEDs on the base and the POD
blink.
icon flashes on the display. The speaker on the POD rings the
selected melody.
• Press any key to answer except
‘+’ and ‘-‘ keys.
• The call timer and clock icon are
displayed. The call timer starts
with MM:SS (minute and second).
• The talk time remaining counter
and hour glass icon are also
displayed. The talk timer starts
with HH:MM (hour and minute).
Note:
1. The call timer displays the time elapsed on the current active call.
2. The talk time remaining counter displays the estimated remaining in use
time at the current battery level before the batteries become empty. If for
any reason the talk time remaining counter displays 00-00 for a prolonged
period of time or is severely inaccurate, charge the POD for a full 15
hours and the counter should reset.
3. When POD is in charging process during talk mode, no talk timer will be
displayed. “-- --“ is shown on the display.