
User's Manual

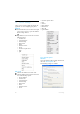
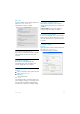
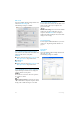

Table Of Contents
- 1 Important
- 2 Your VOIP251 Cordless Telephone
- 3 Getting Started
- 3.1 Requirements
- 3.2 Connecting your charger
- 3.3 Charging your handset
- 3.4 Positioning the base station
- 3.5 Checking the signal strength
- 3.6 Checking the battery level
- 3.7 Installing software
- 3.8 Setting up for the first time
- 3.9 Checking Skype connection status
- 3.10 Auto power off
- 3.11 What is standby mode?
- 3.12 Switching your handset on/off
- 4 Contact List
- 5 Call
- 6 Call Log
- 7 Conference Calls
- 8 Intercom
- 9 Call Transfer
- 10 Skype Tools
- 11 Setting Options
- 12 Advanced Settings
- 13 Emergency Management
- 14 Extra Features
- 15 Phone Settings
- 16 Text and Numbers
- 17 Appendix
- 18 Troubleshooting
- 21 Index

32
Phone Settings
15 Phone Settings
These are the settings available through the PC
application. To start configuring your phone:
Windows
Double-click the tray icon at the bottom right
corner of your screen to open the VOIP251
Phone Settings window.
OR
Right-click the tray icon and select one of the
following options:
• Transfer Call
•General Options
• Audio Settings
• Registration
• Alerts
• Handset Locator
•About
• Check for Update Now
• Help
• Quit
Mac OS X
Click on the VOIP251 icon in the dock.
Click on VOIP251 in the menu bar and select
one of the following options:
• About VOIP251
• Transfer Call
•General Options
• Audio Settings
• Registration
• Alerts
• Handset Locator
•About
• Check for Update Now
•Help
•Services
• Hide VOIP251
• Hide Others
• Show All
• Quit VOIP251
15.1 General options
Windows
Open the VOIP251 Phone Settings window and
select the
General Options
tab.
The following settings are available:
1
2
1
2