Register your product and get support at www.philips.com/welcome VOIP251 US Cordless Phone Warning Use only rechargeable batteries. Charge the handset for 14 hours before use.
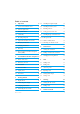
Table of contents 1 Important 4 3.5 Checking the signal strength 12 1.1 Terms and Conditions of Use 4 3.6 Checking the battery level 13 1.2 Power Requirements 4 3.7 Installing software 13 1.3 Safety Information 4 3.8 Setting up for the first time 13 1.4 Conformity 5 3.9 Checking Skype connection status 14 1.5 Recycling & disposal 5 3.10 Auto power off 15 1.6 Disposal instructions for batteries 5 3.11 What is standby mode? 15 1.7 Recycle your batteries 5 3.
7.1 Making a conference call 21 11.3 Setting the key tone 27 7.2 Adding more contacts to a call 21 11.4 Setting the backlight 27 7.3 Making and receiving additional calls 21 11.5 Setting the screen contrast level 27 7.4 Ending a conference call 21 11.6 Naming your handset 27 8 Intercom 22 11.7 Auto pick-up 27 11.8 Auto hang-up 28 8.1 Calling another handset 22 8.2 Transferring a call 22 12 Advanced Settings 29 9 Call Transfer 23 12.
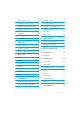
16.1 Entering text and numbers 37 17 Appendix 38 17.1 What is Skype™? 38 17.2 Default (pre-programmed) settings 38 17.3 Phone specifications 38 18 Troubleshooting 40 19 The RBRC© seal 41 20 Compliance information 41 20.1 Caution 41 20.2 Interference 41 20.3 RF Radiation Exposure 42 20.4 Noise 42 20.5 Privacy of Communications 42 20.6 USB Cable 42 20.
1 Important Take time to read this user manual before you use your phone. It contains important information and notes regarding the operation of your telephone. 1.1 Terms and Conditions of Use No emergency calls on Skype. Skype is not a replacement for your ordinary telephone and can't be used for emergency calls. See Skype's terms and conditions at www.skype.com/eula and www.skype.com/tos. The service will not work if there is a power cut or broadband failure. 1.
• Avoid using a telephone during a storm or severe weather with lightning. There may be a risk of electric shock from lightning. • Do not use this product to report a gas leak in the vicinity of the leak. • Do not use the product in places where there are explosive hazards. • Do not use this product near intensive care medical equipment or by any people with pacemakers.
1.8 Packaging information Philips has marked the packaging with standard symbols designed to promote the recycling and appropriate disposal of your eventual waste. A financial contribution has been paid to the associated national recovery & recycling system. The labelled packaging material is recyclable. 1.9 Warranty The warranty information is available on www.philips.com/support. 1.
2 Your VOIP251 Cordless Telephone Congratulations on your purchase and welcome to Philips! To fully benefit from the support that Philips offers, register your product at www.philips.com/welcome. 2.1 What’s in the box? Base Station and 0.
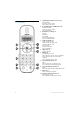
Up Navigation and Presence key u Scroll up menu Increase receiver volume Enter online status menu 2 Down Navigation and Menu key d Scroll down menu Decrease receiver volume Access main menu 3 End and On / Off key e End call Exit menu Clear digits Stop voicemail playback Power on/off the handset 4 Talk and OK key r Make and answer calls Hold, resume and toggle calls Launch conference call Play voicemail Confirm a selection Access call history 5 Skype key s Open contact list 6 Digit keys Dial digit and enter
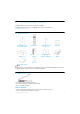
2.4 The base station 1 2 USB cable The length of the cable can be customized up to a length of 0.9m. Refer to the figure below. Base indicator Slow Blinking (0.5 second intervals): Indicates that: - a call is in progress, OR - the handset is being paged, OR - the base station is in registration mode. Fast Blinking (0.1 second intervals): Indicates that the phone is receiving a call. Steady On: Indicates that the base station is connected to computer.
2.5 Display icons Each icon gives you a visual message about what is happening on your handset. Battery 2.6.2 Main menu structure The table below describes the menu tree of your phone.
2.6.3 Browsing the call log and contact list • Short or long press r when the handset is in idle to enter the call log. • Short press s when the handset is in idle to enter the contact list.
3 Getting Started 3.1 Requirements In order to use this phone, your computer should meet the following requirements: • Computer running Windows 2000, Windows XP, Windows Vista, Mac OS X 10.3.9, 10.4.x • 800 MHz processor • Windows: 256 MB RAM and 50 MB HDD Mac OS X: 512 MB RAM and 40 MB HDD • Computer should be switched on 3.2 Connecting your charger 1 Connect the power adapter of the charger to a standard wall outlet. 3.
out of range - lost link. Take your handset closer to the base station or your call will be cut off shortly after the warning. Note If your handset has lost link, you will not be able to make or receive any calls. You will also not be able to carry out many of the phone’s functions and features. 3.6 Checking the battery level The battery icon displays the current battery level. = 100% full = 60% full = 30% full = Empty. Require charging.
Tip If you don’t have a Skype account, you can find details on how to create one at http://www.skype.com. Tip Quit software. Click VOIP251 in the menu bar. Select Quit VOIP251. Note that you cannot make or receive any calls if the software is not running. 3.9 Checking Skype connection status This option allows you to check if Skype is running properly. Tip If you don’t have a Skype account, you can find details on how to create one at http://www.skype.com. Tip Quit software.
not running or you are not logged in. The tray icon is grey. 3.12 Switching your handset on/off 3.12.1 Switching on your handset 1 Press e. The handset may take a few seconds to power up. • The handset is linked with the base station but the VOIP251 software is not running. The tray icon is not displayed. 3.12.2 Switching off your handset 1 Press and hold e. Note Your handset cannot receive any calls if there is no power. 3.
4 Contact List Your phone can retrieve contacts from the contact list on Skype. 4.1 Viewing the contact list 1 Press d. Select SKYPE and press r. Select CONTACT and press r. OR Press s. 2 Scroll to the contact you want. Note Contact list empty. If there are no contacts in the contact list, EMPTY will be displayed. Note If the name contains non-latin characters, the contact’s Skype name will be displayed instead. 4.1.
5 Call Your phone supports Skype, SkypeOut and SkypeIn calls. Note Emergency call. This phone is not designed for making emergency phone calls when the power fails. Alternative arrangements should be made for access to emergency services. See page 38 for more details. 5.1 Making a call This section describes the different ways to make a call. Note Signal strength. Check the signal strength before making a call and during a call. See “Checking the signal strength” on page 12. 5.1.
5.4 Rejecting a call When a call comes in, you can reject the call by pressing e. 5.5 Turning off the ringer You can turn off the ringer for incoming calls. 1 Press and hold # during standby mode or when the phone is ringing. is displayed on the screen. For details on the ringer setting, see “Setting your handset’s ring volume” on page 27. 5.6 During a call This section describes the features that are available during a call. 5.6.1 Holding and resuming a call 1 Press r to hold the call.
Tip SkypeOut. You can dial a SkypeOut number even if you are already on a call. See “Calling SkypeOut” on page 17. Tip Ending additional calls. Press e to end the current call. Press r to resume the previous call. 5.6.6 Answering additional calls During a call, you will hear a call waiting tone and the name of the caller will be displayed to notify you that there is another incoming call. 1 Press r to answer the call. Other calls are put on hold and the icon is displayed. Tip Toggling.
6 Call Log Your phone can retrieve call log records from Skype, including all incoming, outgoing and missed calls. Icon Call Incoming Outgoing Missed The call log includes information of the caller name (or CONFERENCE for conference calls), date and time. 6.1 Viewing the call records 1 Press r when the handset is in standby mode. All call records are displayed. OR Press d. Select SKYPE and press r. Select CALL LOG, then select the type of record you want to view. Press r.
7 Conference Calls A conference call is a conversation between the handset and up to 9 Skype contacts. You can make additional calls, including SkypeOut, while you are on a conference call. 7.1 Making a conference call 1 Press s. 2 Scroll to the first contact you want to call. icon appears next to the 3 Press *. A star contact. 7.3 Making and receiving additional calls During a conference call you can still make and receive other calls.
8 Intercom icons are displayed. Wait for 3 The S and the other party to answer your call. An intercom call is a call to another handset that shares the same base station. Up to 4 VOIP251 handsets can share the same base station. 8.1 Calling another handset 1 Press and hold i. Note If there is only 1 handset registered to the base, NOT AVAILABLE is displayed for 3 seconds. 2 Select the handset number you want. Press r. 4 Your call is transferred to the other handset.
9 Call Transfer Mac OS X Open the “VOIP251 Phone Settings” window and select the Audio Settings tab. You can transfer Skype call(s) between your handset and your computer. 9.1 Enabling call transfer Windows Open the “VOIP251 Phone Settings” window and select the Audio Settings tab. 1 Under PC Skype Audio Settings, check the “Authorize Skype call from computer” box. 2 Select a device from the Earpiece Device and Microphone Device drop down menus. 3 Click Apply.
device. Your handset returns to standby mode and the S icon flashes. Note You will not be able to make a Skype call from your handset while a call is in progress on your computer. If you press r, BUSY will be displayed. 9.3 Transfer to handset Windows 1 During a call taken on your computer, right click the tray icon. Select Transfer Call. Your handset rings. COMPUTER is displayed on the handset and the S icon flashes. Mac OS X 1 During a call taken on your computer, click VOIP251 in the menu bar.
10 Skype Tools This section describes the Skype tools that you can access from this phone. In standby mode: 1 Press d. 2 Select SKYPE. Tip Use u or d to navigate the menus. 10.1 Contact You can browse the contact list, view a contact’s profile and make a Skype call. 10.1.1 Viewing the contact list See “Contact List” on page 16 for details. 10.1.2 Viewing a contact’s profile You can view a contact’s home, office and mobile phone number. From the contact list, 1 Scroll to the contact you want. 2 Press s.
3 Press r to play the voicemail. Tip Change volume. While a voicemail is playing, you can press u or d to adjust the earpiece volume. Tip Stop voicemail. Press e to stop voicemail playback. Press e again to return to standby. 10.5 Sorting You can sort your contacts by Skype status or alphanumerical order. See page 16 for details. 10.6 Call forward Your phone supports Skype Call Forwarding. You can have Skype calls redirected to another number when you are not online. Visit the Skype website at www.skype.
11 Setting Options Note Disable silent mode. Silent mode is disabled if you change the key tone or ringer volume setting. You can customize your phone using these options. In standby mode: 1 Press d. 2 Select SETTING. Tip Use u or d to navigate the menus. 11.1 Setting your handset’s ring tone You can choose from 10 different ringer melodies. 1 Press d. 2 Select SETTING and press r. 3 Select RING TONE and press r. 4 Select the new setting. Press r. • The setting is saved. 11.
11.7.1 Activating/Deactivating auto pick-up 1 Press d. 2 Select SETTING and press r. 3 Select PICK-UP and press r. 4 Select the new setting. Press r. • The setting is saved. 11.8 Auto hang-up Auto hang-up allows you to end a call by placing the handset on the charger. You do not need to press a key to end the call. 11.8.1 Activating/Deactivating auto hang-up 1 Press d. 2 Select SETTING and press r. 3 Select HANG-UP and press r. 4 Select the new setting. Press r. • The setting is saved.
12 Advanced Settings 12.1 Registering another handset You can register up to 4 handsets to your base station. To register an extra handset, use the CD that comes with the extra handset packaging. Follow the instructions in this section only if the extra handset CD has been lost. Note If UNREGISTER is displayed on your handset, follow the steps below. Windows Open the VOIP251 Phone Settings window and select the Registration tab. Then, 1 Click Start Registration. The base station enters registration mode.
13 Emergency Management Skype cannot dial out emergency calls. If you try to dial out an emergency number, NO SUPPORT EMERGENCY will be displayed on your handset and a warning beep will be heard to notify you that you cannot make the call. Note Skype is not a replacement for your ordinary phone. Make sure you have alternate arrangements for emergency calling.
14 Extra Features Discover and explore the additional features your phone offers! Find out how these features can benefit you and help you make the most of your phone. 14.1 Keypad lock You can lock the keypad to prevent accidental presses on the handset while you are carrying it around. 14.1.1 Locking/unlocking the keypad 1 Press and hold * to lock the keypad. LOCKED and the icon displays. Press and hold * again to unlock the keypad. Note Making calls.
15 Phone Settings These are the settings available through the PC application. To start configuring your phone: Windows 1 Double-click the tray icon at the bottom right corner of your screen to open the VOIP251 Phone Settings window.
Mac OS X Open the VOIP251 Phone Settings window and select the General Options tab. The following settings are available: 15.1.4 Ring computer speaker When the box is checked, your computer’s speaker will ring when you receive a Skype call. Note Computer Ringer. You can only enable the computer ringer when Skype is available. 15.1.5 Auto Do Not Disturb You can set your Skype status to automatically change to Do Not Disturb when there are 2 or more calls. When the box is checked, the feature is enabled.
Mac OS X Open the VOIP251 Phone Settings window and select the Audio Settings tab. The following settings are available: 15.2.3 Skype Audio Settings You can choose the audio device that will be used when you take calls on your computer. See page 23 for details. Tip Default audio settings. You can select the default audio device for other applications on your computer. Click Advanced. Your computer’s audio device window will open and you can make changes to the settings. 15.
Mac OS X Open the VOIP251 Phone Settings window and select the Alerts tab. The following settings are available: Tip Alert timer. When there are contacts in the One Time Alert list, you can set the timer for up to 24 hours. The list resets to empty when the timer expires. The Permanent Alert list is not affected. Tip Remove contacts. You can remove contacts by selecting them in the Permanent or One Time Alert lists. Click Remove. 15.4.
Mac OS X Open the VOIP251 Phone Settings window and select the About tab. You can read information about your phone, including connection status and the software version you currently have installed. For details on how to check your connection status, see page 14. 15.6 Handset locator Windows 1 Right click the tray icon and select Handset Locator. All handsets emit a paging tone. STOP HS LOCATOR is displayed. 2 Right click on the tray icon and select Stop Handset Locator to stop the paging.
16 Text and Numbers You can enter text and numbers for your handset name and other menu items. 16.1 Entering text and numbers 1 Find the key with the character you want. 2 Press it as many times as needed for the character you want. Key 0 1 2 3 4 5 6 7 8 9 Characters 0 + space 1 A B C 2 D E F 3 G H I 4 J 5 K L M N O 6 P Q R S 7 T U V 8 W X Y Z 9 Tip Editing. Use e to delete characters.
17 General Settings - Handset Appendix 17.1 What is Skype™? Skype™ is a piece of software that allows you to make free calls. IMPORTANT No Emergency Calls. Skype is not a replacement for your ordinary telephone and cannot be used for emergency calling. Contact sorting method Status (sorted by online status) Auto pick-up Disabled Auto hang-up Enabled Display Settings - Computer Language English Display Settings Handset 17.1.
Frequency bands Europe: 1880-1900MHz South America: 1910-1930MHz North America (UPCS): 1920-1930MHz Taiwan: 1880-1895MHz Number of channels North America (UPCS): 60 channels Taiwan: 96 channels Others: 120 channels Range 300 m open field, 50 m indoor Connection USB Standby time 150 hours Talk time 10 hours Charging time 12 hours Rechargeable battery cells 2 X AAA, NiMH 750 mAh Appendix 39
18 Troubleshooting www.philips.com/support In this chapter, you will find the most frequently asked questions and answers about your phone. Connection Signal icon flashing • The handset may be out of range. Move closer. • If the handset displays UNREGISTER, register the handset. See page 29. Sound No parking tone • The handset may not be placed properly on the charger. Try again. • Charging contacts may be dirty. Disconnect the power supply first and then clean contacts with a damp cloth.
21 Index A I Auto Do Not Disturb 33 Auto hang-up 28 Auto pick-up 27 Icons 10 Intercom, calling 22 transfer 22 B Backlight 27 Base station 9 Battery level 13 K Key tone 27 Keypad lock 31 C M Call forward 26 Call log, viewing 25 Call transfer, enabling call transfer 23 transfer to computer 23 transfer to handset 24 Call, answering 17 ending 17 holding 18 making 17 rejecting 18 Calling from the call log 17 Calling SkypeOut 17 Calls, additional 18 Conference call, adding contacts 21 ending 21 making 2
Copyright © 2008 Koninklijke Philips Electronics N.V. All rights reserved. Trademarks are the property of Koninklijke Philips Electronics N.V. or their respective owners. Specifications are subject to change without notice.
THE RBRC© SEAL The RBRC© seal on the nickel metal hydride battery indicates that Philips Royal Electronics is voluntarily participating in an industry program to collect and recycle these batteries at the end of their useful lives, when taken out of service within the United States and Canada. The RBRC© program provides a convenient alternative to placing used nickel metal hydride batteries in the trash or municipal waste, which may be illegal in your area.