Quick Start Guide DECT200 DRAFT 1.
Table of Contents Hands-free 1-
Important Safety Instructions BEFORE USING YOUR TELEPHONE EQUIPMENT, BASIC SAFETY PRECAUTIONS SHOUD ALWAYS BE FOLLOWED TO REDUCE THE RISK OF FIRE, ELECTRIC SHOCK AND INJURY, INCLUDING THE FOLLOWING. • • • • • • • • • • • • • • • • • • • Read and follow all warnings and instructions marked on the product. Do not use this product near water, laundry tub, in a wet basement, or near a swimming pool. Do not place this product on an unstable table. The product may fall and be damaged.
Environment and Safety -3-
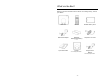
What’s in the Box? Make sure you have all these items in the box. For missing item(s), contact your dealer.
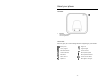
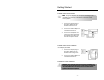
About your phone THE BASE 1 Page key Use to locate handsets. Use for registration. THE ICONS Each icon gives you a visual message of what is happening on your handset.
THE HANDSET 1 2 3 4 5 6 7 8 9 1 0 1 1 Menu & OK key Use to enter the menus. Use to select menu. Use to confirm selection. Redial, Mute & Back key Use to enter the redial log. Use to dial the last dialed number. Use to erase text and numbers. Use to mute/unmute microphone. Use to switch between screens. Up Navigation & Call Log key Use to enter the call log. Use to scroll up menu items. Use to increase the ringer and receiver volume. Down Navigation & Phonebook key Use to enter the phonebook.
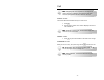
Getting Started CONNECTING YOUR PHONE NOTE: The power adapters (for the phone and charger) are intended to be correctly orientated in a vertical or floor mount position. 1. Connect the output plug of the mains adapter to the bottom of the base unit. 2. Connect the mains adapter to a standard wall outlet. 3. Connect the telephone line cord to the phone sockets at the bottom of the base unit and the wall phone socket. CONNECTING YOUR CHARGER * For multiple pack model 1.
CAUTION: Check the batteries polarity when inserting the batteries. Incorrect polarity may damage the product. 1. Place the 2 rechargeable batteries (included) into the battery compartment. 2. Slide the battery door firmly into place. 3. Place the handset on the base unit or charger for charging. Charge for 14 hours before initial use. * The charger is only applicable to multiple pack model. NOTE: Handset may get warm during initial charge. This is normal.
Call NOTE: Emergency Call. This telephone is not designed for making emergency telephone calls when the power fails. Alternate arrangements should be made for access to MAKING A CALL This section describes the different ways to make a call. 1. 2. . Press Dial the phone number. The number displays on the screen and is dialed out. NOTE: Call Timer. During a call, the call timer displays the talk time of your current call. ENDING A CALL 1. Press or place the handset on the base unit or charger.
Registering Your Handset Registration allows communication between your base unit and handset(s). If your handset cannot communicate with its base, you will not be able to make any call or use some of the functions and features on the phone. NOTE: Your handset is already registered unless you have bought an extra handset individually or you have de-registered If your handset displays UNREGISTERED, follow the steps below to register your handset. on the base for 4 seconds. 1. Press 2. 3. 4.
Troubleshooting Problem(s) Tip(s) No dialing tone • Check your phone connections. • The handset may be out of range. Move closer. • The battery capacity may be low. Charge battery. Signal icon flashing • The handset may be out of range. Move closer. • If the handset displays Unregistered, register the handset. See page 9. No parking tone • The handset may not be placed properly. Try again. • Charging contacts may be dirty. Clean contacts with a damp cloth.