User Guide DECT200 DRAFT 1.
Table of Contents 1 2 3 Environment and Safety ....................................................... 2 What’s in the Box? .............................................................. 4 Welcome .......................................................................... 5 How to use this user guide? ................................................. 5 Need more help? .............................................................. 5 4 About your phone .........................................................
Table of Contents 13 14 15 16 17 Auto answer...................................................................25 Dial mode .....................................................................25 Recall selection ..............................................................25 Area code removal ...........................................................26 CID Prefix......................................................................26 Extra Features ...................................................
Important Safety Instructions BEFORE USING YOUR TELEPHONE EQUIPMENT, BASIC SAFETY PRECAUTIONS SHOUD ALWAYS BE FOLLOWED TO REDUCE THE RISK OF FIRE, ELECTRIC SHOCK AND INJURY, INCLUDING THE FOLLOWING. • • • • • • • • • • • • • • • • • • • Read and follow all warnings and instructions marked on the product. Do not use this product near water, laundry tub, in a wet basement, or near a swimming pool. Do not place this product on an unstable table. The product may fall and be damaged.
Environment and Safety Environment and Safety IMPORTANT This product is not designed for making emergency telephone calls when the power fails. Alternate arrangements should be made for access to emergency services. Power requirements This product requires an electrical supply of 110-120 volts, single-phase alternating current, excluding IT installations defined in standard UL 60950. CAUTION: The electrical network is classified as dangerous according to criteria in the standard UL 60950.
Environment and Safety Environmental Remember to observe the local regulations regarding the disposal of your packaging materials, exhausted batteries, and old equipments. Promote their recycling where possible.
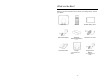
What’s in the Box? Make sure you have all these items in the box. For missing item(s), contact your dealer.
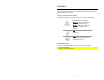
Welcome This user guide provides you with information and instruction you need to get the most from your phone. HOW TO USE THIS USER GUIDE? The following symbols are used to alert you on important information. This symbol has two meanings: • Warning: Critical information for preventing personal injury. • Caution: Critical information for preventing damage on the product. • Tip: Information for easier operation. • Note: Explanatory or critical information for carrying out an operation correctly.
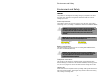
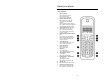
About your phone THE HANDSET 1 2 3 4 5 6 7 8 9 1 0 1 1 Menu & OK key Use to enter the menus. Use to select menu. Use to confirm selection. Redial, Mute & Back key Use to enter the redial log. Use to dial the last dialed number. Use to erase text and numbers. Use to mute/unmute microphone. Use to switch between screens. Up Navigation & Call Log key Use to enter the call log. Use to scroll up menu items. Use to increase the ringer and receiver volume.
About Your Phone THE BASE 1 Page key Use to locate handsets. Use for registration. THE ICONS Each icon gives you a visual message of what is happening on your handset.
About Your Phone THE MENUS Your phone offers a variety of features and functions grouped in the menus. Browsing the menus The main menu includes the Phonebook, Clock/Alarm, Personal Set, and Advanced Set menu. Press to enter the main menu. Press to enter the phonebook. Press to enter the incoming call log. TIP: Quick Exit. Press to exit from any menu instantly. All unconfirmed changes will not be saved.
Getting Started CONNECTING YOUR PHONE NOTE: The power adapters (for the phone and charger) are intended to be correctly orientated in a vertical or floor mount position. 1. Connect the output plug of the mains adapter to the bottom of the base unit. 2. Connect the mains adapter to a standard wall outlet. 3. Connect the telephone line cord to the phone sockets at the bottom of the base unit and the wall phone socket. CONNECTING YOUR CHARGER * For multiple pack model 1.
Getting Started 1. Place the 2 rechargeable batteries (included) into the battery compartment. 2. Slide the battery door firmly into place. 3. Place the handset on the base unit or charger for charging. Charge for 14 hours before initial use. * The charger is only applicable to multiple pack model. NOTE: Handset may get warm during initial charge. This is normal. The handset may take a few seconds to power up. CHECKING THE BATTERY LEVEL The battery icon displays the current battery level.
Getting Started REGISTERING YOUR HANDSET Registration allows communication between your base unit and handset(s). If your handset cannot communicate with its base, you will not be able to make any call or use some of the functions and features on the phone. NOTE: Your handset is already registered unless you have bought an extra handset individually or you have de-registered To register your handset to an additional base unit, see Registering your handset with additional base on page 29.
Call NOTE: Emergency Call. This telephone is not designed for making emergency telephone calls when the power fails. Alternate arrangements should be made for access to MAKING A CALL This section describes the different ways to make a call. 1. 2. . Press Dial the phone number. The number displays on the screen and is dialed out. NOTE: Call Timer. During a call, the call timer displays the talk time of your current call.
Call Calling from your phonebook For details on the phonebook, see Phonebook on page 18. 1. 2. 3. Press . Select the phonebook record you want. to dial out the number. Press Calling from the incoming call log You can return a call from the incoming call log. 1. 2. 3. Press . Select the record you want. to dial out the number. Press ENDING A CALL 1. Press or place the handset on the base unit or charger. ANSWERING A CALL When you receive a call, your phone rings. Press to answer the call.
Call DURING A CALL This section describes the features that are available during a call. Making a second call NOTE: 2nd Call Service. Consult and subscribe from your service 1. 2. Press to put the current call on hold. Dial the number you want. The number displays on the screen and is dialed out. Answering a second call NOTE: 2nd Call Service. Consult and subscribe from your service During a call, your phone sounds a short beep periodically to notify you of a 2nd incoming call. 1.
Intercom and Conference Calls NOTE: You need at least 2 handsets to carry out the functions mentioned in this section. CALLING ANOTHER HANDSET 1. 2. 3. 4. Press . Select the handset you want. Press OK. Wait for the other party to answer your call. Press to cancel or end the intercom call. While you are on the phone While talking on the phone, you can put the external caller on hold and call another handset. 1. Press during the call. 2. Select the handset you want. 3. Press OK.
Intercom and Conference Calls 2. Press and hold to re-establish the conference call.
Text and Numbers You can enter text and numbers for handset name, phonebook record, and others. ENTERING TEXT AND NUMBERS 1. 2. Find the key with the character you want. Press it as many times as needed for the character to display on the screen. Key Characters 0 0 -- / \ 1 space 1 ( ) 2 A B C 2 3 D E F 3 4 G H I 4 5 J K L 5 6 M N O 6 7 P Q R S 8 T U V 8 9 W X Y Z - 17 - o 7 9
Phonebook Each handset has a phonebook that can store up to 50 records. Each phonebook record can have a name of up to 12 characters long and a number of up to 20 digits long. VIEWING THE PHONEBOOK 1. 2. Press . Select the record you want. Searching a record You can search the phonebook by scrolling or by searching the first character. Searching by scrolling 1. While at the phonebook, press or to scroll. Searching by the first character 1.
Phonebook 3. Press OK to send the phonebook number or press and hold again to exit phonebook. ADDING A RECORD NOTE: Memory Full. If your phonebook is full, a notification displays. Delete unnecessary records before adding new ones. 1. 2. 3. Press . Select PHONEBOOK ADD. Press OK. Enter the name. Press OK. NOTE: Duplicate Name. Phonebook records with identical names cannot be saved. 4. Enter the number. TIP: Pause. Press and hold 5. to insert a pause. Press OK. Your new record is saved.
Phonebook 3. Press OK to confirm. All records are deleted.
Call Log The call log stores the call history of the last 20 incoming and the last 5 dialed calls. VIEWING THE CALL RECORDS 1. Press to view the incoming call log, or 2. 3. to view the dialed call log. Press Select the record you want. Press to see details. MAKING A CALL Returning a call To return a call from the incoming call log, see Calling from the incoming call log on page 13. Redialing a call To make a call that you have made previously, see Calling from the dialed call log on page 12.
Call Log - 22 -
Custom Options Make this your handset – change the look and sound to suit your needs and tastes. From the display to sound, this section shows you how to set your preference. PERSONALIZING YOUR PHONE’S DISPLAY Naming your handset Every handset can have its own name. It displays on the screen during standby. 1. 2. 3. 4. . Press Select PERSONAL SET HANDSET NAME. Press OK. Edit the name. Use BACK to make corrections. Press OK when finished. The new setting is saved.
Custom Options Setting your handset’s ringer volume Your handset has 6 ringer volume levels (including ringer off). 1. 2. 3. 4. Press . Select PERSONAL SET HANDSET TONE VOLUME. Press OK. Select the volume level. Press OK when finished. The new setting is saved. Setting the key tone Key tone is the sound you hear when you press a key on your handset. 1. 2. 3. 4. Press . Select PERSONAL SET HANDSET TONE KEY BEEP. Press OK. Select the new setting. Press OK when finished. The new setting is saved.
Calling Features Your phone supports a number of call-related features to help you handle and manage your calls more effectively and conveniently. AUTO ANSWER Auto answer enables you to answer an incoming call by simply picking up the handset from the charging cradle. You do not need to press a key to answer the call. Activating/Deactivating auto answer 1. 2. 3. 4. Press . Select PERSONAL SET AUTO ANSWER. Press OK. Select the new setting. Press OK. The new setting is saved.
Calling Features Selecting recall duration 1. 2. 3. 4. Press . Select ADVANCED SET RECALL TIME. Press OK. Select the new setting. Press OK. The new setting is saved. AREA CODE REMOVAL The area code feature automatically removes an area code of an incoming call. You can define an area code you want to remove. The phone number will be saved in the call log without the area code. Activating the area code 1. 2. 3. 4. Press . Select ADVANCED SET AREA CODE. Press OK.
Extra Features Discover and explore the additional features your phone offers! Find out how these features can benefit you and help you make the most from your phone. THE ALARM CLOCK Use your phone as an alarm clock to wake you up from your sleep. You can have different alarm settings for each handset. Setting the alarm clock 1. 2. 3. 4. Press . Select CLOCK/ALARM SET ALARM. Press OK. Select ON. Press OK. Enter the alarm time. The clock is in 24-hour format. Press OK. The alarm clock is set.
Extra Features Deactivating baby call 1. 2. Press . Select OFF. Press OK. KEYPAD LOCK You can lock the keypad to prevent accidental presses on the handset while you are carrying it around. Locking/Unlocking the keypad 1. Press and hold to lock and unlock the keypad. MISSING HANDSET(S) 1. Press on the base unit. All the handsets connected to this base unit ring. 2. Press on the base unit again to stop paging. All the handsets stop ringing, or Press any key to stop the paging of that handset.
The System REGISTERING YOUR HANDSET WITH ADDITIONAL BASE This section shows you how to register your handset to additional base unit(s). If your handset displays UNREGISTERED, refer to Registering your handset on page 11. on the base unit for 4 seconds. 1. Press and hold 2. 3. 4. on the handset. Press Select ADVANCED SET REGISTRATION. Press OK. Enter the system PIN (Pre-set: 0000). Press BACK to make corrections. Press OK. Select the base number you want.
The System DELETING A HANDSET Use one handset to delete (de-register) another handset that shares the same base unit. 1. 2. 3. 4. 5. . Press Select ADVANCED SET DELETE HS. Press OK. Select the handset (number) you want to delete. Press OK. Enter the system PIN. Use BACK to make corrections. Press OK. The handset is deleted. CHANGING THE SYSTEM PIN The system PIN is used for registering, deleting handsets, and protecting the access rights to some of the other menus. The pre-set system PIN is 0000.
Appendix DEFAULT SETTINGS These are the factory pre-programmed settings of your phone.
Appendix TROUBLESHOOTING Problem Tip No dialing tone • Check your phone connections. • The handset may be out of range. Move closer. • The battery capacity may be low. Charge battery. Signal icon flashing • The handset may be out of range. Move closer. • If the handset displays Unregistered, register the handset. See page 11. No parking tone • The handset may not be placed properly. Try again. • Charging contacts may be dirty. Clean contacts with a damp cloth.
Appendix PHONE SPECIFICATIONS Item Specification Product name Frequency bands SYNER.
Appendix Compliance Statement Equipment Approval Information Your telephone equipment is approved for connection to the Public Switched Telephone Network and is in compliance with parts 15 and 68, FCC Rules and Regulations and the Technical Requirements for Telephone Terminal Equipment Published by ACTA. Notification to the local telephone company On the bottom of this equipment is a label indicating, among other information, the US number and Ringer Equivalence Number (REN) for the equipment.
Appendix This equipment generates, uses, and can radiate radio frequency energy and, if not installed and used in accordance with the instructions, may cause harmful interference to radio communications. However, there is no guarantee that interference with not occur in a particular installation.
Appendix The term « IC : » before the radio certification number only signifies that Industry Canada technical specifications were met. Operation is subject to the following two conditions: (1) this device may not cause interference, and (2) this device must accept any interference, including interference that may cause undesired operation of the device.
Appendix Service Centers USA Location : Ascalade Communications 5077 W.