
Installation guide


Page 25
Using Telnet
Copy the files to the AMS Images folder on the Macintosh. On the
PC, copy the files to the same directory as the AMS executable
(In-Band or Out-of-Band).
Upgrading the Hub
Image Code
You can download the image code to the hub using AsantéView
Lite (version 2.3 or later) In-Band or Out-of-Band, or AsantéView
In-Band or Out-of-Band (version 2.3 or later). You do this by select-
ing the
Software Upgrade command in the Configuration menu.
See the appropriate AsantéView User’s Guide for information on
performing software upgrades.
For the NMM Lite, you need image code version 1.1 or later (at the
time of this writing, the current version is 2.0; see “Asking
for Assistance” on page 3 to contact us for information on the lat-
est version).
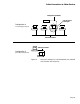
Starting Telnet The following instructions show how to start the Telnet applica-
tion (not included with the NMM Lite) and get to the Asanté
Remote Management System Main menu using a Macintosh com-
puter. The examples in the figures show screens for a Macintosh
using NCSA/BYU Telnet version 2.5; however, you may use any
Telnet application.
1
Open the Telnet application by double-clicking its
icon. Figure 13 shows the icon for NCSA/BYU Telnet
version 2.5 on a Macintosh.
Figure 13 Icon for NCSA/BYU Telnet 2.5 (Macintosh)
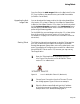
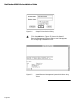
2
Choose Open Connection from the File menu. The ses-
sion dialog appears. Figure 14 shows an example.
3
Select the Session name field and type the IP address
of the hub you want to configure. Figure 14 shows an
example with the IP address already typed in.